background image

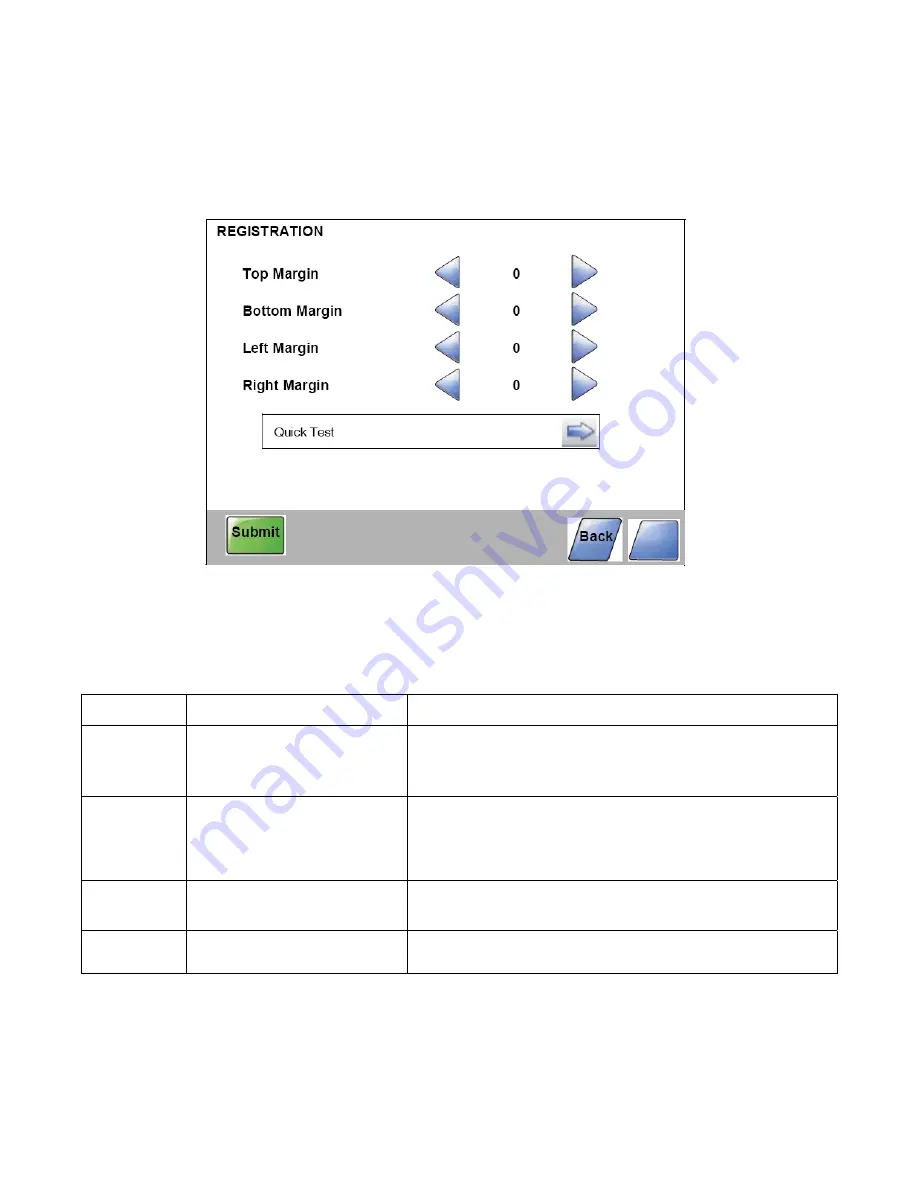
REGISTRATION (printer) 


Previous Print registration makes sure the printing is properly aligned on the page. 


The settings available are: 
 

Description   Value  

Direction of change  

Top Margin   -25 to +25 Each increment 

causes approximately 4 pels 
shift (at600 dpi).  

A positive change moves the image down the page and 
increases the top margin. A negative change moves the 
image up and decreases the top margin.  

Bottom 
Margin  

-20 to +20 Each increment 
causes approximately 0.55 
mm shift in the bottom 
margin.  

A positive change compresses the image so it appears to 
move down the page, and a negative change moves the 
image up.  

Left Margin   -25 to +25  

A positive change moves the image right, and a negative 
change moves the image left. No compression occurs.  

Right 
Margin  

-10 to +10  

A positive change moves the image left, and a negative 
change moves the image right.  


9

Summary of Contents for MB780

Page 1: ...o responsibility for the results of errors beyond its control While all reasonable efforts have been made to make this document accurate and helpful as possible we make no warranty of any kind expressed or implied as to the accuracy or completeness of the information contained herein For the most up to date service information available visit our website at www okidata com Okidata Americas Inc 201...

Page 2: ...SE SENSOR TEST Page 21 DEVICE TESTS Page 22 PRINTER SETUP Page 23 EP SETUP Page 25 REPORTS Page 26 EVENT LOG Page 27 SCANNER TESTS Page 28 Available Configuration Menus Page 30 Maintenance Counter Value Page 31 Reset Maintenance Counter Page 31 USB Scan to Local Page 31 Print Quality Pages Page 32 Reports Menu Settings Page 32 Reports Event Log Page 33 Size Sensing Page 33 Panel Menus Page 34 PPDS...

Page 3: ...ase Page 36 Scanner Manual Registration Page 37 Disable Scanner Page 38 Paper Prompts Page 38 Envelope Prompts Page 38 Action for Prompts Page 38 Jobs On Disk Page 39 Disk Encryption Page 39 Wipe Disk Page 40 Font Sharpening Page 40 Require Standby Page 40 LES Applications Page 40 Key Repeat Initial Delay Page 41 Key Repeat Rate Page 41 Wiper Message Page 41 Clear Custom Status Page 41 3 ...

Page 4: ...Accessing the Service Menus There are different test menus that can be accessed during POR to identify problems with the printer Pages 5 29 Page 5 4 ...

Page 5: ...etting the Printer will be displayed The printer perform Exit Diag Menu Accessing the Configuration Menu Entering Configuration Menu 5 Turn off the printer 6 Press and hold 2 and 6 buttons simultaneously 7 Turn on the printer 8 Release the buttons after 10 seconds Exiting Configuration Menu Touch Exit Config Menu to exit the Configuration Menu Resetting the Printer will be displayed The printer pe...

Page 6: ...ft Margin Right Margin Quick Test See Quick Test on page 10 PRINT TESTS Tray 1 See Input source tests on page 12 Tray 2 if installed Tray 3 if installed Tray 4 if installed Tray 5 if installed MP Feeder Envelopes MP Feeder if installed Printing Print Quality Pages See Printing Quality Pages on page 12 HARDWARE TESTS Panel Test See Panel Test on page 14 Button Test See Button Test on page 14 DRAM T...

Page 7: ... 1 Tray 2 if installed Tray 3 if installed Tray 4 if installed Tray 5 if installed Envelope Feeder MP Feeder Sensor Tests See Sensor Test input tray on page 19 Tray 1 Tray 2 if installed Tray 3 if installed Tray 4 if installed Tray 5 if installed Envelope Feeder MP Feeder OUTPUT BIN TESTS See OUTPUT BIN TESTS on page 20 Feed Tests Standard Bin Sensor Tests Standard Bin BASE SENSOR TEST See BASE SE...

Page 8: ...aults See EP Defaults on page 25 Fuser Temp See Fuser Temperature Fuser Temp on page 25 Fuser Page Count See Fuser Page Count on page 25 Warm Up Time See Warm Up Time on page 25 Transfer See Transfer on page 26 Print Contrast See Print Contrast on page 26 Charge Roll See Charge Roll on page 26 Gap Adjust See Gap Adjust on page 26 Auto Dark Adjust See Auto Dark Adjust on page 26 REPORTS Menu Settin...

Page 9: ...op margin A negative change moves the image up and decreases the top margin Bottom Margin 20 to 20 Each increment causes approximately 0 55 mm shift in the bottom margin A positive change compresses the image so it appears to move down the page and a negative change moves the image up Left Margin 25 to 25 A positive change moves the image right and a negative change moves the image left No compres...

Page 10: ... menu below the header row Touch to decrease the value or to increase the value Touch Submit to save the change or Touch Back to cancel and return to the Diagnostics Menu Touch Submit to save all changed values The device prints a Quick Test page from the appropriate paper tray While the Quick Test page prints Printing Alignment Page appears on the LCD Quick Test The Quick Test contains the follow...

Page 11: ... or A4 paper Touch REGISTRATION from the Diagnostics Menu Touch to select Quick Test The message Quick Test Printing appears on the display Once the Quick Test Page completes printing the Registration screen displays again Touch Back to return to the Diagnostics Menu 11 ...

Page 12: ...pattern is printed only on the first envelope Note The Print Test Page always prints on one side of the paper regardless of the duplex setting or the presence of a duplex option Touch Back to return to PRINT TESTS Printing Quality Pages The purpose of this diagnostic function is to allow printing of the print quality test pages with the toner cartridge lockout function disabled The print quality p...

Page 13: ...up time transfer print contrast charge roll settings and gap adjust Contents of the EVENT LOG from DIAGNOSTICS Configuration information including printer serial number controller code level engine code level operator Next panel code level font versions and cartridge information Default values for the QUALITY MENU settings used to print the pages 13 ...

Page 14: ...displays Then the message Resetting Printer appears and the power indicator light blinks red Turn the printer off and on While the DRAM test executes the power indicator blinks green The following type of message appears DRAM Test P F xxx represents the installed DRAM size P represents the number of times the memory test has passed and finished successfully Initially 000000 displays with the maxim...

Page 15: ...AK Test Packet Test Force Enabled USB High Speed Certification Testing Port 1 Test J Test K Test SEO NAK Test Packet Test Force Enabled USB High Speed Certification Testing Port 2 Test J Test K Test SEO NAK Test Packet Test Force Enabled USB High Speed Certification Testing Port 3 Test J Test K Test SEO NAK Test Packet Test Force Enabled USB High Speed Certification Testing To stop testing before ...

Page 16: ...sheet The single test stops automatically when a single duplex sheet is printed and the continuous test continues until you press Stop Top Margin duplex This setting controls the offset between the first scan line on the front of the duplex page and the first scan line on the back of the page Therefore be sure to set the top margin in REGISTRATION before setting the duplex top margin See Registrat...

Page 17: ...s the DC motor at high speed and low speed taking an average of the power PWM required for each speed and calculating the KE value To run the Motor Test duplex Select Motor Test from DUPLEX TESTS The power indicator light blinks and the message Motor Test Testing displays When the motor stops the results are displayed Listed below is an example of such results Touch Back or press Stop to exit the ...

Page 18: ...uplex Feed 2 from DUPLEX TESTS The power indicator blinks while the paper is feeding and the message Duplex Feed 2 Feeding displays The message Duplex Feed 2 Clear Paper displays when the paper reaches paper stop position 2 and the power indicator turns on solid Remove the media from the duplex unit and clear the message on the operator panel by pressing Stop 18 ...

Page 19: ...media continues feeding from the selected source until Stop is pressed Sensor Test input tray This test is used to determine if the input tray sensors are working correctly To run the Input Tray Sensor Test Select the Sensor Test from INPUT TRAY TESTS Select the input source from the sources displayed on the Sensor Test menu All installed sources are listed Select the sensor to test Various source...

Page 20: ...o Select either Single or Continuous Single feeds one sheet of media from the selected source Continuous media continues feeding from the selected source until Stop is pressed Touch Back to return to OUTPUT BIN TESTS Sensor Test standard output bin This test is used to verify if the standard bin sensor is working correctly To run the Sensor Test for the standard bin select Sensor Test from OUTPUT ...

Page 21: ...the DIAGNOSTICS menu The following sensors are listed 1 Toner Level Toner level sensor remove the cartridge and replace to actuate the sensor 2 Input Input sensor 3 Output Output exit sensor 4 Narrow Media Output exit sensor 5 Front Door Front door sensor Manually actuate the sensors to verify that each sensor switches from open to closed Press Stop to exit the test 21 ...

Page 22: ...indicator turns on solid Press Stop to exit the test Disk Test Clean Warning This test destroys all data on the disk and should not be attempted on a good disk Also note that this test may run approximately 1 hours depending on the disk size Select Disk Test Clean from the DEVICE TESTS menu Contents will be lost Continue message displays to warn that all contents on the disk will be lost Select Ye...

Page 23: ... Changing this setting resets the printer to factory defaults and data may be lost It cannot be undone Printed Page Count The page count can only be viewed and cannot be changed Touch Back to return to Diagnostics Menu Permanent Page Count The permanent page count can only be viewed and cannot be changed Touch Back to return to Diagnostics Menu Serial Number The serial number can only be viewed an...

Page 24: ...lay a keyboard with 1 through 0 and a through f The current values for Configuration ID 1 and Configuration ID 2 are displayed 1 Use keys to type the numbers for the two configuration IDs 2 Use the left arrow to move over a digit from the right of the number toward the left 3 When the numbers are correct touch Submit 4 If you have a question touch the question mark icon 5 To exit without changing ...

Page 25: ...changing the settings Fuser Temperature Fuser Temp This adjustment can be used to help solve some customer problems with paper curl on low grade papers and problems with letterheads on some types of media The fuser temperature can be adjusted to Normal Lower or Lowest The default is Normal Select Back to exit without changing the settings Fuser Page Count The fuser page count can only be viewed an...

Page 26: ...en sheets Increasing this value may reduce curl of some printed media and eliminate some output bin stacking problems However increasing this value also results in slower overall performance measured in pages per minute The range of values is 0 to 255 and the default value is 0 Select Back to return to Diagnostics Menu Auto Dark Adjust The settings are Enable and Disable REPORTS Menu Settings Page...

Page 27: ...urn to EVENT LOG Menu Print Log Additional diagnostic information is available when you print the event log from Diagnostics Menu rather than Configuration Menu The Event Log printed from Diagnostics Menu includes Detailed printer information including code versions Time and date stamps Page counts for most errors Additional debug information in some cases The printed event log can be faxed to Oki...

Page 28: ...he setting s current value CURRENT VALUE Use the arrows to select from Letter Legal or A4 Select Start to begin Running Flatbed displays Select 4 to exit the test Select Back to return to Diagnostics menu Sensor Tests The following tests are available Sensor ADF document set Sensor ADF closed interlock Sensor FB scanner HP Sensor ADF sheet through Sensor ADF top door interlock Sensor ADF media exi...

Page 29: ...d 2 and 6 buttons simultaneously 11 Turn on the printer 12 Release the buttons after 10 seconds Exiting Configuration Menu Touch Exit Config Menu to exit the Configuration Menu Resetting the Printer will be displayed The printer performs a POR and the printer returns to ready mode Exit Config Menu 29 ...

Page 30: ...at Fax Storage See NumPad Job Assist on page 35 ADF Edge Erase See ADF Edge Erase on page 36 FB Edge Erase See FB Edge Erase on page 36 Scanner Manual Registration See Scanner Manual Registration on page 37 Disable Scanner See Disable Scanner on page 38 Paper Prompts See Disable Scanner on page 38 Envelope Prompts See Envelope Prompts on page 38 Action for Prompts See Action for Prompts on page 38...

Page 31: ...elect Back to return to the main Configuration Menu Reset Maintenance Counter After scheduled maintenance the technician needs to reset the page counter To reset the maintenance page count to zero Select Reset Maintenance Counter from the Configuration Menu Select Yes to reset the counter or touch No to exit without resetting When the reset operation is complete the menu returns to the main Config...

Page 32: ...ollowing is printed on the first page Device Information to include page count installed memory processor speed serial number engine ID system card ID and printer revision levels Cartridge Information Printer Margin Settings Scanner Margin Settings Minimum Stroke Width Reports Menu Settings Page To print the Menu Settings Page Select Menu Settings Page from Reports The message Printing Menu Settin...

Page 33: ...g controls whether the printer automatically registers the size of paper installed in an input source with size sensing When the setting is Auto every input option equipped with size sensing hardware automatically registers what previous size media it contains When the setting is Off the media size detected by hardware is ignored The media size can be set by the operator panel or the data stream T...

Page 34: ...splays the setting s name in the header and CURRENT VALUE below the header row Select or to change the setting The selections are On and Off The default is Off Select Submit to save your change Select Back to exit without changing value Factory Defaults This setting enables a user to restore all the printer settings to the original factory settings Selections are Restore Base Restore STD NET or Re...

Page 35: ...50 MB and 100 MB The default is 25 MB Values will only be displayed if the amount of installed DRAM is at least twice the amount of the value that is at least 200 MB of installed DRAM is required to display the 100 MB selection Select Submit to save your change Select Back to exit without changing value NumPad Job Assist Select NumPad Job Assist from the Configuration Menu The panel displays the s...

Page 36: ...n the header and CURRENT VALUE below the header row Select to increase value or to decrease value The values are 0 through 6 The default is 3 Select Submit to save your change Select Back to exit without changing Value FB Edge Erase The ADF Edge Erase and FB Edge Erase settings specify in millimeters the size of a border around the scanned image that will be erased For copies the printed page will...

Page 37: ...Top Margin settings Select Submit Select Copy Quick Test and compare the new copy to the original Repeat the flatbed alignment steps until the position on the page of the Quick Test copy closely matches the original To align the ADF To align the ADF front Place the Quick Test page face up short edge first into the ADF To align the ADF back Place the Quick Test page facedown short edge first into t...

Page 38: ...hange Select Back to exit without changing Envelope Prompts This setting controls the tray the user is directed to refill when a specific envelope size is out The selections are Auto default MP Feeder and Manual Envelope Select Envelope Prompts from the Configuration Menu The panel displays the setting s name in the header and CURRENT VALUE below the header row Select or to change the setting The ...

Page 39: ...or from Disable to Enable then the printer completely formats the hard disk All information on the disk will be unrecoverable To change this setting Select Disk Encryption from the Configuration Menu Note If an advanced password has been established you must enter this password in order to change the setting If no advanced password exists you can establish one by using the keyboard that appears on...

Page 40: ...ect to increase value or to decrease value Select Submit to save your change Select Back to exit without changing This function is not supported when the device generates output at 600 dpi resolution Require Standby This setting determines if the Standby Mode is On or Off The default is On If Standby Mode is On the printer begins functioning in Standby Mode when it remains idle for an amount of ti...

Page 41: ...second To change this setting Select Key Repeat Rate from the Configuration Menu Select to increase value or to decrease value Select Submit to save your change Select Back to exit without changing Wiper Message To change this setting Select Wiper Message from the Configuration Menu Select or to change the setting The values are On default and Off Select Submit to save your change Select Back to e...

Reviews: