Oki C5400n User Manual Download Page 106

REPLACING CONSUMABLE ITEMS > 106

2.

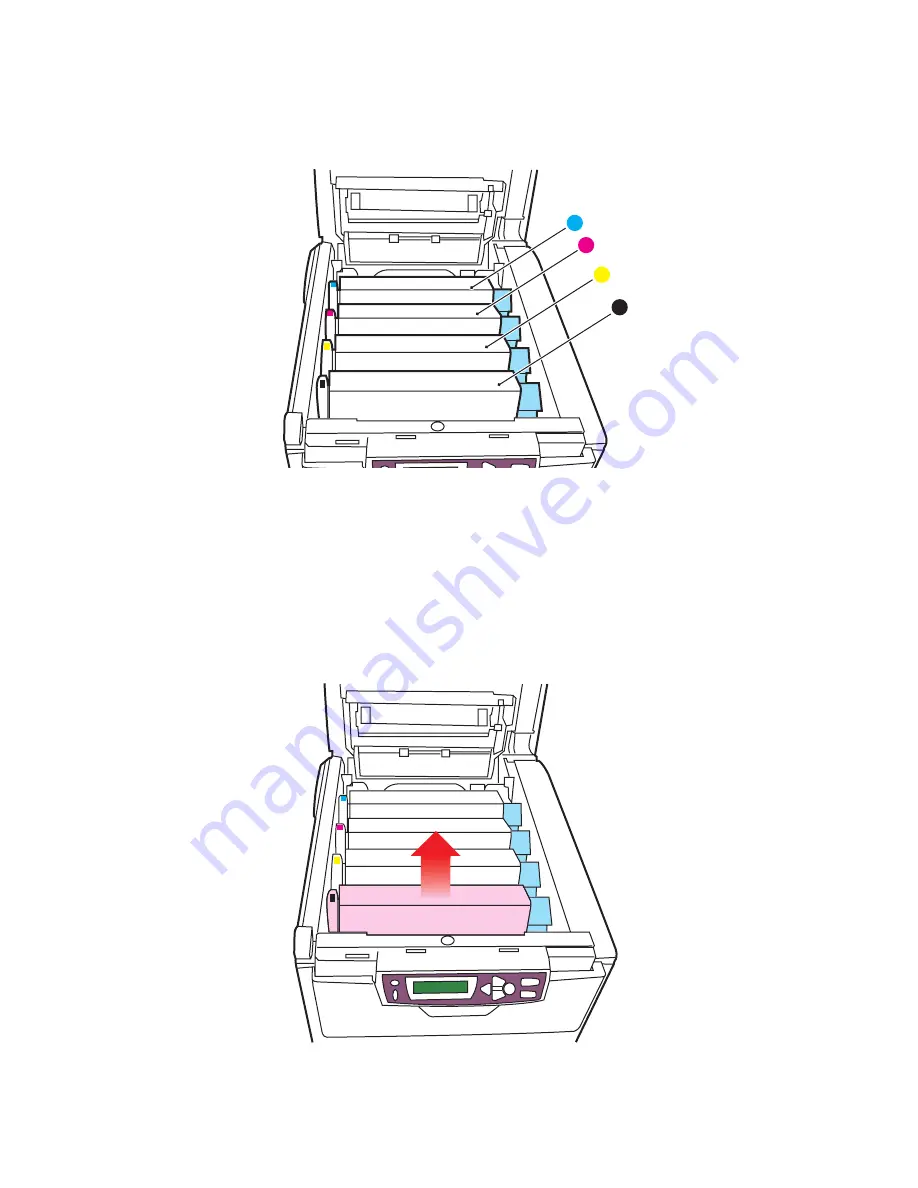
Note the positions of the four cartridges.

3.

Holding it by its top centre, lift the image drum, complete with 
its toner cartridge, up and out of the printer.

1. Cyan cartridge

2. Magenta cartridge

3. Yellow cartridge

4. Black cartridge

1

2

3

4

Summary of Contents for C5400n

Page 1: ...C5400n C5400dn user s guide...

Page 2: ...nd manuals are available from the Oki Europe website http www okieurope com Copyright 2004 All rights reserved Oki and Microline are registered trademarks of Oki Electric Industry Company Ltd Energy S...

Page 3: ...ferences in Windows applications 20 PostScript emulation 21 PCL emulation 22 Secure printing feature 23 Sending the document to print 23 Printing secure documents 24 Proof and print feature 26 Sending...

Page 4: ...6 CMYK ink simulation 47 Windows ICM colour matching 47 Overlays and macros 49 Creating PCL overlays 49 Installing upgrades 53 Adjusting Windows printer drivers 53 Colour Printing 55 Factors that affe...

Page 5: ...Create and download the project 88 Test printing the overlay 89 Defining overlays 89 Printing with PostScript overlays 91 Creating PCL Overlays 92 Creating the overlay image 92 Create and download ma...

Page 6: ...CONTENTS 6 PCL driver 124 PostScript driver 125 Clearing paper jams 126 Specifications 134 Index 135 Oki contact details 138...

Page 7: ...text which may help you to use and understand the product CAUTION A caution appears in this manual like this A caution provides additional information which if ignored may result in equipment malfunc...

Page 8: ...ur Digital LED technology for high speed processing of your printed pages PostScript 3 PCL 5C and Epson FX emulations for industry standard operation and wide compatibility with most computer software...

Page 9: ...terhead stationery alternative paper sizes or other print media Additional memory allows printing of more complex pages including two sided and booklet pages with the optional duplex unit Internal 20G...

Page 10: ...n Standard printed copy delivery point Holds up to 250 sheets at 80g m 2 Operator panel Menu driven operator controls and LCD display panel 3 Paper tray Standard blank paper tray Holds up to 300 sheet...

Page 11: ...nter through the rear of the printer and is stacked here face up This is mainly used for heavy print media When used in conjunction with the multi purpose feed tray the paper path through the printer...

Page 12: ...st item in this menu LANGUAGE 4 Press ENTER to change this setting 5 Use the keys to move in either direction through the list of available languages until the language you want is displayed 6 Press t...

Page 13: ...es should be free from twist curl or other deformations They should also be of the rectangular flap type with glue that remains intact when subjected to hot roll pressure fusing used in this type of p...

Page 14: ...paper path through the printer is almost straight The multi purpose tray can feed paper widths as small as 100mm and lengths up to 1200mm banner printing For paper lengths exceeding 356mm Legal 14in...

Page 15: ...opened and the tray extension pulled out when required for use In this condition paper will exit via this path regardless of driver settings The face up stacker can hold up to 100 sheets of 80g m stan...

Page 16: ...TRAYS 1 Remove the paper tray from the printer 2 Fan the paper to be loaded at the edges 1 and in the middle 2 to ensure that all sheets are properly separated then tap the edges of the stack on a fla...

Page 17: ...r tray Capacity depends on the type of paper stock Do not load damaged paper Do not load paper of different sizes or types at the same time Do not pull the paper tray out during printing except as des...

Page 18: ...paper weight 7 For face up printing make sure the face up rear stacker 3 is open and the paper support 4 is extended Paper is stacked in reverse order and tray capacity is approximately 100 sheets dep...

Page 19: ...aded paper load the paper with pre printed side down and top edge away from the printer Optional duplex unit must be installed for this function Envelopes should be loaded face up with top edge to the...

Page 20: ...ne for PCL emulation and the other for PostScript 3 emulation If you print mainly from general Office applications choose the PCL driver For faster printing of PDF documents choose PostScript If you p...

Page 21: ...f using the face up rear paper stacker reverse order would normally stack your pages in numerical order 4 You can specify how many pages to print on a sheet Pages will be scaled to fit the number you...

Page 22: ...should match the type of paper on which you intend to print 4 A variety of document finishing options can be selected such as normal one page per sheet or N up where N can be any number up to 16 for p...

Page 23: ...UMENT TO PRINT 1 From your application s Print dialogue select your printing choices in the normal way and then click the Properties button 2 In the driver window on the Job Options tab and select Sec...

Page 24: ...R to enter this digit Repeat this procedure for each of the four digits 4 Use the buttons to display each of your stored secure documents in turn or to select all documents When the required selection...

Page 25: ...e printers on your network or connected to your computer 3 Select the icon for the printer holding your secure documents 4 From the Printers menu choose HDD Print Jobs 5 In the HDD Print Jobs window c...

Page 26: ...e Properties button 2 In the driver window on the Job Options tab and select Proof and Print 2 3 In the small pop up window which appears enter a name for this print job 16 characters maximum and a 4...

Page 27: ...3 Use the buttons to display the first digit of your PIN and then press ENTER to enter this digit Repeat this procedure for each of the four digits 4 Use the buttons to display each of your stored doc...

Page 28: ...icon for the printer holding your secure documents 4 From the Printers menu choose HDD Print Jobs 5 In the HDD Print Jobs window choose the View User Jobs option button and enter your PIN in the text...

Page 29: ...inting choices in the normal way and then click the Properties button 2 In the driver window on the Job Options tab and select Store to HDD 1 3 In the small pop up window which appears enter a name fo...

Page 30: ...he first digit of your PIN and then press ENTER to enter this digit Repeat this procedure for each of the four digits 4 Use the buttons to display each of your stored secure documents in turn or to se...

Page 31: ...printers on your network or connected to your computer 3 Select the icon for the printer holding your secure documents 4 From the Printers menu choose HDD Print Jobs 5 In the HDD Print Jobs window cho...

Page 32: ...u print mainly from general Office applications choose the PCL driver For faster printing of PDF documents choose PostScript Also choose PostScript if you print mainly from professional DTP and graphi...

Page 33: ...nless you wish to scale the printout to fit another size and should also be the same as the size of paper you will feed into the printer 2 You can specify how many pages to print on a sheet Pages will...

Page 34: ...preferred tray 3 A variety of document finishing options can be selected such as normal one page per sheet or N up where N can be any number up to 16 for printing scaled down pages at more than one pa...

Page 35: ...PRINT From your application s Print dialogue select your printing choices in the normal way and then click the Properties button PCL Emulation 1 In the driver window on the Job Options tab select Secu...

Page 36: ...ect a number from 0 9 in the Change Setting for drop down box Repeat for passwords 2 4 3 Click OK again to close the driver window and again to close your application s Print dialogue The document wil...

Page 37: ...t 1 2 In the small pop up window which appears enter a name for this print job 16 characters maximum and a 4 digit PIN using any combination of digits from 0 to 9 and click OK 3 Click OK again to clos...

Page 38: ...rmal way and then click the Properties button PCL Emulation 1 In the driver window on the Job Options tab select Store to HDD 1 2 In the small pop up window which appears enter a name for this print j...

Page 39: ...drop down box 2 above Repeat for passwords 2 4 3 Click OK again to close the driver window and again to close your application s Print dialogue The document will be sent to the printer s hard disk bu...

Page 40: ...vary depending on the application from which you are printing Some applications will override any colour matching settings in the printer driver without warning RGB or CMYK The guidelines for choosin...

Page 41: ...the Print Space or Output space MATCHING SPECIFIC COLOURS For instance a Company logo RGB only Oki Colour Matching and the sRGB setting PCL or PS driver PostScript Colour Matching using the Relative C...

Page 42: ...river s colour options are only designed to work with RGB data If you are printing CMYK data we recommend you use the PostScript driver To open colour matching options from the Windows Control Panel 1...

Page 43: ...printing photographs when using a professional graphics monitor d Digital Camera Optimised for printing photographs taken with a digital camera This tends to produce prints with lighter and brighter...

Page 44: ...xample of using the Colour Swatch function You wish to print a logo in a particular shade of red The steps you would follow are 1 Print a colour swatch then select the shade of red that best suits you...

Page 45: ...graphic images Vivid or Digital Camera settings produce brightest colours sRGB is the best choice for matching specific colours such as printing logos Monitor 6500k Perceptual Optimised for printing p...

Page 46: ...cts both RGB and CMYK data Rendering Intents When a document is printed a conversion takes place from the document s colour space to the printer colour space The rendering intents are essentially a se...

Page 47: ...ATION Affects CMYK data only This option simulates what the output will look like on a printing press using the ink types SWOP Euroscale or Toyo If using CMYK Ink Simulation it is recommended that you...

Page 48: ...es of profiles that match your printer model If you do not see any profiles associated with the driver click Add and locate the ICC profiles for your printer Windows ICM uses the information in these...

Page 49: ...th any future document When printing files to disk do not select any special features such as two sided printing or multiple copies These are not appropriate to macros they apply only to your final do...

Page 50: ...maintain the oval shape turn off deselect the Configure Image Data Palette ID and Palette Control filters 4 Set the Files of Type drop down list to PRN Files prn 5 Navigate to the folder where the ov...

Page 51: ...ojects Save Project and enter a meaningful name e g Letter Stationery so that you can recognise it 9 Choose Projects Send Project Files to Printer to download the project to the printer 10 When the me...

Page 52: ...tep 2 para 7 and define which page s c of your documents will use this overlay Then click the Add button 1 to add this overlay to the list of defined overlays Repeat for any other related overlays thi...

Page 53: ...users on different computers the driver must be adjusted on each user s machine The illustrations shown here are for Windows XP Other Windows versions may appear slightly different but the principles...

Page 54: ...from the Windows Control Panel 2 Right click the printer icon for this printer and choose Properties from the pop up menu 3 On the Device Settings tab select the upgrade you have just installed from t...

Page 55: ...important factors are listed below Differences between the range of colours a monitor or printer can reproduce Neither a printer nor a monitor is capable of reproducing the full range of colours visi...

Page 56: ...or s colour temperature influences how warm or cool the colours look Several of the colour matching options make reference to your monitor s colour temperature Many modern monitors allow the colour te...

Page 57: ...ur matching settings in the printer driver without warning RGB OR CMYK The guidelines for choosing a colour matching method make a distinction between RGB Red Green Blue and CMYK Cyan Magenta Yellow B...

Page 58: ...y help Adjusting the brightness or intensity of a print If the print is too light dark you can use the Brightness control to adjust it If the colours are too intense not intense enough use the Saturat...

Page 59: ...s from applications such as Microsoft Excel or Microsoft PowerPoint Printing specific colours for example a company logo RGB documents Select Oki Colour Matching and use the sRGB setting CMYK document...

Page 60: ...driver s colour options are only designed to work with RGB data If you are printing CMYK data we recommend you use the PostScript driver To open colourmatchingoptions from the Windows Control Panel 1...

Page 61: ...turation b Monitor 6500k Vivid Optimised for printing photographs but with even more saturated colours than the Monitor 6500k Perceptual setting c Monitor 9300k Optimised for printing graphics from ap...

Page 62: ...colours Note that this is not the full range of colours that the printer can produce Listed on each sample colour are the corresponding RGB Red Green Blue values This can be used to pick specific col...

Page 63: ...olling the colour output of the printer Some of the colour matching options only work on certain types of data The table below summarises the various options available and what types of data they affe...

Page 64: ...a digital camera Your results will vary depending on the subject and the conditions under which the photograph was taken sRGB The printer will try to reproduce the sRGB colour space This may be usefu...

Page 65: ...s common to both devices exactly and clips the out of gamut colours to their nearest printed equivalent Tries to print white as it appears on screen The white of a monitor is often very different from...

Page 66: ...ou should see the names of profiles that match your printer model If you do not see any profiles associated with the driver click Add and locate the ICC profiles for your printer Windows ICM uses the...

Page 67: ...s provided on your printer driver CD ROM You must install it separately since it is not installed along with the printer driver The Colour Correct utility has the following features Microsoft Office p...

Page 68: ...nu system press the keys on the operator panel to move up and down through the list of menus until the menu you wish to view is displayed Then proceed as follows 1 Press ENTER to enter the menu 2 Use...

Page 69: ...Prints complete menu listing with current settings shown PRINT FILE LIST EXECUTE Prints a list of overlays macros fonts and other files stored on the printer s hard disk drive if installed PRINT PCL...

Page 70: ...document to be printed from 1 to 999 DUPLEX ON OFF Turns the duplex 2 sided printing function on or off if this feature is installed PAPER FEED TRAY1 TRAY2 MP TRAY Selects the default tray for paper f...

Page 71: ...page is detected To achieve this speed the printer requires an additional 10 20 seconds to warm up and 30 60 seconds to cool down when switching to 16ppm for colour pages This setting is therefore mos...

Page 72: ...portrait is 65 and for Letter is 60 EDIT SIZE CASSETTE SIZE LETTER EXECUTIVE LEGAL14 LEGAL13 5 LEGAL13 A4 A5 A6 B5 CUSTOM COM 9 ENVELOPE COM 10 ENVELOPE MONARCH ENV DL ENVELOPE C5 ENVELOPE Sets the si...

Page 73: ...fusing temperature to better accommodate the media to be fed For example letterhead may benefit from a slightly lower fusing temperature to ensure that its ink does not offset TRAY1 MEDIAWEIGHT LIGHT...

Page 74: ...to better accommodate the selected type of media MPT MEDIAWEIGHT MEDIUM 75 90g m HEAVY 91 120g m ULTRA HEAVY 121 203g m Selects the media weight to be fed from the multi purpose tray UNIT OF MEASURE M...

Page 75: ...count interval occurs during a print job it will occur at the end of that job and will take up to 55 seconds If set to manual this adjustment will only be performed when initiated by the next menu it...

Page 76: ...image C REG FINE ADJUST M REG FINE ADJUST Y REG FINE ADJUST 3 0 3 3 0 3 3 0 3 Performs fine adjustment of image timing in relation to the black image component INK SIMULATION OFF SWOP EUROSCALE JAPAN...

Page 77: ...cted each time a print job is received USB PS PROTOCOL RAW ASCII Selects PostScript data format for USB port NET PS PROTOCOL RAW ASCII Selects PostScript data format for network port CLEARABLE WARNING...

Page 78: ...ue to a paper jam once the jam has been cleared ERROR REPORT ON OFF If ON the printer will print error details when a PostScript Emulation error occurs LANGUAGE English German French Italian Spanish S...

Page 79: ...fonts are installed in the expansion ROM slot or additional fonts have been downloaded to RAM as permanent fonts FONT No I000 C001 S001 Sets the current default font number from the currently selecte...

Page 80: ...2 Win 3 1 L5 Wingdings Dingbats MS Symbol OCR A OCR B HP ZIP USPSFIM USPSSTP ISO Swedish1 ISO Swedish2 ISO Swedish3 ISO 2 IRV ISO 4 UK ISO 6 ASC ISO 10 S F ISO 11 Swe ISO 14 JASC ISO 15 Ita ISO 16 Por...

Page 81: ...e value when Auto CR LF Mode is set to OFF with the 10CPI character WHITE PAGE SKIP OFF ON Selects whether blank pages are printed or not CR FUNCTION CR CR LF Selects whether a received carriage retur...

Page 82: ...ARROW MEDIUM WIDE Sets width of ACK signal in compatible receiving to 0 5 S 1 0 S or 3 0 S ACK BUSY TIMING ACK IN BUSY ACK WHILE BUSY Sets the order in which the BUSY signal is output For ACK IN BUSY...

Page 83: ...change press ENTER and use keys to increment 1st octet then press ENTER again to move on to next octet When 4th octet has been set press ENTER again to register new address SUBNET MASK xxx xxx xxx xxx...

Page 84: ...automatic power save mode Delay before entering this mode is set in the system configuration menu PAPER BLACK SETTING 2 0 2 Used for small adjustment when you experience faded print or light specks s...

Page 85: ...the printer TRAYn PAGE COUNT The total number of pages fed from tray n MPT PAGE COUNT The total number of pages fed from the multi purpose tray COLOUR PAGE COUNT The total number of pages printed in...

Page 86: ...ll your special stationery and store it in the printer for use whenever you need it If you have chosen to install the PCL driver macros perform a similar function You can create several overlays or ma...

Page 87: ...inuation page images for business letters 3 Use downloaded files to define your overlays ready for use when printing your documents When printing overlay files to disk do not select any special featur...

Page 88: ...N Files prn 5 Navigate to the folder where the PRN files are stored and select one or more of these to include in your overlay set You can have more than one printer PRN file in a project For example...

Page 89: ...oad is complete click OK to clear the message TEST PRINTING THE OVERLAY 1 Click on the printer icon for the relevant printer and choose Printers Test Form 2 In the Test PostScript Form window to test...

Page 90: ...can find them using Storage Device Manager to view the project file or the printer s Information Menu to print a file list and identify them from there 6 Click Add 5 to add this overlay into the defin...

Page 91: ...e and choose any options you will require ensuring that the target printer is your PostScript printer driver in which the overlays have been defined 3 Click the Properties button to open the Printing...

Page 92: ...dy for use with any future document When printing files to disk do not select any special features such as two sided printing or multiple copies These are not appropriate to macros they apply only to...

Page 93: ...ese to include in your overlay set You can have more than one macro file in a project For example one for top pages and another for continuation pages Use standard Windows techniques Shift or Ctrl key...

Page 94: ...Macro 2 In the Test Macro window enter its ID number and click OK After a short pause the printer will print the macro 3 When each macro has been tested click Exit 4 Click the standard Windows Close...

Page 95: ...mber that names and IDs of overlay files must be entered exactly as they appeared in the Storage Device Manager project window Remember also that names are case sensitive If you forgot to note the ove...

Page 96: ...in which the overlays have been defined 3 Click the Properties button to open the Printing Preferences window 4 On the Overlay tab check the Use active overlays checkbox 1 5 In the Defined Overlays li...

Page 97: ...ty or 2 500 pages high capacity conversely at 2 5 there is sufficient toner for 6 000 pages standard capacity or 10 000 pages high capacity in the cartridge The printer is shipped with sufficient tone...

Page 98: ...city cyan 5 000 A4 5 42127407 Toner high capacity magenta 5 000 A4 5 42127406 Toner high capacity yellow 5 000 A4 5 42127405 Toner rainbow pack 1 ea CMYK 5 000 A4 5 42403002 Toner standard capacity bl...

Page 99: ...he new one came in Follow any regulations recommendations etc which may be in force concerning waste recycling If you do spill any toner powder lightly brush it off If this is not enough use a cool da...

Page 100: ...n the printer s top cover fully 2 Note the positions of the four cartridges WARNING If the printer has been powered on the fuser may be hot This area is clearly labelled Do not touch 1 Cyan cartridge...

Page 101: ...ns pull the coloured toner release lever on the cartridge to be replaced towards the front of the printer in the direction of the arrow but stop at the central upright position 1 b If you are replacin...

Page 102: ...the green drum surface 6 Remove the new cartridge from its box but leave its wrapping material in place for the moment CAUTION The green image drum surface at the base of the cartridge is very delicat...

Page 103: ...g material and peel off the adhesive tape from the underside of the cartridge 9 Holding the cartridge by its top centre with the coloured lever to the right lower it into the printer over the image dr...

Page 104: ...g gently down on the cartridge to ensure that it is firmly seated push the coloured lever 1 towards the rear of the printer This will lock the cartridge into place and release toner into the image dru...

Page 105: ...utes before opening the cover The printer contains four image drums cyan magenta yellow and black 1 Press the cover release and open the printer s top cover fully CAUTION Static sensitive devices hand...

Page 106: ...ote the positions of the four cartridges 3 Holding it by its top centre lift the image drum complete with its toner cartridge up and out of the printer 1 Cyan cartridge 2 Magenta cartridge 3 Yellow ca...

Page 107: ...tridge to the right to release the left hand end as shown and withdraw the toner cartridge out of the image drum cartridge Place the cartridge on a piece of paper to avoid marking your furniture CAUTI...

Page 108: ...ge inside the packaging material for disposal 8 Place the toner cartridge onto the new image drum cartridge as shown Push the left end in first and then lower the right end in It is not necessary to f...

Page 109: ...nd into their slots in the sides of the printer cavity 11 Finally close the top cover and press down firmly at both sides so that the cover latches closed NOTE If you need to return or transport your...

Page 110: ...user to cool for about 10 minutes before opening the cover 1 Press the cover release and open the printer s top cover fully 2 Note the positions of the four cartridges It is essential that they go bac...

Page 111: ...r chassis 6 Pull the lifting bar 6 upwards so that belt tilts up towards the front and withdraw the belt unit from the printer CAUTION The green image drum surface at the base of each cartridge is ver...

Page 112: ...unit and lower the belt unit flat inside the printer 8 Turn the two fasteners 5 90 to the right until they lock This will secure the belt unit in place 9 Replace the four image drums complete with the...

Page 113: ...Press the cover release and open the printer s top cover fully WARNING If the printer has recently been powered on some fuser components will be very hot Handle the fuser with extreme care holding it...

Page 114: ...s handle 1 lift the fuser straight up and out of the printer If the fuser is still warm place it on a flat surface which will not be damaged by heat 5 Remove the new fuser from its packaging and remov...

Page 115: ...to their slots in the metal partition which separates the fuser area from the image drums 8 Push the two retaining levers 2 towards the rear of the printer to lock the fuser in place 9 Finally close t...

Page 116: ...aper and makes large documents even easier to handle The duplex unit slides straight into the rear of the printer and requires no tools to install 1 Unpack the new unit and remove any transit material...

Page 117: ...ess ENTER again to print the menu map d When the menu map is printed press ON LINE to exit the menu system 6 Examine the first page of the menu map Near the top of the page between the two horizontal...

Page 118: ...printer off and disconnect the AC power cable 2 Press the cover release and open the printer s top cover fully 3 Lift the front cover latch and pull open the front cover 4 Remove the screw securing t...

Page 119: ...expansion slot 1 in the printer 9 If the RAM expansion slot already contains a memory upgrade board that board will have to be removed before you can install the new one To remove it proceed as follo...

Page 120: ...n firmly at each side to latch it closed 15 Reconnect the AC power cable and switch the printer on 16 When the printer is ready print a menu map as follows a Press the button to access the Information...

Page 121: ...ter off and disconnect the AC power cable 2 Press the cover release and open the printer s top cover fully 3 Lift the front cover latch and pull open the front cover 4 Remove the screw securing the ri...

Page 122: ...Locate the six legs of the disk unit into the mounting holes on the printer 10 Push the handle flat against the disk unit which will lever the unit slightly towards the rear of the printer locking it...

Page 123: ...s printed press ON LINE to exit the menu system 16 Examine the first page of the menu map Near the top of the page between the two horizontal lines you will see the current printer configuration This...

Page 124: ...pear slightly different but the principles are the same PCL DRIVER If you have installed a memory upgrade it is not necessary to change the PCL printer driver and you can ignore this section If you ha...

Page 125: ...XP via the Start Menu or from the Windows Control Panel 2 Right click the printer icon for this printer and choose Properties from the pop up menu 3 On the Device Settings tab locate the list of insta...

Page 126: ...tops and the LCD window on the operator panel informs you of the event If printing multiple pages or copies do not assume that having cleared an obvious sheet that others will not also be stopped some...

Page 127: ...e necessary to remove the four image drums to gain access to the paper path 4 Holding it by its top centre lift the image drum complete with its toner cartridge up and out of the printer 1 Cyan cartri...

Page 128: ...any part of the belt unit To remove a sheet with its leading edge at the front of the belt 1 carefully lift the sheet from the belt and pull it forwards into the internal drum cavity and withdraw the...

Page 129: ...the sheet from the belt push the fuser pressure release lever 4 towards the front and down to release the fuser s grip on the sheet and withdraw the sheet through the drum cavity area Then allow the...

Page 130: ...o the drum cavity making sure to locate them in the correct order Holding the complete assembly by its top centre lower it into place in the printer locating the pegs at each end into their slots in t...

Page 131: ...10 Open the rear exit tray 5 and check for a sheet of paper in the rear path area 6 Pull out any sheets found in this area If the sheet is low down in this area and difficult to remove it is probably...

Page 132: ...If your printer has a duplex unit installed press the cover release at the centre of the unit open the cover and remove any sheets in this area then close the cover 13 Lift the front cover release and...

Page 133: ...stacked properly is undamaged and that the paper guides are properly positioned against the edges of the paper stack When satisfied replace the tray 16 Finally close the top cover and press down firml...

Page 134: ...in main tray 530 sheets in optional 2nd tray 100 sheets in multi purpose tray or 50 transparencies or 10 envelopes Paper weight 64 120g m in main tray 64 176g m in 2nd tray 64 203g m in multi purpose...

Page 135: ...Windows ICM 66 D Duplex how to install 116 paper size and weight limits 15 selecting in Windows 21 22 33 34 E Envelopes loading 19 F Fonts printing a list 69 Fuser how to replace 113 life expectancy...

Page 136: ...verlays 91 P Page orientation portrait or landscape 21 33 Paper jam clearing 126 loading cassette trays 16 loading letterhead 17 recommended types 13 supported sheet sizes 14 weight selection in Windo...

Page 137: ...INDEX 137 Transparencies recommended types 13 U Upgrades duplex unit 116 memory 118 USB enabling or disabling 82...

Page 138: ...ku Tokyo 108 8551 Japan Tel 81 3 5445 6158 Fax 81 3 5445 6189 http www okidata co jp Oki Data Singapore Pte Ltd 78 Shenton Way 09 01 Singapore 079120 Tel 65 221 3722 Fax 65 421 1688 http www okidata...

Page 139: ...central house balfour road hounslow tw3 1hy united kingdom tel 44 0 20 8219 2190 Fax 44 0 20 8219 2199 C5400n C5400dn 07048901 Iss 01...

Reviews: