background image

INSTALLATION AND RELOCATION PROCEDURE > 25

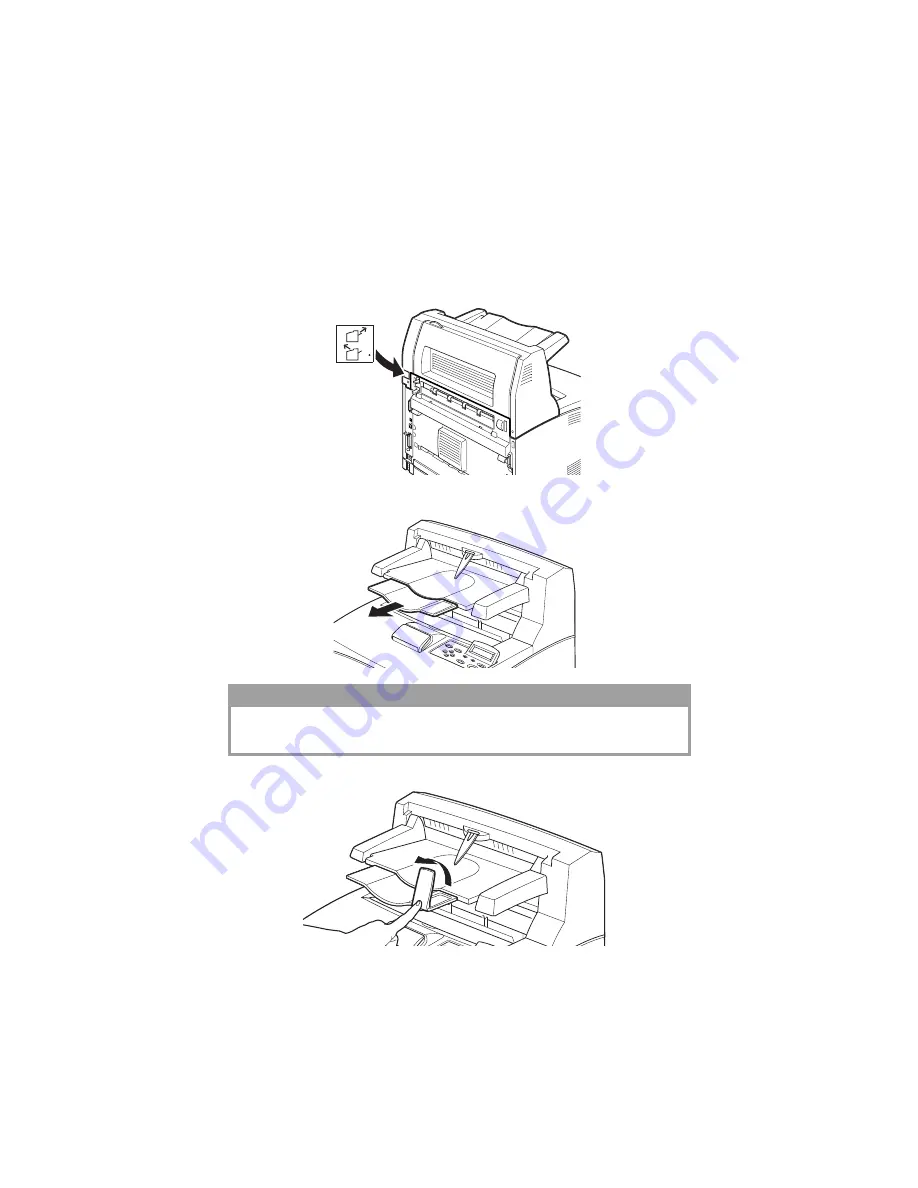
5.

Close the cover. 

6.

If you install the face up (rear) tray on the printer, affix the label 
provided to the back of the offset catch tray.

7.

Pull out the extension tray.

8.

Flip up the stopper when printing on heavy weight papers.

CAUTION!

Printing while the tray is folded up may cause a paper jam. Be sure to open 
the tray when using the printer.

Summary of Contents for B6200 Series

Page 1: ......

Page 2: ...rope http www okieurope com Oki Americas Inc http www okidata com Copyright 2004 Oki Data Americas All rights reserved Oki and Microline are registered trademarks of Oki Electric Industry Company Ltd...

Page 3: ...r television reception which can be determined by turning the equipment off and on the user is encouraged to try to correct the interference by one or more of the following measures Reorient or reloca...

Page 4: ...Installing a Universal Tray 16 Installing the Duplex Unit 21 Installing the Offset Catch Tray 23 Installing a Network Software Kit Hard Disk Compact Flash Disk or Additional Memory 26 Preparing the pr...

Page 5: ...the Desktop Printer for A Network 51 Create the Desktop Printer For USB 51 Activate the duplex unit and additional options 52 To print a job using the optional duplex unit 52 To Load the Manuals 52 Ma...

Page 6: ...fectively please read this guide before using the printer This guide is applicable to the B6200 B6300 Series printers in general although illustrations used are based on the B6300 This guide assumes t...

Page 7: ...tiple up printing 2 sided printing Watermark printing Poster printing Booklet printing Transparency separation Favorites Special media printing Secure printing requires the Hard Disk option Proof prin...

Page 8: ...re used throughout this guide to emphasize certain procedures or information Indicates items displayed on the computer and the printer control panel Also indicates the title of printed reports lists f...

Page 9: ...plug only to a properly rated power outlet HANDLING THE PRINTER The printer is very heavy and should always be lifted by two people The printer with consumables weighs 20 4kg 45lb B6200 or 22 6kg 50lb...

Page 10: ...ng instructions and Quick Setup Guide Safety and Warranty Booklet CD ROM The CD ROM contains printer drivers software and documentation designed to help you fully utilize your new printer Oki has prov...

Page 11: ...e remaining paper in the 550 sheet paper tray 5 Tray 1 Holds 150 sheets of paper 6 Tray 2 Holds 250 sheets B6200 or 550 sheets B6300 of paper 7 Power switch Switches the printer power on and off 8 Ext...

Page 12: ...t to any wall 200mm 8in from the left vent to any wall and 300mm 12in from the right vent to any wall A poorly ventilated machine can cause excessive internal heat and fire The following diagram shows...

Page 13: ...Do not expose the printer to the direct draft of air conditioning or heating NOTE Sudden temperature fluctuations can affect print quality Rapid heating of a cold room or moving the printer from a loc...

Page 14: ...sert the right and left tabs of the face up rear tray into the holes at the back of the printer 1 and lower the tray into position 2 2 Push up the rear output tray lever as shown in the diagram 1 and...

Page 15: ...s unless specifically instructed in this guide A high voltage component can cause electric shock Do not try to alter the machine configuration or modify any parts An unauthorized modification can caus...

Page 16: ...IVERSAL TRAY You can install up to two levels of universal tray 550 sheet option to this printer This section explains how to install two trays as an example 1 Ensure that you have all of the followin...

Page 17: ...g the parts as shown in the diagram 4 Align the front and back corners of the top and bottom tray modules and slowly lower the top module so that the guide pins at the four corners of the bottom modul...

Page 18: ...8 INSTALLATION AND RELOCATION PROCEDURE 5 Insert the fasteners provided into the two locations inside the tray module and the two locations at the back of the tray module Insert the fasteners securely...

Page 19: ...recessed areas 8 Align the corners of the printer and the tray modules and lower the printer gently so that the guide pins at the four corners of the tray modules fit into the holes at the base plate...

Page 20: ...the fasteners provided into the two locations inside and the two locations at the back of the printer Insert the fasteners securely 10 Push both trays completely into the printer NOTE For details on h...

Page 21: ...nd refit it when the duplex unit has been installed 1 Remove the duplex unit cover by pushing the two tabs as shown in the diagram 1 Next remove the connector cap at the top right of the back of the p...

Page 22: ...22 INSTALLATION AND RELOCATION PROCEDURE 3 Tighten the screws at both ends of the bottom of the duplex unit...

Page 23: ...printer 1 Lift the second lever on the top left corner at the back of the printer 1 and open the cover 2 NOTE An offset catch tray can be installed on the B6300 only NOTE When the duplex unit is inst...

Page 24: ...own in the diagram to uninstall the top cover of the paper exit 3 Insert the right and left tabs of the offset catch tray into the holes at the top of the printer 1 and lower it slowly onto the top of...

Page 25: ...ear tray on the printer affix the label provided to the back of the offset catch tray 7 Pull out the extension tray 8 Flip up the stopper when printing on heavy weight papers CAUTION Printing while th...

Page 26: ...e steps are required at the beginning and at the end of each installation to prepare the printer and to close it These steps are described here Preparing the printer 1 Remove the screw on the right de...

Page 27: ...ottom of the metal cover into the notch of the printer 1 and tighten the two screws on the top of the cover 2 2 Align and insert the protrusions at the top of the right detachable cover into the notch...

Page 28: ...ware kit so its notch 1 is aligned with the protrusion on the slot 3 Release the hook on the top of the slot 4 Gently insert the network software kit into the slot and press firmly at the top corner o...

Page 29: ...re kit fully and securely into the slot will cause the hook on the top of the slot to rise 5 Remove the cap from the network connector 6 Refer to Closing the printer on page 27 NOTE Be sure to insert...

Page 30: ...move the cable of the Compact Flash bracket from the connector on the printer NOTE When the Compact Flash disk option is installed on your printer you cannot install the hard disk You can install only...

Page 31: ...in the diagram and install it in the printer Align the arrow on the hard disk with the arrow on the printer and insert the bracket at the top of the disk into the install position 6 Tighten the screws...

Page 32: ...Open the fastener on the Compact Flash disk drive 3 Locate the Compact Flash disk as shown in the diagram NOTE When the hard disk option is installed on your printer you cannot install the Compact Fla...

Page 33: ...INSTALLATION AND RELOCATION PROCEDURE 33 4 Close the fastener 5 Refer to Closing the printer on page 27...

Page 34: ...until it clicks into position 2 4 Refer to Closing the printer on page 27 CAUTION Do not touch the terminal area of the additional memory Do not bend or damage the additional memory Before handling t...

Page 35: ...the drum toner cartridge stand upside down or place it upside down as this may damage the drum A drum shutter protects the photosensitive drum from light Do not open the drum shutter Although the tone...

Page 36: ...g Keep the drum toner cartridge out of the reach of children 1 Open the cover 2 Take the drum toner cartridge out of the packaging box and shake it seven or eight times as shown in the diagram NOTE Wh...

Page 37: ...cover securely CAUTION When pulling out the seal pull it out horizontally The tape might break if it is pulled out diagonally After the seal has been pulled out do not shake or bump the drum toner car...

Page 38: ...at the back of the printer serial 1 USB 2 network 3 parallel 4 For a parallel cable lift up the wire clip on both sides to secure it after it has been inserted into the connector 2 For Parallel USB or...

Page 39: ...t the other end of the power cord to the power outlet 3 Press the power switch of the printer to the position The power will be applied and the control panel will display that the printer is ready to...

Page 40: ...PAPER This section explains how to load Letter size plain paper in portrait orientation in the paper tray 1 Place the paper tray on a flat surface and remove the lid 2 If the base plate of the paper...

Page 41: ...d the paper with the side to be printed facing up and with all four corners aligned CAUTION Do not place paper over the right width guide Do not load paper exceeding the maximum fill line or the maxim...

Page 42: ...es and sizes of the loaded paper you need to configure settings on the control panel Change the paper type when non plain paper such as recycled paper heavyweight paper or transparencies is loaded Con...

Page 43: ...ed the printer is ready to receive data from the computer 4 LCD Display Displays menu values printer status and error messages 5 ATTENTION indicator When illuminated there is a malfunction in the prin...

Page 44: ...y 1 Recycled then press the FEED SELECT button to record the setting and the MENU button to close the menu screen 9 buttons Press these to move to the required menu item and required value on the disp...

Page 45: ...e display language 1 Press the MENU button to display the Menu screen 2 Press the or button until Display Language is displayed then press the button 3 Press the or button until the required language...

Page 46: ...List will be printed 5 Press the MENU button when printing has completed NOTE If you have made a mistake when operating the control panel press the MENU button to restart For details on how to operat...

Page 47: ...age 1 Boot your computer and start the web browser 2 Enter the printer s IP address or URL in the address input column on the web browser and press the Enter key Using Online Help For details regardin...

Page 48: ...ned OFF 2 Insert the driver CD supplied with your printer into your CD ROM drive The CD will autorun If it doesn t click Start Run Browse Browse to your CD ROM drive and double click Install exe click...

Page 49: ...click the printer icon then click Properties 3 Click the Print Test Page button TO INSTALL THE POSTSCRIPT DRIVER AS WELL 1 With the Software Installation screen open click the Printer Driver Installer...

Page 50: ...talled you must enter the driver and activate them 1 From the taskbar click Start Settings Printers 2 Right click the printer icon then click Properties 3 Select the Options Device Settings tab 4 Sele...

Page 51: ...Easy Install from the drop down menu Click Install 9 Select your printer model Click OK 10 When the installation is complete click Quit CREATE THE DESKTOP PRINTER FOR A NETWORK 1 Activate Chooser from...

Page 52: ...he desktop 2 Select Printer from the desktop menu 3 Click the Change drop down menu 4 Select each option Click the To drop down menu and select Installed Click OK TO PRINT A JOB USING THE OPTIONAL DUP...

Page 53: ...click the OKI Mac Installer icon then click Continue and accept the License agreement 8 Select MAC OS X 1 Driver from the drop down menu in the left corner Click Install 9 Select your printer model Cl...

Page 54: ...nter model 2 Click Printers from the Menu bar 3 Select Show Info 4 Select Installable Options from the drop down list 5 Select your printer s installed options NOTE To list printer models enable Ether...

Page 55: ...nt on Both Sides 3 Select the binding 4 Click Print TO LOAD THE MANUALS Note In order to open the on line manual you must have Acrobat Reader installed 1 Insert the CD into your CD ROM drive 2 From th...

Page 56: ...move the drum toner cartridge is displayed refer to Inside Cover A on page 58 CAUTION When removing jammed paper make sure that no pieces of torn paper are left in the machine A piece of paper remaini...

Page 57: ...opening cover B hold the part marked with a open the cover of the fuser unit 2 and remove any jammed paper Cover C Duplex Unit Push up the lever 1 to open the duplex unit cover NOTE Remove the rear t...

Page 58: ...on page 59 INSIDE COVER A Follow the procedure below to remove any jammed paper when the control panel indicates either Paper jam Open Cover A or Remove cartridge Clear jam 1 Open cover A and holding...

Page 59: ...ear jam and Clear jam and close Cover A Pulling out the paper trays 1 Pull out all paper trays and remove any wrinkled paper 2 Examine the inside of the printer and remove any jammed paper CAUTION Whe...

Page 60: ...60 IF PAPER JAMS After removing the paper 1 Push the paper trays completely back into the printer 2 Open and close Cover A to clear the error message...

Page 61: ...Action Corrupt HDD File Press SEL key When the hard disk option is installed the printer assumes that data in the hard disk is corrupted if power is cut off when the printer is in use Press the FEED S...

Page 62: ...il Unable to retrieve IP address from DNS Check the settings for DNS and retrieving IP address Ready to print Get IP Add Fail Failed to retrieve IP address from DHCP server Change the retrieving metho...

Page 63: ...essories 15 installing the printer 12 Installing the Printer Driver 48 L loading paper loading paper in paper tray 40 M Macintosh OS X 1 driver installation53 Macintosh OS 9 1 driver installation 51 M...

Page 64: ...printer provided that the warranty service is performed by an Oki Data authorized service provider Oki Data reserves the right to use new and or refurbished parts in the warranty repair process As a c...

Page 65: ...D THE RESPECTIVE WARRANTY PERIOD DESCRIBED ABOVE Some states do not allow limitations on how long an implied warranty lasts so the above limitation may not apply to you OKI DATA SHALL NOT BE RESPONSIB...

Page 66: ...Oki Data de Mexico S A de C V Mariano Escobedo No 748 8 Piso Col Anzures e p 11590 M xico DF Tel 52 55 5263 8780 Fax 52 55 5263 8785 BRAZIL Oki Data do Brasil Ltda Rua Alexandre Dumas 2220 80 andar C...

Reviews: