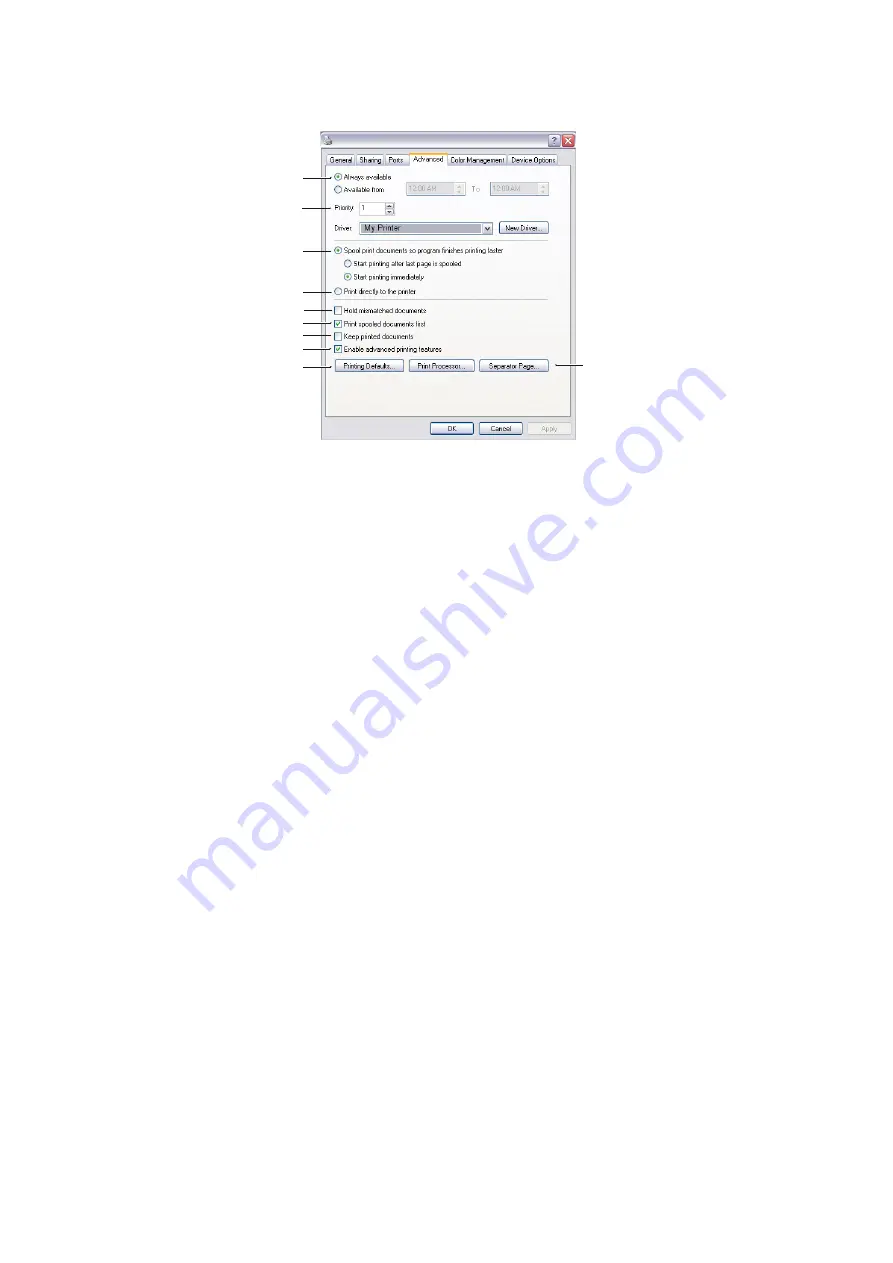
Oki B410DN User Manual Download Page 46

Operation > 46

Advanced tab

1.

You can specify which times of day your printer will be available.

2.

Indicates current priority, from 1 (lowest) to 99 (highest). Highest priority 

documents will print first.

3.

Specifies that documents should be spooled (stored in a special print file) before 

being printed. The document is then printed in the background, allowing your 

application program to become available more quickly. Options follow:
This specifies that printing should not start until the last page has been spooled. If 

your application program needs a lot of time for further computation in the middle of 

printing, causing the print job to pause for more than a short period, the printer could 

prematurely assume that the document has finished. Selecting this option would 

prevent that situation, but printing will be completed a little later, as the start is 

delayed.
This is the opposite choice to the one above. Printing starts as soon as possible after 

the document begins spooling.

4.

This specifies that the document should not be spooled, but printed directly. Your 

application will not normally be ready for further use until the print job is complete. 

This requires less disk space on your computer, since there is no spool file.

5.

Directs the spooler to check the document setup and match it to the printer setup 

before sending the document to print. If a mismatch is detected, the document is 

held in the print queue and does not print until the printer setup is changed and the 

document restarted from the print queue. Mismatched documents in the queue will 

not prevent correctly matched documents from printing.

6.

Specifies that the spooler should favour documents which have completed spooling 

when deciding which document to print next, even if completed documents are lower 

priority than documents which are still spooling. If no documents have completed 

spooling, the spooler will favour larger spooling documents over shorter ones. Use 

this option if you want to maximise printer efficiency. When this option is disabled 

the spooler chooses documents based only on their priority settings.

7.

Specifies that the spooler should not delete documents after they are completed. 

This allows documents to be re submitted to the printer from the spooler instead of 

printing again from the application program. If you use this option frequently it will 

require large amounts of disk space on your computer.

8.

Specifies whether advanced features, such as pages per sheet, are available, 

depending on your printer. For normal printing keep this option enabled. If 

1

2

3

4

5

6

7

8

9

10

My Printer Properties

Summary of Contents for B410DN

Page 1: ...B410d B400 Series B410dn B430d B430dn B440dn User s Guide...

Page 2: ...are available from www okiprintingsolutions com Copyright 2008 Oki Europe Ltd All rights reserved Oki Oki Printing Solutions and Microline are registered trademarks of Oki Electric Industry Company Lt...

Page 3: ...er for at least 15 minutes keeping eyelids open Seek medical attention Spillages should be treated with cold water and soap to help reduce risk of staining skin or clothing MANUFACTURER Oki Data Corpo...

Page 4: ...tton 13 Changing language 14 Printer menu setup tool 14 Menu functions 15 Printing menu settings 21 B430d B430dn B440dn 22 Operator panel 22 Panel elements 22 Menu functions 23 Printing menu settings...

Page 5: ...reating the overlay image 56 Create and download macros 56 Test printing the macro 57 Defining overlays 57 Printing with PCL overlays 58 Consumables and maintenance 59 Consumable order details 59 Tone...

Page 6: ...all even if it is described as compatible and if it does work your product s performance and print quality may be degraded Specifications subject to change without notice All trademarks acknowledged N...

Page 7: ...terfaces 10 100 BASE TX Network standard for B410dn B430dn and B440dn lets you share this valuable resource among users on your office network Multi Purpose tray for B430d B430dn and B440dn to extend...

Page 8: ...than one printer as a model and the illustrations screenshots reflect this What you see will be appropriate to the model you are using ONLINE USAGE This manual is intended to be read on screen using a...

Page 9: ...USED The following abbreviations are used in this manual ABBREVIATION MEANING Ctrl Control dpi dots per inch DIMM Dual In line Memory Module d duplex n network card installed LED Light Emitting Diode...

Page 10: ...ace down 3 Output Stacker extension 4 Top cover release button 5 Multi Purpose Tray only for B430d B430dn and B440dn 50 sheets shown in open position 6 Multi Purpose Tray extension 7 Paper Tray 250 sh...

Page 11: ...Parallel interface connection 20 USB interface connection 21 LAN interface connection only for B410dn B430dn and B440dn 22 Test button only for B410dn B430dn and B440dn 23 Memory panel to upgrade your...

Page 12: ...EDs indicate Ready 1 and Attention 2 LED INDICATORS The LED indicators show the status of the printer and have three operating conditions as follows Indicator off Indicator on Flash Both LED indicator...

Page 13: ...ws Printing the demo and menu pages Printing any data held in the buffer after printing has been cancelled The other functions of the Online button are activated after turning the printer off line the...

Page 14: ...nging the printer settings are carried out as follows Click on Start All Programs Okidata Printer Menu Setup Tool and select the Printer Menu Setup Tool NOTE To reset the printer to the default settin...

Page 15: ...s These can be overridden by the settings in your printer driver or application For example if you have set the number of copies in the Printer Menu settings to one this will be overridden if you sele...

Page 16: ...A CHECK ENABLE RESOLUTION 600DPI TONER SAVE MODE DISABLE ORIENTATION PORTRAIT LINES PER PAGE 64 LINES EDIT SIZE CASSETTE SIZE ITEM DEFAULT REMARKS TRAY1 PAPERSIZE A4 TRAY1 MEDIATYPE PLAIN TRAY1 MEDIAW...

Page 17: ...WARNING ONLINE AUTO CONTINUE ON MANUAL TIMEOUT 60 SEC TIMEOUT INJOB 40 SEC TIMEOUT LOCAL 40 SEC TIMEOUT NET 90 SEC B410dn only LOW TONER CONTINUE JAM RECOVERY ON ERROR REPORT OFF ITEM DEFAULT REMARKS...

Page 18: ...INE PITCH 6 LPI WHITE PAGE SKIP OFF CR FUNCTION CR LF FUNCTION LF LINE LENGTH 80 COLUMN FORM LENGTH 11 7 INCH TOF POSITION 0 0 INCH LEFT MARGIN 0 0 INCH FIT TO LETTER DISABLE TEXT HEIGHT SAME ITEM DEF...

Page 19: ...BI DIRECTION ENABLE ECP ENABLE ACK WIDTH NARROW ACK BUSY TIMING ACK IN BUSY I PRIME 3 MICRO SEC ITEM DEFAULT REMARKS USB ENABLE SOFT RESET ENABLE SPEED 480 Mbps SERIAL NUMBER ENABLE NOTE This is appl...

Page 20: ...et of replacement consumables to hand and you need to know how soon you will need them HUB LINK SETTING AUTO NEGOTIATE FACTORY DEFAULTS EXECUTE ITEM DEFAULT REMARKS USAGE REPORT ENABLE RESET COUNTER E...

Page 21: ...ne button for at least four seconds but less than seven seconds 3 The printer prints a list of the menu settings and a demo print page See Online button on page 13 Using the Printer Menu Setup Tool 1...

Page 22: ...this briefly to select the menu or setting indicated on the LCD 5 Online button Press to switch between ONLINE and OFFLINE status Press to exit the menu and displays ONLINE when in the MENU mode 6 Can...

Page 23: ...your document in the printer driver Factory default settings are shown in the following tables Information menu This menu provides a quick method of listing various items stored within the printer Sh...

Page 24: ...A4 TRAY 1 MEDIATYPE PLAIN TRAY 1 MEDIAWEIGHT MEDIUM TRAY2 PAPERSIZE A4 When tray 2 is installed TRAY2 MEDIATYPE PLAIN When tray 2 is installed TRAY2 MEDIAWEIGHT MEDIUM When tray 2 is installed MPT PAP...

Page 25: ...ULT REMARKS FONT SOURCE RESIDENT FONT NO I0 FONT PITCH 10 00 CPI SYMBOL SET PC 8 A4 PRINT WIDTH 78 COLUMN WHITE PAGE SKIP OFF CR FUNCTION CR LF FUNCTION LF PRINT MARGIN NORMAL PEN WIDTH ADJUST ON TRAY...

Page 26: ...BLE TEXT HEIGHT SAME ITEM DEFAULT REMARKS CHARACTER PITCH 10 CPI CHARACTER SET SET 2 SYMBOL SET IBM 437 LETTER O STYLE DISABLE ZERO CHARACTER NORMAL LINE PITCH 6 LPI WHITE PAGE SKIP OFF CR FUNCTION CR...

Page 27: ...Mbps OFFLINE RECEIVE DISABLE SERIAL NUMBER ENABLE NOTE This is applicable only to the B430dn and B440dn models ITEM DEFAULT REMARKS TCP IP ENABLE IP VERSION IPv4 NETBEUI ENABLE NETWARE ENABLE ETHERTAL...

Page 28: ...arly useful if you do not have a full set of replacement consumables to hand and you need to know how soon you will need them ITEM DEFAULT REMARKS USAGE REPORT ENABLE RESET COUNTER EXECUTE GROUP COUNT...

Page 29: ...ss the Menu or button until the INFORMATION MENU is available then press button 2 Press the or button until the display prompts you to print the menu map 3 Press the button to print the menu map 4 Pre...

Page 30: ...se heavily embossed headed paper Do not use specially treated papers such as carbon paper non carbon paper thermal paper and impact paper Avoid using paper with perforations cut outs and ragged edges...

Page 31: ...paper tray from the bottom of the printer and place plain paper 1 in the tray keeping the level of the paper in the tray below the paper full guide arrowheads shown on the paper guides 2 For loading A...

Page 32: ...Rear cover is open In this condition paper will exit via this path regardless of driver settings Always use this tray in conjunction with the Manual Feed Tray Multi Purpose Tray or for heavyweight sto...

Page 33: ...pose Tray and push the set button 3 Ensure that the paper is loaded below the arrow level 5 to avoid paper jam B410 Load single sheet at a time into the Manual Feed Tray For single sided printing on h...

Page 34: ...oo little heat will cause the image not to fuse fully into heavyweight paper B410D B410DN You can change the media type as follows 1 Start the Printer Menu Setup tool 2 Click Media Menu 3 Click on the...

Page 35: ...edly until EDIT SIZE is displayed then press button NOTE If the settings in the printer differ from those selected on your computer the printer will not print and the LCD will display an error message...

Page 36: ...utton until MEDIA MENU is displayed then press the button 2 Press the or button until MEDIA TYPE or MEDIA WEIGHT for the required tray is displayed then press button 3 Press the or button until the re...

Page 37: ...mbers depend on the order of connecting or turning on each printer 3 LAN For network cable connection This port is standard on the B410dn B430dn and B440dn If you are connecting your printer directly...

Page 38: ...cally 7 For the B430d B430dn B440dn once the driver has been installed the operator panel language switching utility will run automatically Choose your preferred operating language See Changing langua...

Page 39: ...enu Setup Tool menus PRINTING PREFERENCES IN WINDOWS APPLICATIONS When you choose to print your document from a Windows application program a Print dialogue box appears This dialogue usually specifies...

Page 40: ...elected such as normal one page per sheet or N up where N can be 2 or 4 for printing scaled down pages at more than one page per sheet 4 Under 2 sided Printing you can choose from auto or manual Under...

Page 41: ...watermark text behind the main page image This is useful for marking documents as draft confidential etc If you would like to print on special stationery such as forms and letterhead but do not want...

Page 42: ...le Line Art determines that an array of lines is used for dithering 2 Select dithering texture by setting the size of dots used in the halftone screen 3 Set this control to print greyscale effects in...

Page 43: ...page order can be set as front to back or back to front of the document 4 Set the number of pages to be printed on a single sheet You can also set it to print a booklet 5 Click the Advanced button to...

Page 44: ...0d and B410dn setting prints at 2400 x 600dpi This setting requires the most printer memory and takes the longest to print It is the best option for printing photographs The High Quality setting print...

Page 45: ...ting 6 A single on screen button restores the default settings SETTING FROM WINDOWS CONTROL PANEL When you open the driver properties window directly from Windows rather than from within an applicatio...

Page 46: ...ince there is no spool file 5 Directs the spooler to check the document setup and match it to the printer setup before sending the document to print If a mismatch is detected the document is held in t...

Page 47: ...ator page that prints between documents This is particularly useful on a shared printer to help each user find their own documents in the output stack Device options tab In this window you can select...

Page 48: ...ou can make a variety of font settings depending on your application 3 You can set which optional upgrades are installed on your printer See the chapter entitled Installing options PRINTER SETTINGS IN...

Page 49: ...gal 13 and 14 and Custom paper sizes using paper stocks from 60 105g m2 To carry out Auto Duplex Printing 1 Select File Print and click the Properties button 2 Select the input tray Tray1 Tray2 option...

Page 50: ...zes using paper stocks from 60 124g m2 1 Ensure that there is enough paper in the Paper Tray to carry out the print job 2 Select File Print and click the Properties button 3 Select the Multi Purpose T...

Page 51: ...and place it in the Paper Tray ensuring that the printed side is facing up and the bottom of the page facing into the printer 4 8 Close the Paper Tray and press the Online button The message window sh...

Page 52: ...ferences If you require further information click the Duplex Help button 7 When every second page has printed take the paper from the output stacker 8 Set the paper one page at a time in the Manual Fe...

Page 53: ...o create a project file import the PRN file s and download the generated filter HST file to the printer The project file will contain one or more overlay images which are functionally related such as...

Page 54: ...recognise it later if you want to modify it 10 Choose Projects Send Project Files to Printer to download the project to the printer If you have a hard disk in the printer SDM will automatically downl...

Page 55: ...LAYS Once you have defined your overlays you are ready to use them for any documents you wish The example illustrated here uses two overlays for business letters The first prints on just the top page...

Page 56: ...DM to discover the printer 2 Choose Projects New Project to start a new project 3 Choose Projects Filter Macro File The Filter Printer Patterns dialogue box appears Make any adjustments in the setting...

Page 57: ...in Windows XP window via the Start menu or the Windows Control Panel 2 Right click on the Relevant PostScript printer icon and choose Printing Preferences from the pop up menu 3 On the Job Options tab...

Page 58: ...r application s Print dialogue and choose any options you will require ensuring that the target printer is your PCL printer driver in which the overlays have been defined 3 Click the Properties button...

Page 59: ...00 more pages then display Toner Empty and stop printing Printing will resume after a new toner cartridge has been installed REPLACING THE TONER CARTRIDGE It is recommended that you clean the LED arra...

Page 60: ...of the printer to close the cartridge then remove the used toner cartridge 2 4 Clean the top of the ID unit with a clean lint free cloth 5 Put the cartridge down gently onto a piece of paper to preven...

Page 61: ...om the underside of the cartridge 4 9 Holding the cartridge by its top centre with the coloured lever to the right 5 lower it into the printer over the image drum unit from which the old cartridge was...

Page 62: ...t it is firmly seated push the coloured lever towards the rear of the printer 8 This will lock the cartridge into place and release toner into the image drum unit 12 Gently wipe the LED array surface...

Page 63: ...REPLACING THE IMAGE DRUM 1 Press the cover release and open the printer s top cover fully 2 Holding it by its top centre remove the used image drum and toner cartridge out of the printer WARNING Neve...

Page 64: ...onto the new image drum cartridge Push the left end in first and then lower the right end in 8 Push the coloured release lever away from you to lock the toner cartridge onto the new image drum unit an...

Page 65: ...manual feed tray on page 33 3 Press and hold down the Online button for at least seven seconds 4 The printer grips the paper and prints a cleaning page 5 Return the printer ONLINE by pressing the Onli...

Page 66: ...maintenance 66 CLEANING THE LED ARRAY Clean the LED array whenever a new toner cartridge is installed or if there are faded vertical areas or light printing down a page Wipe the LED array gently with...

Page 67: ...paper tray or at any point on the paper path through the printer When a jam occurs the printer immediately stops and the operator panel informs you of the event If printing multiple pages or copies d...

Page 68: ...given above 2 Press the cover release and open the printer s top cover NOTE The B430dn model has been illustrated below The principles are the same for all models of this printer WARNING If the print...

Page 69: ...e install the image drum complete with toner cartridge ensuring that the pegs 1 2 correctly locate into the slots on each side of the printer 3 6 Lower the top cover but do not press down to latch it...

Page 70: ...s down on the fuser pressure release lever If you are not using the rear cover close it once the paper is removed from this area 8 Remove the Duplex unit 1 and check for any paper in this area Remove...

Page 71: ...presentative SYMPTOM PROBLEM SOLUTION Blank sheets printed Image drum cartridge not properly installed Reinstall image drum cartridge Empty or missing toner cartridge Install new toner cartridge Entir...

Page 72: ...hed print Dirty rollers toner dropped inside printer or image drum problem Replace image drum and toner Contact service Printed page is light blurred Is toner low Replace toner cartridge Is paper mean...

Page 73: ...Manual Feed Multi Purpose tray Remove existing sheets of paper from the tray and add the new sheets to them ensuring alignment and then load the tray Postcards envelopes label sheets or transparencie...

Page 74: ...trol panel to equal lines per page in your software SYMPTOM PROBLEM SOLUTION Graphic image prints partly on one page partly on the next Insufficient printer memory for this image at this resolution Ch...

Page 75: ...the processing of large files Second paper tray to increase your printer s paper handling capacity by 530 sheets 75g m INSTALLING OPTIONS ORDER NUMBERS INSTALLATION PROCEDURE To install any of the abo...

Page 76: ...28 pages per minute maximum Resolution B410d B410dn 600 x 2400 dots per inch B430d B430dn and B440dn 1200 x 1200 dots per inch Operating platform Windows 2000 XP XP server 2003 x 64 bit edition Vista...

Page 77: ...0dn Tray1 530 sheets Optional Tray 2 530 sheets B430d B430dn B440dn Multi Purpose Tray 50 sheets B410d B410dn Manual Feed Tray Single sheet Paper output Face up face down depending on paper size type...

Page 78: ...nvironmental conditions Feed Tray Ejection Method Paper type Size Weight T1 T2 MPT MF FU FD Plain paper A4 Letter L ML M MH 0 0 0 0 0 0 A5 B5 Executive L ML M MH H 0 0 0 0 0 0 Legal 13 Legal 14 H 0 0...

Page 79: ...0 0 0 0 A5 B5 Executive L ML M MH H X X X X 0 0 0 0 Statement L ML M MH H X X X X 0 X 0 0 A6 L ML M MH H X X X X X X 0 0 Custom L ML M MH U U U X U U 0 0 W 86 216 L 140 356 H X X X X U U 0 0 Postcards...

Page 80: ...rinting speed is reduced when you set the paper size of A5 A6 Postcards Envelopes as Heavy 7 Label mode must be selected in the printer driver if you want to print on heavy media which exceeds 120g m2...

Page 81: ...l B410d B410dn 12 B430d B430dn B440dn 22 options installing 75 Overlays 53 Overlays and macros general 41 53 Overlays PCL how to create 56 printing with overlays 57 58 Overlays PostScript defining in...

Page 82: ...pore Pte Ltd 78 Shenton Way 09 01 Singapore 079120 Tel 65 6221 3722 Fax 65 6421 1688 http www oki com sg Oki Systems Thailand Ltd 1168 81 82 Lumpini Tower 27th Floor Rama IV Road Bangkok 10120 Thailan...

Page 83: ...Oki Europe Limited Blays House Wick Road Egham Surrey TW20 0HJ United Kingdom Tel 44 0 208 219 2190 Fax 44 0 208 219 2199 www okiprintingsolutions com 07091401 iss 2...

Reviews: