background image


12


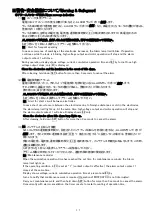
■運転の前に

/Prior to operation 

危険

/

Danger


電装カバーを開けたままで運転しないでください。


→感電、故障の原因となります。


Do not operate the unit without putting the cover on electrical connection part.   
Failure to this may lead to electric shock and/or product failure. 


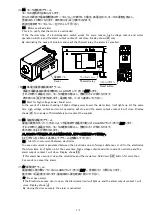
・ランプ

  Lamp 


・操作パネル


Operation panel


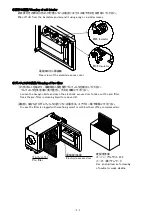
●モータ回転方向の確認

/

Check direction of motor rotation


①電源を供給してください。

POWER

ランプ(乳白)が点灯することを確認してください。


Supply power to the MISTCATCH. Make sure that the power lamp (opaque white) lights. 

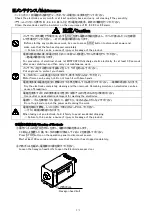
②操作パネルの

RUN

を押した後、モータの回転が開始されたら

STOP

を押してください。


Press RUN button on the operation panel. After the motor starts rotation   
press STOP button. 

③モータの回転方向がモータに貼られている矢印シールと同じで


あることを確認してください。


回転方向が反対の場合には、電源の

R

相と

S

相を入れ替えてください。


Ensure that the direction of motor rotation is same as shown in 
the arrow direction on the motor. 
In case it rotates to the opposite direction, exchange R and S of 
the power supply. 


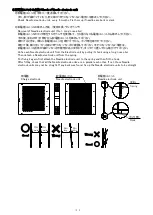
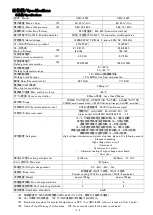
ALARM

ランプ(赤)


ALARM  lamp

Red


表示部


Display 

通電時、点灯します。


Lights up when current is 
applied 

POWER

ランプ(乳白


POWER lamp

Opaque white


アラーム発生時、点灯、点滅します。


Lights up or blinks in the event of 
an alarm


OPERATION

ランプ(橙)


OPERATION lamp

Orange


運転時、点灯します。


Lights up during operation 


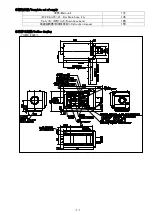
待機時:運転積算時間表示


運転積算時間ランプ(

x100 Hour

)点灯


In standby state :   

Displays cumulative operation time   

Cumulative operation time LED 
  (x100 Hour) ON 

運転時:電圧値、電流値、運転積算時間順次表示


同時に下記ランプ点灯


電圧ランプ(

kV

(

電流ランプ(

mA

(


運転積算時間ランプ(

x100 Hour

(

In operation: 

Displays voltage, current and   
cumulative operation time by turns 
with turning on the respective LEDs of 

                voltage (kV, green), current (mA, green) 

and cumulative operation time   
(x100 Hour, green) 


DOWN button 

DOWN

ボタン


SET

ボタン

  SET button 

パラメータ設定時:

SET MODE

ランプ

(

)

点灯


In parameter setting: SET MODE LED (blue)  ON 


RUN button 

RUN

ボタン


UP button 

UP

ボタン


STOP button 

STOP

ボタン


Summary of Contents for MIST CATCH OMC-E325

Page 1: ...ference This brochure contains general instructions for safety handling installation operation and maintenance of MISTCATCH However please understand that they may not cover all possible contingencies...

Page 2: ...Contents Safety precautions Part names Installation Prior to operation Operation Warning Safeguard Maintenance Specifications Maintenance parts Warranty...

Page 3: ...designated under Fire Defense Law of Japan Please ensure that the following substances are not allowed to enter into MISTCATCH since it aims to inhale common oil mist generated from machinery in prod...

Page 4: ...ay from the rotating part of fan 1000m This product is not designed for using outdoor or at high altitude above 1000 meters The site of use should be free from stress such as vibrations or impacts Do...

Page 5: ...ollecting electrode Pre filter Drain pipe Lamp Electrode access door Operation panel Exhaust port Suction port Fan Exhaust port Electrode access door Suction port Drain pipe Lamp Operation panel Motor...

Page 6: ...the MISTCATCH right side up and fix it perpendicularly and horizontally within a tolerance of 2 Failure to this may lead to scattering of water due to poor drainage Where the suction port is close to...

Page 7: ...sonnel M10 M10 Fix the bottom of the MISTCATCH at 4 points with M10 bolts and nuts M10 bolts and nuts are not included in the supply Duct and drain works OMC E325 Intake piping for OMC E325 200 For OM...

Page 8: ...included in the supply When you fabricate an original duct flange like an example illustrated below secure it with 12 M8 bolts using the holes provided It is recommended to seal around the jointed par...

Page 9: ...il drainage If oil is pooled inside the hose scattering can occur 400mm When submerged keep at least 400mm distance between the drain port and the liquid surface Caution The suctioning duct should tak...

Page 10: ...er s action is not interrupted by other equipment Do not connect an inverter to the power source Failure to this may lead to breakdown of the product M4 4 Detach the cover for the electrical connectio...

Page 11: ...for external operation input is wrong external operation is disabled Tighten the dome nut of the cable gland to fix the cable OMC E345 For wiring of OMC E345 secure the cable using a cable tie as ill...

Page 12: ...se it rotates to the opposite direction exchange R and S of the power supply ALARM ALARM lamp Red Display Lights up when current is applied POWER POWER lamp Opaque white Lights up or blinks in the eve...

Page 13: ...setting F1 Initial setting 8 Setting range 7 8 or 9 This is to change over high voltage output level According to the output value to each electrode collection amount of oil mist and maintenance inter...

Page 14: ...arm Alarm 2 output setting F3 Initial setting 0 Setting range 0 1 This is to set whether to output maintenance reminder 0 Alarm indication and contact output are ineffective 1 Alarm indication and con...

Page 15: ...r safety reasons in case a large amount of spark or short circuit has occurred at charge electrode or collecting electrode If it is desired not to stop mist emission set it to 1 for continuous operati...

Page 16: ...In 5 seconds after starting operation high voltage is applied to the electrodes and mist collection starts During operation voltage current and cumulative operation time are displayed by turns as wel...

Page 17: ...dirt in the electrodes the alarm lamp red lights up At the same time high voltage output and motor operation will stop and the alarm output contact 1 will close Display shows E2 only Clean the electr...

Page 18: ...contact 2 will close Display shows E5 Turn power off immediately and contact the supplier E6 1 E6 SET 3 E6 Alert for overcurrent between electrodes In case overcurrent is generated between the electr...

Page 19: ...and then carry out maintenance work Put on groves to protect your hands Motor frame can be very hot Do not touch it with bare hands Dry the electrodes completely cleaning and then remount Remaining mo...

Page 20: ...electrodes with a brush Dry the electrodes completely after washing Caution Operating a MISTCATCH with wet electrodes can be a cause of sparking Caution Before attaching each electrode make sure that...

Page 21: ...detach a Needle electrode unit from the spring For fixing it again first attach the Needle electrode unit to the spring and then fit the hook After fitting check that all the Needle electrode units a...

Page 22: ...open the electrode access door to take out the pre filter Soak the pre filter in cleaning liquid to remove dirt In case the filter is clogged with machining swarf or oil blow them off by compressed a...

Page 23: ...dirty electrode P19 Clean the electrodes See page 19 Oil mists generated are beyond the ability of the product Contact the supplier In case any trouble occurred during operation turn off power immedi...

Page 24: ...WER OPERATION ALARM POWER lamp Opaque white OPERATION lamp Orange ALARM lamp Red External operation input DC24V 24VDC Continuous signal External output 1a AC250V 2A DC30V 2A 2 Alarm output 1a AC250V 2...

Page 25: ...Complete set of supply Main unit 1 32 2 Drain hose 2m 1 Drain hose band 1 Instruction manual 1 Outline drawing OMC E325...

Page 26: ...OMC E345 Outline of electrode Charge electrode Weight approx 3 6kg Collecting electrode Weight approx 12 8kg...

Page 27: ...gent K79 Aluminum safe cleaning agent OMC E325 Motor of OMC E325 OMC N210 M75 OMC E345 Motor of OMC 345 OMC N215 M150 Closing plate for suction port OMC E047 1 Warranty 1 This product is covered with...

Page 28: ...21 Main Factory 7000 21 Nakagawa Hosoe Kita ku Hamamatsu Shizuoka 431 1304 Japan TEL 81 53 522 5562 FAX 81 53 523 2362 http www ohm jp e index html 2 2019 10 2nd Edition The contents of this manual is...

Reviews: