


If this product fails due to a defect in material or workmanship within TWO
YEARS from the date of purchase, we will at our option repair or replace it free of
charge. This warranty excludes tires, wheels, brushes and bag, which are
expendable and become worn during normal use.
This warranty does not cover:
Repairs necessary because of operator abuse or negligence.
•
Equipment used for commercial or rental purposes.
•
Paint that is worn or faded due to normal use or exposure.
•
To arrange for product repair call 1-800-652-2321, or return this product to place
of purchase for replacement.
This warranty gives you specific legal rights, and you may also have other rights
which may vary from state to state. This warranty applies only while this product
is in use in the United States.
In the space below record the purchase date of your Lawn Sweeper.
Model Number
42LS
Purchase Date
Keep this Owner's Manual and your receipt in a safe place for future reference.
After the two year warranty period all replacement parts may be ordered by
calling
1-800-652-2321
.
When ordering replacement parts, always give the following information:
Product
18 cu ft LAWN SWEEPER
•
Model Number
42LS
•
Part Number
•
Part Description
•
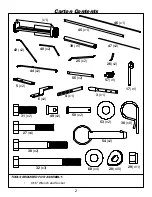
10
Warranty