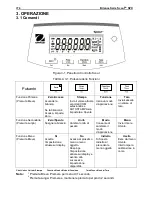
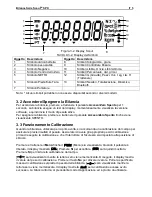
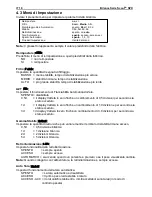
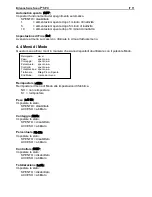
background image


Bilance Serie Scout

TM

 SPX 


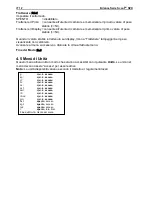
    IT 13 

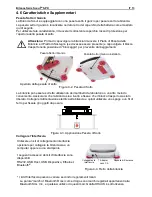
4.6 Caratteristiche Supplementari


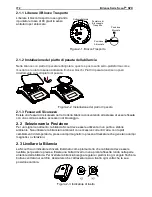
Pesata Sotto il Gancio 

La Bilancia Scout è equipaggiata con una peseta sotto il gancio per pesare sotto la bilancia.  
La peseta sotto il gancio è localizzata nel lato retro del coperchio della batteria come mostrato 
qui di seguito.  
Per utilizzare tale caratteristica, rimuovere il sottostante coperchio rosso di protezione per 
l’apertura della pesata di sotto 
 

Attenzione: 

Prima di capovolgere la bilancia rimuovere il Piatto di Pesata della 

Bilancia e il Piatto di Sostegno (se dovesse essere presente) e capovolgere il blocco 
trasporto nella posizione di “bloccaggio” per prevenire danneggiamenti. 


Figura 4-2. Pesata di Sotto 


La bilancia può essere sorretta utilizzando dei martinetti da laboratorio o un altro metodo 
conveniente. Assicurarsi che la bilancia sia a livello e fissa e che il blocco trasporto sia stato 
liberato. Collegare l’alimentazione elettrica alla bilancia e quindi utilizzare uno spago o un fil di 
ferro per fissare gli oggetti da pesare. 


Figura 4-3. Applicazione Peseta di Sotto 

Collegare l’Interfaccia 

Utilizzare un kit di collegamento interfaccia 
opzionale per collegare la bilancia sia a un 
computer oppure a una stampante. 
 
I seguenti accessori del kit d’Interfaccia sono 
disponibili: 
RS232, USB Host, USB Dispositivo, Ethernet, 
Bluetooth

®*


      Figura 4-4. Retro della bilancia 


* I kit d’Interfaccia possono variare secondo i regolamenti locali.  

La parola “marchio” Bluetooth® così come il logo sono marchi registrati appartenenti alla 
Bluetooth SIG. Inc., e qualsiasi utilizzo di questi marchi dalla OHAUS è sotto licenza. 

Collegamento 

Interfaccia 

Adapter 

Jack CA 

Fessura di Sicurezza 

Pesata Sotto il Gancio


Pesata Sotto il Gancio installato


Apertura della pesata di sotto


Summary of Contents for Scout SPX Series

Page 1: ...ustin Ft Worth NicolScales com 800 225 8181 Contact Us Nicol Scales Measurement is an ISO Accredited Calibration Company that has provided calibration repair and sales of all types of weighing and mea...

Page 2: ...lances SPX Instruction Manual Balanzas Scout TM Series SPX Manual de instrucciones Balances Scout TM S ries SPX Mode d emploi ScoutTM Waagen Serien SPX Bedienungsanleitung Bilance Serie ScoutTM SPX Ma...

Page 3: ...EN 2 SCOUTTM SERIES BALANCES SPX...

Page 4: ...ervicing this equipment Failure to comply with these warnings could result in personal injury and or property damage Retain all instructions for future reference Verify that the local AC power supply...

Page 5: ...lock accessory 2 2 Selecting the Location For best performance the Scout SPX balance should be used in a clean stable environment Do not use the balance in environments with excessive drafts with rap...

Page 6: ...polarity as shown in the battery compartment Note After power on it is recommended to warm up the balance for at least 5 minutes before using it 2 5 Initial Calibration When the Balance is first insta...

Page 7: ...e Secondary Function Long Press Zero Off Turns the balance Off Units Changes the weighing unit Mode Allows changing the application mode Menu Enter the User menu Menu Function Short Press Yes Accepts...

Page 8: ...ode To turn the balance off press and hold the On Zero Off button until OFF is displayed 3 3 Calibration Operation When the balance is operated for the first time a span calibration is recommended to...

Page 9: ...hows the piece count 7 Add additional pieces until the desired count is reached 8 To clear the stored APW press and hold Mode until Count is displayed Press Yes when Clr pwW is displayed Note Press Fu...

Page 10: ...nder the target weight range the under icon will light If the sample is within the target weight range the accept symbol will light If the sample is over the target weight range over icon will light N...

Page 11: ...f the items to be accumulated 6 To clear the stored total press and hold Mode until total is displayed When Clr tot is displayed press Yes 3 9 Hold Mode There are two modes for the display hold Peak H...

Page 12: ...ck On Off Totalize On Off Hold Disp Peak Off Reset g kg ct N oz ozt dwt lb lb oz grn hkt sgt twt t tola tical End End End End Notes Only available in certain regions When the Security Switch is in loc...

Page 13: ...isplay will maintain zero until a change of 3 divisions per second has been exceeded Stable Range Stable Set the amount the reading can vary while the stability symbol remains on 0 5d 0 5 balance divi...

Page 14: ...enu activates modes so they will be available for use with the Mode button Reset reset Reset the Mode menu to factory defaults NO not reset YES reset Weigh wWEIGH Set the status OFF disabled ON enable...

Page 15: ...will blink and the displayed weight will not change Advance to the next menu or return to the top of the current menu End Mode End 4 5 Unit Menu This menu activates units so they will be accessible w...

Page 16: ...onvenient method Ensure the balance is level and secure and that the transportation lock has been released Power on the balance then use a string or wire to attach items to be weighed Figure 4 3 Weigh...

Page 17: ...ting or percentage error sample weight 1d Balance shows error then exits parts counting or goes to Clr APU Lo ref Percent Reference weight or APW is too low for accurate results CAL E Fail to do calib...

Page 18: ...e external span or linearity calibration Digital with external weight Tare Range Full Capacity by subtraction Weighing Units g kg ct N oz ozt dwt lb lb oz grn Tael HongKong Tael Singapore Tael Taiwan...

Page 19: ...1 0 1 0 2 1 Span Calibration Mass 200 g 300 g 2 kg 5 kg 8 kg Linearity Calibration Mass 200 400 g 300 600 g 1 kg 2 kg 3 kg 6 kg 4 kg 8 kg Stabilization Time s 1 Construction ABS plastic housing with...

Page 20: ...080 x 0 005 Pound Ounce lb oz 1lb 5 870oz x 0 005oz 4lb 13 600oz x 0 005oz 13lb 10 700oz x 0 005oz 18lb 1 25oz x 0 05oz Grain grn 6480 x 2 9570 x 2 33950 x 2 95680 x 2 126540 x 20 6 2 Drawings Figure...

Page 21: ...sidential installation This equipment generates uses and can radiate radio frequency energy and if not installed and used in accordance with the instructions may cause harmful interference to radio co...

Page 22: ...t has been damaged by accident or misuse exposed to radioactive or corrosive materials has foreign material penetrating to the inside of the product or as a result of service or modification by other...

Page 23: ......

Page 24: ...de seguridad PRECAUCI N Lea atentamente todas las advertencias en material de seguridad antes de proceder a la instalaci n de llevar a cabo conexiones u operaciones de mantenimiento en estos equipos...

Page 25: ...eja de pesaje 2 1 3 Ranura de seguridad Existe una ranura de seguridad en la parte trasera de la balanza que permite el aseguramiento de la balanza mediante un cable opcional y un accesorio de cierre...

Page 26: ...pilas Nota Despu s de la alimentaci n se recomienda dejar que el equilibrio caliente durante al menos 5 minutos antes de usarla 2 5 Calibraci n inicial Cuando se instala la balanza por primera vez y...

Page 27: ...a Zero Off apagado Apaga la balanza Unidades Modifica la unidad de pesaje Modo Permite la modificaci n del modo de aplicaci n Men Acceder al men del usuario Funci n Men Pulsaci n corta Yes S Acepta la...

Page 28: ...lsado el bot n On Zero Off Encendido Cero Apagado hasta que se muestra OFF apagado en pantalla 3 3 Operaci n de calibraci n Cuando se pone en marcha la balanza primera vez se recomienda llevar a cabo...

Page 29: ...de elementos indicado sobre la bandeja y luego Yes s para calcularel APW peso medio del elemento a pesar La pantalla mostrar el recuento de elementos 7 A adir elementos adicionales hasta alcanzar la c...

Page 30: ...uese necesario coloque un recipiente vac o sobre la bandeja y pulse Tare Tara 6 Coloque el material de muestra sobre la bandeja o en el recipiente Si el peso de la muestra est por debajo del rango del...

Page 31: ...antalla Clr tot pulsar Yes s 3 9 Modo de mantenimiento de los valores mostrados en pantalla Hold Hay dos modos que permiten mantener los valores mostrados en pantalla hold PeakHold Mantener el valor m...

Page 32: ...set Reconfigurar g kg ct oz ozt dwt lb lb oz grn hkt sgt twt t tola tical End Fin End Fin End Fin End Fin Notas nicamente disponible en algunos pa ses y regiones Cuando el interruptor de seguridad se...

Page 33: ...undo 3d Se mostrar el valor cero en pantalla hasta que se supere un cambio de 3 divisiones por segundo Stable Range Rangoestable Stable Configurar la cantidad en la que puede variar la lectura mientra...

Page 34: ...olver a la parte superior del men actual 4 4 Men Mode Modo Este men permite activar los modos para que se hallen disponibles para ser utilizados mediante el bot n Mode Reconfigurar Reset reset Reconfi...

Page 35: ...se modificar Avanzar hacia el men siguiente o volver a la parte superior del men actual End Mode End Salir del men 4 5 Men unidades Este men activa las unidades para resulten accesibles con el bot n U...

Page 36: ...uentra nivelada y apoyada con seguridad y que el bloqueo de transporte ha sido anulado Encienda la balanza y use una cuerda o un alambre para fijar los elementos que deban de ser pesados Gr fico 4 3 A...

Page 37: ...pasa la capacidad del rango establecido Err 8 4 Carga insuficiente sin bandeja de pesaje Err 8 5 Tara fuera de rango Err 8 6 El valor mostrado en pantalla sobrepasa 999999 posible en modo de Totalizac...

Page 38: ...esoras Contacte con OHAUS Nota El Kit Bluetooth se halla nicamente disponible en algunas regiones o pa ses de acuerdo con las normativas aplicables a nivel nacional 6 Datos T cnicos Los datos t cnicos...

Page 39: ...das d gitos Dimensiones de la bandeja 93 mm 3 7 pulgadas 120 mm 4 7 pulgadas 170 x 140 mm 6 7 x 5 5 pulgadas Dimensione de balance W x D x H 202 x 222 x 103 mm 8 x 8 7 x 4 1 in 202 x 224 x 54 mm 8 x 8...

Page 40: ...tooth Host USB Host todos disponibles como accesorio Fabricaci n Carcasa en pl stico ABS con bandeja de acero inoxidable 304 SST Dimensiones de la bandeja 120 mm 4 7 pulgadas 170 x 140 mm 6 7 x 5 5 pu...

Page 41: ...GESTI N DE RESIDUOS En cumplimiento con la Directiva Europea 2002 96 EC sobre la gesti n de residuos de equipos el ctricos y electr nicos Waste Electrical and Electronic Equipment WEEE este dispositi...

Page 42: ...para obtener la ayuda adecuada Aviso de Industry Canada Este aparato digital de la Clase B cumple con la norma canadiense ICES 003 Registro ISO 9001 En 1994 Ohaus Corporation de Estados Unidos recibi...

Page 43: ......

Page 44: ...Ne pas se conformer ces mises en garde peut causer des blessures et ou des d g ts mat riels Conserver toutes les instructions pour future r f rence V rifier que l alimentation lectrique locale corresp...

Page 45: ...our de meilleurs r sultats il est n cessaire d utiliser la balance Scout dans un environnement propre et stable Ne pas utiliser la balance dans des environnements avec des courants d air importants av...

Page 46: ...larit indiqu e dans le logement des piles Note Apr s la mise sous tension il est recommand de laisser le reste chaude pendant au moins 5 minutes avant de l utiliser 2 5 Calibrage initial Lors de la pr...

Page 47: ...ur de tare Fonction secondaire Appui long Z ro D sactiv Met la balance hors tension Unit s Change l unit de pesage Mode Permet de modifier le mode d application Menu Entrer dans le menu utilisateur Fo...

Page 48: ...tenir le bouton On Zero Off jusqu ce que OFF soit affich 3 3 Op ration calibration Lorsque la balance est utilis e pour la premi re fois un talonnage par intervalle est recommand pour garantir des r s...

Page 49: ...uter des pi ces jusqu ce que le d compte d sir soit atteint 8 Pour effacer la m moire de l APW stock e maintenir le bouton Mode enfonc jusqu ce que Count s affiche Appuyer sur OUI lorsque clr pwW s af...

Page 50: ...oids cibles l ic ne inf rieur s allume Si l chantillon est l int rieur de la plage de poids cibles le symbole de validation s allume Si l chantillon est sup rieur la plage de poids cibles l ic ne sup...

Page 51: ...ntenir Mode enfonc jusqu ce que total s affiche Lorsque Clr tot s affiche appuyez sur Oui 3 9 Mode maintenir Il existe deux modes pour maintenir l affichage Maintien du maximum permet l utilisateur de...

Page 52: ...Masse volumique Allum teint Maintenir Affichage Maximum Arr t Disp Peak Off R initialiser g kg ct N oz ozt dwt lb lb oz grn hkt sgt twt t tola tical Fin Fin Fin Fin Remarque Uniquement disponible dan...

Page 53: ...ce qu un changement de 3 divisions par seconde ait t d pass Plage stable Stable R gler de combien la marge d indication peut varier tandis que le symbole de stabilit demeure allum 0 5 d 0 5 division b...

Page 54: ...ec le bouton Mode R initialiser reset R initialiser le menu Mode aux valeurs d usine par d faut NON ne pas r initialiser OUI r initialiser Pes e wWeIGH D finir le statut TEINT d sactiv ALLUM activ Com...

Page 55: ...pas Avancer au menu suivant ou revenir au d but du menu actuel Mode fin End 4 5 Menu unit s Ce menu active des unit s de sorte que celles ci soient accessibles avec le bouton Unit s Les unit s dans l...

Page 56: ...surer que la balance soit de niveau et stable et que le verrou de transport ait t lib r Mettre la balance sous tension puis utiliser une cha ne ou un fil pour attacher les articles peser Figure 4 3 Ap...

Page 57: ...e z ro Err 8 3 En surcharge poids exc de la capacit nominale Err 8 4 En sous charge plateau enlev Err 8 5 Tare hors plage Err 8 6 Valeur affich e d passe 999999 possible dans le mode totalisation Err...

Page 58: ...ontacter OHAUS Remarque Le kit Bluetooth n est disponible qu uniquement dans certaines r gions conform ment la r glementation locale 6 FICHE TECHNIQUE Les donn es techniques sont valides en vertu des...

Page 59: ...93 mm 3 7 pouces 120 mm 4 7 pouces 170 x 140 mm 6 7 x 5 5 pouces Dimensions d balance L x P x H 202 x 222 x 103 mm 8 x 8 7 x 4 1 in 202 x 224 x 54 mm 8 x 8 8 x 2 1 in Dimensions l exp dition 300 x 25...

Page 60: ...cessoire Construction Bo tier en plastique ABS avec un plateau en acier inoxydable 304 SST Dimensions du plateau 120 mm 4 7 pouces 170 x 140 mm 6 7 x 5 5 pouces Dimensions d balance L x P x H 202 x 22...

Page 61: ...te www ohaus com weee AS NZS 61000 6 1 AS NZS 61000 6 3 CAN CSA C22 2 No 61010 1 UL Std No 61010 1 MISE AU REBUT En conformit avec la Directive europ enne 2002 96 CE relative aux d chets d quipements...

Page 62: ...9001 En 1994 Ohaus Corporation tats Unis a re u la certification ISO 9001 du Bureau Veritas Quality International BVQI qui confirme que le syst me de gestion de la qualit de Ohaus est conforme aux sp...

Page 63: ......

Page 64: ...en Nichtbeachtung dieser Hinweise kann zu Verletzungen und oder Sachsch den f hren Bewahren Sie alle Anleitung zum sp teren Nachschlagen auf berpr fen Sie ob die lokale Netzspannung innerhalb der Band...

Page 65: ...latz ausw hlen F r eine optimale Leistung sollte die Scout Waage in einer sauberen stabilen Umgebung verwendet werden Verwenden Sie die Waage nicht in Umgebungen mit berm iger Zugluft mit starken Temp...

Page 66: ...eis Nach dem Einschalten wird empfohlen vor der Verwendung des Bilanz warm f r mindestens 5 Minuten zu lassen 2 5 Anf ngliche Kalibrierung Wenn die Waage zum ersten Mal installiert oder an eine andere...

Page 67: ...und rfunktion Lange dr cken Zero Aus Schaltet die Waage aus Einheiten ndert die Wiegeeinheit Modus Erm glicht die nderung des Anwendungsmo dus Men Geht ins Benutzerme n Men funktion Kurz dr cken Ja Ak...

Page 68: ...Taste bis AUS angezeigt wird 3 3 Kalibriervorgang Wenn die Waage zum ersten Mal bet tigt wird wird eine umfassende Kalibrierung empfohlen um genaue Wiegeergebnisse zu gew hrleisten Vor der Durchf hru...

Page 69: ...us tzliche St cke hinzu bis die gew nschte Anzahl erreicht ist 8 Zum L schen des gespeicherten APW dr cken und halten Sie Modus bis Count angezeigt wird Dr cken Sie auf Ja wenn Clr pwW angezeigt wird...

Page 70: ...er Wenn das Gewicht der Probe unter dem Zielgewichtsbereich ist leuchtet das Symbol Unter auf Wenn die Probe innerhalb des Zielgewichtsbereichs ist wird das Symbol Akzeptiert aufleuchten Wenn die Prob...

Page 71: ...um L schen der gespeicherten Summe dr cken und halten Sie Modus bis total angezeigt wird Wenn Clr tot angezeigt wird dr cken Sie auf Ja 3 9 Hold Modus F r Anzeige Halten gibt es zwei Modi Peak Hold er...

Page 72: ...ozt dwt lb lb oz grn hkt sgt twt t Tola Tikal Ende Ende Ende Ende Hinweise Nur in bestimmten Regionen verf gbar Wenn der Sicherheitsschalter in Sperrstellung ist wird die Kalibrierungsfunktion ausgeb...

Page 73: ...alten bis eine nderung von 3 Divisionen pro Sekunde berschritten wurde Stabiler Bereich Stable Stellen Sie den Betrag ein den der Messwert variieren darf 0 5d 0 5 Waagen Strichteilung 1d 1 Waagen Stri...

Page 74: ...ksetzen reset Setzen Sie das Men Modus auf die Werkseinstellung zur ck NEIN Nicht zur cksetzen JA Zur cksetzen Wiegen wWeIGH Legen Sie den Status fest AUS deaktiviert EIN aktiviert Z hlen Count Legen...

Page 75: ...sich nicht ver ndern Weiter zum n chsten Men oder zur ck zum Anfang des aktuellen Men s Beenden des Modus End 4 5 Einheiten Men Dieses Men aktiviert Einheiten so dass sie mit der Taste Einheiten zug n...

Page 76: ...d sicher steht und dass die Transportsicherung freigegeben wurde Schalten Sie die Waage ein dann verwenden Sie eine Schnur oder einen Draht um die Gegenst nde zu befestigen die gewogen werden sollen A...

Page 77: ...dem Nullbereich Err 8 2 Gewicht unterschreitet die Leistung auf dem Nullbereich Err 8 3 berlast Gewicht bersteigt die Nennkapazit t Err 8 4 Unterlast Waagschale entfernt Err 8 5 Tara au erhalb des Be...

Page 78: ...l Kontakt OHAUS Hinweis Bluetooth Kit ist nur in bestimmten Regionen und gem der rtlichen Bestimmungen verf gbar 6 TECHNISCHE DATEN Die technischen Daten gelten unter den folgenden Umgebungsbedingunge...

Page 79: ...splaygr e 20 mm 0 78 Zoll Ziffern Anwendungsmodi Wiegen Z hlen Prozent Kontrollwiegen Summieren Display Hold Akkubetriebszeit bei 20 C 80 Stunden 120 Stunden 80 Stunden Spezifizierter Temperaturbereic...

Page 80: ...kits variieren abh ngig von rtlichen Vorschriften Bluetooth Installationssatz ist in bestimmten Regionen nach den rtlichen Vorschriften nur zur Verf gung Kapazit t x Lesbarkeit Modell SPX123 SPX223 SP...

Page 81: ...ung auf dem Produkt angezeigt Kennzeichnung Standard EN 61010 1 EN 61326 1 Die Konformit tserkl rung finden Sie im Internet unter www ohaus com ce Dieses Produkt entspricht der EU Richtlinie 2002 96 E...

Page 82: ...renzen gew hrleisten Dieses Ger t erzeugt und verwendet Hochfrequenzenergie und wenn es nicht in bereinstimmung mit den Anweisungen installiert und verwendet wird kann es St rungen des Funkverkehrs ve...

Page 83: ...oder radioaktiven oder zersetzenden Stoffen ausgesetzt wurde Fremdstoffe ins Innere des Produktes eingedrungen sind oder wenn der Defekt aus einer nicht von Ohaus durchgef hrten Modifikation oder Serv...

Page 84: ...di questi avvertimenti potrebbe causare lesioni personali e o danneggiamenti ai beni Tenere tutte le istruzioni per futuri riferimenti Controllare che l alimentazione elettrica CA locale sia entro la...

Page 85: ...bloccaggio 2 2 Selezionare la Posizione Per un miglior rendimento la bilancia Scout deve essere utilizzata in un pulito e stabile ambiente Non utilizzare la bilancia in ambienti con eccessive correnti...

Page 86: ...o l accensione si consiglia di lasciare che il caldo bilancia per almeno 5 minuti prima di utilizzarlo 2 5 Calibrazione iniziale Quando la bilancia installata per la prima volta e quando spostata in u...

Page 87: ...Spento Spegne la bilancia Unit Cambia l unit di pesata Modo Consente di cambiare il modo d applicazione Men Invia il menu Utente Funzione Men Premuta Breve Si Accetta l impostazione attuale sul displa...

Page 88: ...nere il pulsante Acceso Zero Spento finch viene visualizzato SPENTO 3 3 Funzionamento Calibrazione Quando la bilancia utilizzata per la prima volta si raccomanda una calibrazione del campo per assicur...

Page 89: ...i pezzi 7 Aggiungere pezzi supplementari finch il desiderato conteggio sia raggiunto 8 Per cancellare la memorizzata APW premere e trattenere Modo finch Count Conteggiare sia visualizzato Premere Si q...

Page 90: ...o campione dovesse essere sotto la gamma del peso bersaglio l icona qui di seguito si accender Se il campione dovesse essere entro la gamma del peso bersaglio il simbolo accetta si accender Se il camp...

Page 91: ...nere Modo finch total sia visualizzato Quando Clr tot visualizzato premere Si 3 9 Modo di trattenere Esistono due modi per trattenere il display Trattenere il Picco consente all utente di catturare e...

Page 92: ...Acceso Spento Controllare Acceso Spento Totalizzare Acceso Spento Trattenere Disp Picco Spento Reimpostare g kg ct N oz ozt dwt lb lb oz grn hkt sgt twt t tola tical Fine Fine Fine Fine Nota Disponib...

Page 93: ...ro finch un cambiamento di 3 0 divisioni per secondo sia stato ecceduto Gamma Stabile Stable Impostare la quantit di lettura che pu variare mentre il simbolo di stabilit rimane acceso 0 5d 0 5 divisio...

Page 94: ...l pulsante Modo Reimpostare reset Reimpostare il men di Modo alle impostazioni di fabbrica NO non reimpostare SI reimpostare Peso wWEIGH Impostare lo stato SPENTO disabilitato ACCESO abilitato Contegg...

Page 95: ...to non cambier Avanzare al men successivo o ritornare in cima all attuale men Fine del Modo End 4 5 Men di Unit Questo men attiva unit in modo che saranno accessibili con il pulsante Unit Le unit nel...

Page 96: ...o metodo conveniente Assicurarsi che la bilancia sia a livello e fissa e che il blocco trasporto sia stato liberato Collegare l alimentazione elettrica alla bilancia e quindi utilizzare uno spago o un...

Page 97: ...raccarico peso eccede capacit nominale Err 8 4 Sottocarico piatto di pesata della bilancia rimosso Err 8 5 Tara fuori portata Err 8 6 Il valore visualizzato eccede 999999 possibile nel modo Totalizzaz...

Page 98: ...la OHAUS Nota Il kit Bluetooth solamente disponibile in certe regioni secondo i Regolamenti locali 6 DATI TECNICI I dati tecnici sono validi sotto le seguenti condizioni ambientali Per l Interno util...

Page 99: ...ioni Piatto do Pesata della Bilancia 93 mm 3 7 inch 120 mm 4 7 inch 170 x 140 mm 6 7 x 5 5 inch Dimensioni Bilance W x D x H 202 x 222 x 103 mm 8 x 8 7 x 4 1 in 202 x 224 x 54 mm 8 x 8 8 x 2 1 in Dime...

Page 100: ...ssorio Costruzione ABS sede in plastica con 304 piatto di peseta della bilancia SST in acciaio inossidabile Dimensioni Piatto do Pesata della Bilancia 120 mm 4 7 inch 170 x 140 mm 6 7 x 5 5 inch Dimen...

Page 101: ...61000 6 3 CAN CSA C22 2 No 61010 1 UL Norma No 61010 1 SMALTIMENTO In conformit alla Direttiva Europea 2002 96 CE sui rifiuti di apparecchi elettrici ed elettronici RAEE WEEE il presente dispositivo n...

Page 102: ...Nel 1994 la Ohaus Corporation Stati Uniti ha ricevuto il certificato di registrazione ISO 9001 dal Bureau Veritus Quality International BVQI a conferma che il sistema di gestione della qualit di Ohaus...

Page 103: ......

Page 104: ......

Page 105: ...dedor del mundo Avec des bureaux dans le monde entier Weltweite Gesh ftsstellen Con uffici in tutto il mondo www ohaus com 30268991 P N 30268991 B 2016 OHAUS Corporation all rights reserved todos los...

Reviews: