background image

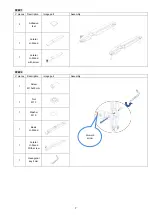
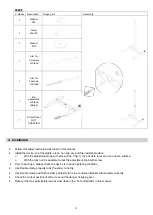
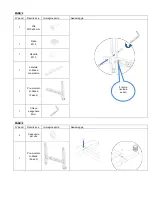
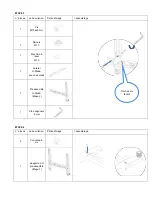
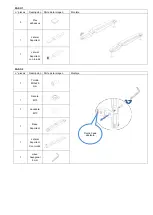
STEP 3 

n° pieces  Description 

Image part 

Assembly 

Screw 

M10x25 mm 

Nut 

M10 

Washer 

M10 

Lateral 

H-Stand
with feet 

Pre-

assembled 

H-Stand

(Step 2) 

Hexagonal 

key 8mm 

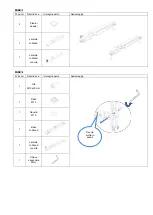
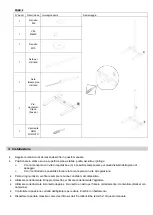
STEP 4 

n° pieces  Description 

Image part 

Assembly 

Screw cover 

Pre-

assembled 

H-Stand

(Step 3) 

Forward 

arrow 

Summary of Contents for 30586771

Page 1: ...one Guide d installation Guía de instalación Installationsanleitung UNIVERSAL H STAND 30586771 TELESCOPIC H STAND 30586772 5 Commonwealth Ave Woburn MA 01801 Phone 781 665 1400 Toll Free 1 800 517 8431 Visit us at www TestEquipmentDepot com ...

Page 2: ...ut Machinery directive Direttiva Macchine Directive Machines Directiva de Máquinas Maschinenricttlinie 2006 42 CE Safety Machinery Sicurezza del macchinario Sécurité des machines Seguridad de maquinaria Maschinensicherheit EN ISO 12100 OHAUS reserves the right to modify the characteristics of its products with the aim to constantly improve their quality Nell impegno di migliorare costantemente la ...

Page 3: ...ujeto al soporte con la abrazadera y que el vaso con la muestra esté seguro La vibración generada durante el uso general puede causar aflojamiento Überprüfen Sie vor dem ersten Gebrauch und überprüfen Sie regelmäßig ob das Instrument mit der Klemme sicher am Ständer befestigt ist und ob das Becherglas mit der Probe sicher ist Während des allgemeinen Gebrauchs erzeugte Vibrationen können zu einer L...

Page 4: ...bre mobile du support doit être tenu et fixé avec l autre main pour éviter qu il ne bouge de manière inattendue Preste atención cuando el mango de bloqueo de altura esté desenroscado el eje móvil del soporte debe sujetarse y asegurarse con la otra mano para evitar que se mueva inesperadamente Achten Sie darauf wenn der Höhenverriegelungsgriff abgeschraubt ist Die mobile Welle des Ständers muss mit...

Page 5: ...GARANZIA 15 1 INTRODUCTION 16 2 ASSEMBLÉE 16 3 INSTALLATION 19 4 ENTRETIEN 20 5 DONNÉES TECHNIQUES 20 6 GARANTIE 20 1 INTRODUCCIÓN 21 2 ASAMBLEA 21 3 INSTALACIÓN 24 4 MANTENIMIENTO 25 5 DATOS TÉCNICOS 25 6 GARANTÍA 25 1 EINLEITUNG 26 2 MONTAGE 26 3 INSTALLATION 29 4 WARTUNG 30 5 TECHNISCHE DATEN 30 6 GARANTIE 30 7 DECLARATION OF CONFORMITY DICHIARAZIONE DI CONFORMITA DECLARATION DE CONFORMITE DECL...

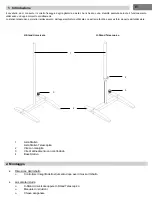
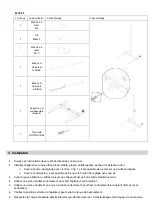
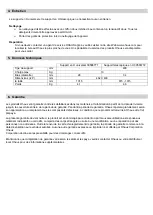
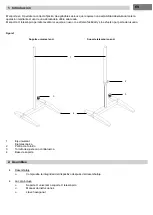
Page 6: ...ifting of equipment in use with extreme ease and without effort by the user Fig 1 Universal H Stand Telescopic H Stand 1 Universal Shaft Telescopic Shaft 2 Knob with screw 3 Adjusting screw with counter nut 4 Stand base 2 Assembly Unpacking Check the integrity of device after the unpacking The box include Universal H Stand or Telescopic H Stand Instruction manual Hexagonal key EN 1 2 4 3 3 ...

Page 7: ...t Assembly 3 Adhesive feet 1 Lateral H Stand 1 Lateral H Stand with screw STEP 2 n pieces Description Image part Assembly 1 Screw M10x25 mm 1 Nut M10 1 Washer M10 1 Basis H Stand 1 Lateral H Stand With screw 1 Hexagonal key 8mm Forward arrow ...

Page 8: ...art Assembly 1 Screw M10x25 mm 1 Nut M10 1 Washer M10 1 Lateral H Stand with feet 1 Pre assembled H Stand Step 2 1 Hexagonal key 8mm STEP 4 n pieces Description Image part Assembly 2 Screw cover 1 Pre assembled H Stand Step 3 Forward arrow ...

Page 9: ...surface With the adjustment knob with screw Pos 3 fig 1 it is possible to level on an uneven surface With the lock nut it is possible to lock the adjustment knob with screw Prior to each use always check the device is in good operating condition Use Double clamp properly to fix the stirrer correctly Use Double clamp and Ribbon clamp properly to fix the container Beaker with sample correctly Check ...

Page 10: ...ials and workmanship from the date of delivery through the duration of the warranty period During the warranty period OHAUS will repair or at its option replace any component s that proves to be defective at no charge provided that the product is returned freight prepaid to OHAUS This warranty does not apply if the product has been damaged by accident or misuse exposed to radioactive or corrosive ...

Page 11: ...ecchiatura utilizzata con estrema facilità e senza sforzi da parte dell utilizzatore H Stand Universale H Stand Telescopico 1 Asta Stativo Asta Stativo Telescopica 2 Vite con maniglia 3 Vite di allineamento con controdado 4 Base Stativo 2 Montaggio Rimozione dall imballo Controllare l integrità dello strumento dopo aver rimosso l imballo La scatola include H Stand Universale oppure H Stand Telesco...

Page 12: ...o 3 Piedini adesivi 1 Laterale H Stand 1 Laterale H Stand con vite FASE 2 N pezzi Descrizione Immagine parte Assiemaggio 1 Vite M10x25 mm 1 Dado M10 1 Ranella M10 1 Base H Stand 1 Laterale H Stand con vite 1 Chiave esagonale 8mm Freccia rivolta in avanti ...

Page 13: ... 1 Vite M10x25 mm 1 Dado M10 1 Ranella M10 1 Laterale H Stand con piedino 1 Pre montato H Stand Fase 2 1 Chiave esagonale 8mm FASE 4 N pezzi Descrizione Immagine parte Assiemaggio 2 Cappuccio per vite 1 Pre montato H Stand Fase 3 Freccia rivolta in avanti ...

Page 14: ...le compensare eventuali dislivelli della piano di appoggio Con il controdado è possibile bloccare la la manopola con vite di regolazione Prima di ogni utilizzo verificare sempre le buone condizioni del dispositivo Utilizzare correttamente il doppio morsetto per fissare correttamente l agitatore Utilizzare correttamente il morsetto doppio e il morsetto a nastro per fissare correttamente il contenit...

Page 15: ...vorazione dalla data di consegna fino alla durata del periodo di garanzia Durante il periodo di garanzia Ohaus riparerà o a sua discrezione sostituirà gratuitamente qualsiasi componente che si dimostra difettoso a condizione che il prodotto venga restituito franco carico prepagato a Ohaus La presente garanzia non si applica se il prodotto è stato danneggiato da un incidente o da uso improprio espo...

Page 16: ...équipement utilisé avec une extrême facilité et sans effort de l utilisateur Fig 1 Support en H universel Support télescopique en H 1 Arbre universel Arbre télescopique 2 Bouton avec vis 3 Vis de réglage avec contre écrou 4 Base de support 2 Assemblée Déballage Vérifiez l intégrité de l appareil après le déballage La boîte comprend Support en H universel ou support en H télescopique Manuel d instr...

Page 17: ...ge 3 Pieds adhésifs 1 Latéral H Stand 1 Latéral H Stand avec vis ÉTAPE 2 n pièces La description Partie d image l assemblage 1 Vis M10x25 mm 1 Rainure M10 1 Machine à laver M10 1 Base H Stand 1 Latéral H Stand Avec vis 1 Clé exagonale 8 mm Flèche vers l avant ...

Page 18: ...s M10x25 mm 1 Rainure M10 1 Machine à laver M10 1 Latéral H Stand avec des pieds 1 Pré assemblé H Stand Étape 2 1 Clé exagonale 8 mm ÉTAPE 4 n pièces La description Partie d image l assemblage 2 Couvercle à vis 1 Support en H pré assemblé Étape 3 Flèche vers l avant ...

Page 19: ... avec vis Pos 3 fig 1 il est possible de niveler sur une surface inégale Avec le contre écrou il est possible de bloquer le bouton de réglage avec une vis Avant chaque utilisation vérifiez toujours que l appareil est en bon état de fonctionnement Utilisez une pince double correctement pour fixer l agitateur correctement Utilisez une pince double et une pince à ruban correctement pour fixer correct...

Page 20: ...llances dans les matériels et la fabrication à partir de la date de livraison jusqu à la couverture entière de la période de garantie Pendant la période de garantie Ohaus réparera gratuitement selon son appréciation ou remplacera tous les composants défectueux à condition que le produit soit retourné à Ohaus et le fret prépayé La présente garantie devient nulle si le produit est endommagé par acci...

Page 21: ...uipo en uso con extrema facilidad y sin esfuerzo por parte del usuario Figura 1 Soporte universal en H Soporte telescópico en H 1 Eje universal Eje telescópico 2 Perilla con tornillo 3 Tornillo de ajuste con contratuerca 4 Base de soporte 2 Asamblea Desembalaje Compruebe la integridad del dispositivo después del desembalaje La caja incluye Soporte H universal o soporte H telescópico Manual de inst...

Page 22: ... adhesivos 1 Lateral Soporte H 1 Lateral Soporte H con tornillo PASO 2 n piezas Descripción Parte de la imagen Montaje 1 Tornillo M10x25 mm 1 Ranura M10 1 Lavadora M10 1 Base Soporte H 1 Lateral Soporte H Con tornillo 1 Llave hexagonal 8 mm Flecha hacia adelante ...

Page 23: ...rnillo M10x25 mm 1 Ranura M10 1 Lavadora M10 1 Lateral Soporte H con pies 1 Pre ensamblado Soporte H Paso 2 1 Llave hexagonal 8 mm PASO 4 n piezas Descripción Parte de la imagen Montaje 2 Cubierta de tornillo 1 Soporte H premontado Paso 3 Flecha hacia adelante ...

Page 24: ... ajuste con tornillo Pos 3 fig 1 es posible nivelar sobre una superficie irregular Con la contratuerca es posible bloquear la perilla de ajuste con un tornillo Antes de cada uso verifique siempre que el dispositivo esté en buenas condiciones de funcionamiento Utilice la abrazadera doble correctamente para fijar el agitador correctamente Utilice la abrazadera doble y la abrazadera de cinta correcta...

Page 25: ...eriales y mano de obra desde la fecha de entrega y hasta que termine el período de garantía Durante el período de garantía Ohaus reparará o si procede reemplazará sin coste alguno cualquier componente o componentes que resulten ser defectuosos siempre y cuando se devuelva el producto a Ohaus con los gastos de envío pagados por adelantado Esta garantía no se aplica si el producto ha sido dañado por...

Page 26: ...on Geräten im Einsatz mit extremer Leichtigkeit und ohne Anstrengung des Benutzers Abb 1 Universeller H Ständer Teleskop H Ständer 1 Universalwelle Teleskopwelle 2 Knopf mit Schraube 3 Einstellschraube mit Gegenmutter 4 Standfuß 2 Montage Auspacken Überprüfen Sie die Integrität des Geräts nach dem Auspacken Die Box enthält Universeller H Ständer oder Teleskop H Ständer Bedienungsanleitung Sechskan...

Page 27: ...Klebende Füße 1 Seitlich H Stand 1 Seitlich H Stand mit Schraube SCHRITT 2 Nr Stücke Beschreibung Bildteil Versammlung 1 Schraube M10x25 mm 1 Nut M10 1 Unterlegscheibe M10 1 Basis H Stand 1 Seitlich H Stand Mit Schraube 1 Exagonalschlüssel 8mm Vorwärtspfeil ...

Page 28: ...chraube M10x25 mm 1 Nut M10 1 Unterlegscheibe M10 1 Seitlich H Stand mit Füßen 1 Vormontiert H Stand Schritt 2 1 Exagonalschlüssel 8mm SCHRITT 4 Nr Stücke Beschreibung Bildteil Versammlung 2 Schraubenabdeckung 1 Vormontierter H Ständer Schritt 3 Vorwärtspfeil ...

Page 29: ...ellknopf mit Schraube Pos 3 Abb 1 ist es möglich auf unebenem Untergrund zu nivellieren Mit der Kontermutter kann der Einstellknopf mit einer Schraube arretiert werden Überprüfen Sie vor jedem Gebrauch ob sich das Gerät in einem guten Betriebszustand befindet Verwenden Sie die Doppelklemme richtig um den Rührer richtig zu befestigen Verwenden Sie die Doppelklemme und die Farbbandklemme ordnungsgem...

Page 30: ... Material und Verarbeitungsfehler ab dem Zeitpunkt der Lieferung für die Dauer der Garantiezeit Während der Garantiezeit repariert Ohaus alle Komponenten die sich als defekt erweisen oder ersetzt diese kostenlos sofern das Produkt frachtfrei an Ohaus zurückgesandt wird Diese Garantie gilt nicht wenn das Produkt durch einen Unfall oder unsachgemäßen Gebrauch beschädigt wurde radioaktiven oder korro...

Page 31: ...it est conforme aux normes suivantes Nosotros casa fabricante Corporación OHAUS declaramos bajo nuestra responsabilidad que el producto es conforme con las siguientes normas Der Hersteller OHAUS Corporation erklärt unter eigener Verantwortung dass das Gerät mit folgenden Normen übereinstimmt EN ISO 12100 Safety of machinery and satisfies the essential requirements of the following directives e sod...

Page 32: ...Test Equipment Depot 800 517 8431 5 Commonwealth Ave MA 01801 TestEquipmentDepot com ...

Reviews: