IMPORTANT ! KEEP FOR FUTURE REFERENCE
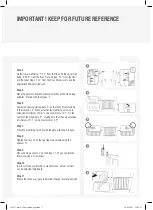
Step 4
Fix the lower wall fixing ‘F’ 3,7‘‘ from the floor. Fix the upper wall
fixing ‘E’ 32,8‘‘ from the floor. Fix one hinge ‘I’ 3‘‘ from the floor
and the other hinge ‘I’ 31‘‘ from the floor. Make sure to use the
appropriate fixings for the wall.
Step 5
Place the gate into position, making sure that both of the hinge
spindles ‘D’ align with the hinges ‘I’.
Step 6
Adjust the opening side spindle ‘C’ so that they fit comfortably
in the wallcups ‘E’. Make sure that the wall fixing screws are
extended a minimum of 0,8‘‘ and a maximum of 2,1‘‘. Do the
same for the hinge-bars ‘D’, making sure that they are extended
a minimum of 1,1‘‘ and a maximum of 2,5‘‘.
Step 7
Press the wall fixing catch and lift the gate, allowing it to open.
Step 8
Tighten the nuts ‘G’ on the opening side spindle using the
spanner ‘H’.
Step 9
Place the hinge covers ‘J’ on the hinges ‘I’. These can later be
removed using a screwdriver.
Step 10
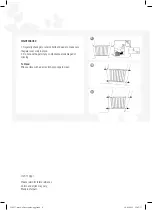
To allow for uneven flooring or wall surfaces, all four corners
can be adjusted individually.
Step 11
Ensure that once your gate is installed it hangs level and upright.
8
7
4
2
1
1
I
E
F
5
6
1
H
110217-maya-a5-userguide-oggi.indd 3
18.02.2011 15:43:17


