background image

25

Graphic LCD display

1.0

4

Description and design 

of the main display

4.1

All important data of controller operation are shown on the graphic LCD display.

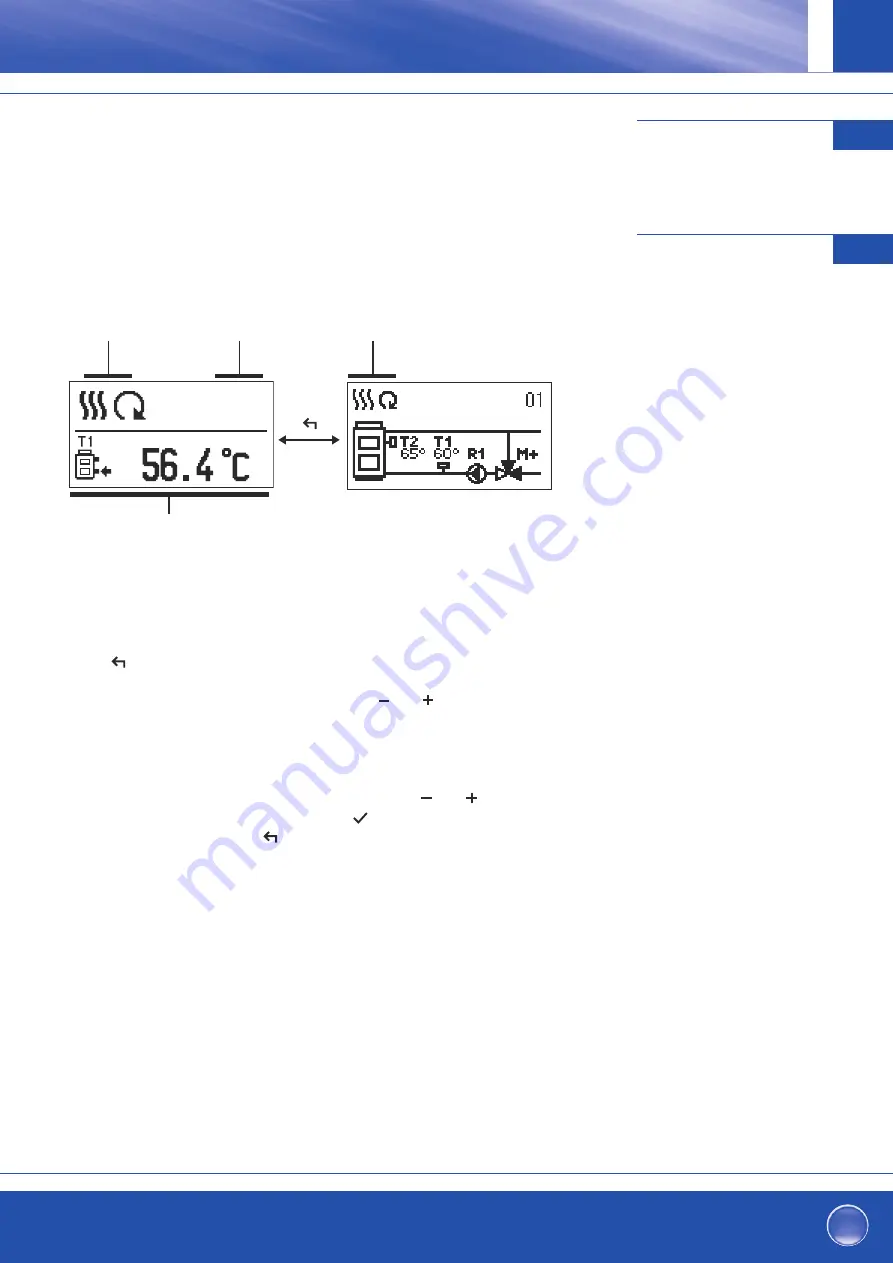
Display of information on the screen:
The controller mode, notifications and warnings are displayed in the upper third of the
display. For switching between basic display and display of the hydraulic scheme use the
button        .

To check the temperature and other data, use buttons        and        . The number of sensors
and other data, which can be listed on the display, depends on the selected hydraulic
scheme and controller settings.

Note: If you would like to have a specific data display to appear after you stop using

the keyboard then select the desired data with buttons        and        . Confirm
the selected screen by pressing the button        for 2 seconds.

Note: When you press the button        for 2 seconds, then the display of the temperature

will change from one to two rows and vice versa. On the two line
temperature display, the measured temperature is displayed in the first row
and the required or calculated temperatire in the second row.

Controller mode.

Controller mode.

Temperature, protection functions and 
overview of other data.

Notifications
and warnings.

Constant temperature controller

GB

Summary of Contents for 212000017

Page 1: ...nt temperature controller Installation and operating instructions GB R gulateur valeur constante Notice de montage et d utilisation FR Regolatore di temperatura costante Istruzioni per il montaggio e...

Page 2: ...ameters and auxiliary tools Service parameters Factory settings Operation mode by sensor Failure Controller installation Controller s electric connection Technical data Disposal of old electrical elec...

Page 3: ...for manual operation 3 Button Return back 4 Button Move to left decreasing 5 Button Menu entry confirmation of selection 6 Button Move to right increasing 7 Button Help 8 LED indication valve rotation...

Page 4: ...p 2 Hydraulic scheme selection 3 2 Next you select a hydraulic scheme for the control ler function Move between schemes by means of buttons and Confirm the selected scheme by pressing the button After...

Page 5: ...ends on the selected hydraulic scheme and controller settings Note If you would like to have a specific data display to appear after you stop using the keyboard then select the desired data with butto...

Page 6: ...1 T2 Symbol Description Notifications In case of exceeding the maximum temperature or activation of protection function the controller indicates the event with flashing symbol on the display If the ma...

Page 7: ...move through the list of warnings Press to exit the list Delete warning and notification logs By pressing the button will erase notification and warning log All sensors that are not connected will be...

Page 8: ...TERS SERVICE PARAMETERS FACTORY SETTINGS Diagrams of measured temperatures by days for last week Diagrams of measured temperatures for current day Output operation time counter Special service data Ba...

Page 9: ...ons and you choose the required temperature and a new window opens Set the set point temperature with buttons and confirm with button Exit the settings by pressing the button Temperature settings 8 1...

Page 10: ...it the setup menu with the button You set the exact time and date in the following manner By pressing buttons and move among individual data By pressing button you select data that you want to change...

Page 11: ...screen illumination and autoexit from menu to the main screen current setting value Graphic symbol current setting value graphic current setting value numeric value The last confirmed value of settin...

Page 12: ...oller parameters and auxiliary tools 12 1 32 All additional settings and adjustments of controller performance are carried out by means of parameters User Service and parameters are found on the secon...

Page 13: ...rol ler carries out the automatic changeover between summer and winter time 0 NO 1 YES 1 TONES By setting this field you define sound signals of the controller 0 OFF 1 KEYPAD 2 ERRORS 3 KEYPAD AND ERR...

Page 14: ...When you select the required para meter group in the menu a new screen opens Parameter mark Parameter value Parameter description Setting range Default value Hydraulic scheme By pressing buttons and y...

Page 15: ...NG THE SERVICE SETTINGS This setting enables the change of code which is necessary to unlock the service settings WARNING Keep new code on a safe place Without this code is impossible to change servic...

Page 16: ...sition correction intensity Smaller value means shorter movements higher value means longer movements 0 5 2 0 1 BACKLASH OF MIXING VALVE Setting of mixing valve running time to compensate the backlash...

Page 17: ...e is moved to its control range and immediate con troller respond at startup of system 0 30 seconds 15 Parameters for heat source Para Function Parameter description Setting Default meter range value...

Page 18: ...SYSTEM TEMPERATURE IN COOLING MODE Setting of minimal temperature at which the controller fully closes the valve 10 30 C 15 MAX SYSTEM TEMPERATURE IN COOLING MODE Setting of maximal temperature at wh...

Page 19: ...to base exclusively on customer design and calculations and needs to be in compliance with valid rules and regulations Pictures diagrams and text in this manual are intended solely as an example and...

Page 20: ...w x h x d 102 x 84 x 94 mm Weight 800 g Housing PC thermoplastic Power supply 230 V 50 Hz Consumption 0 5 VA Degree of protection IP42 acc to EN 60529 Safety class I acc to EN 60730 1 Permissible ambi...

Page 21: ...ction of your old appliance will help prevent potential negative consequences for the environment and human health It is a precondition for reuse and recycling of used electrical and elec tronic equip...

Page 22: ...ostenfreie Bestell und Service Hotline Fon 0800 6 343662 Fax 0800 6 343292 Free service number Phone 00800 63436624 Fax 00800 63432924 N gratuits T l 0800 919109 Fax 0800 915408 Gratis servicenummers...

Reviews: