background image

ODYS  Slim TV 700-R 

20 

EN 

7.3 

Advanced DVB-T Functions  

TV/RAD Button (TV/Radio) 

Press the 

TV/RAD

 button to toggle between DVB-T TV and DVB-T radio.   


Please note 

DVB-T radio is only available in very few areas. 

EPG Button (Electronic Program Guide) 

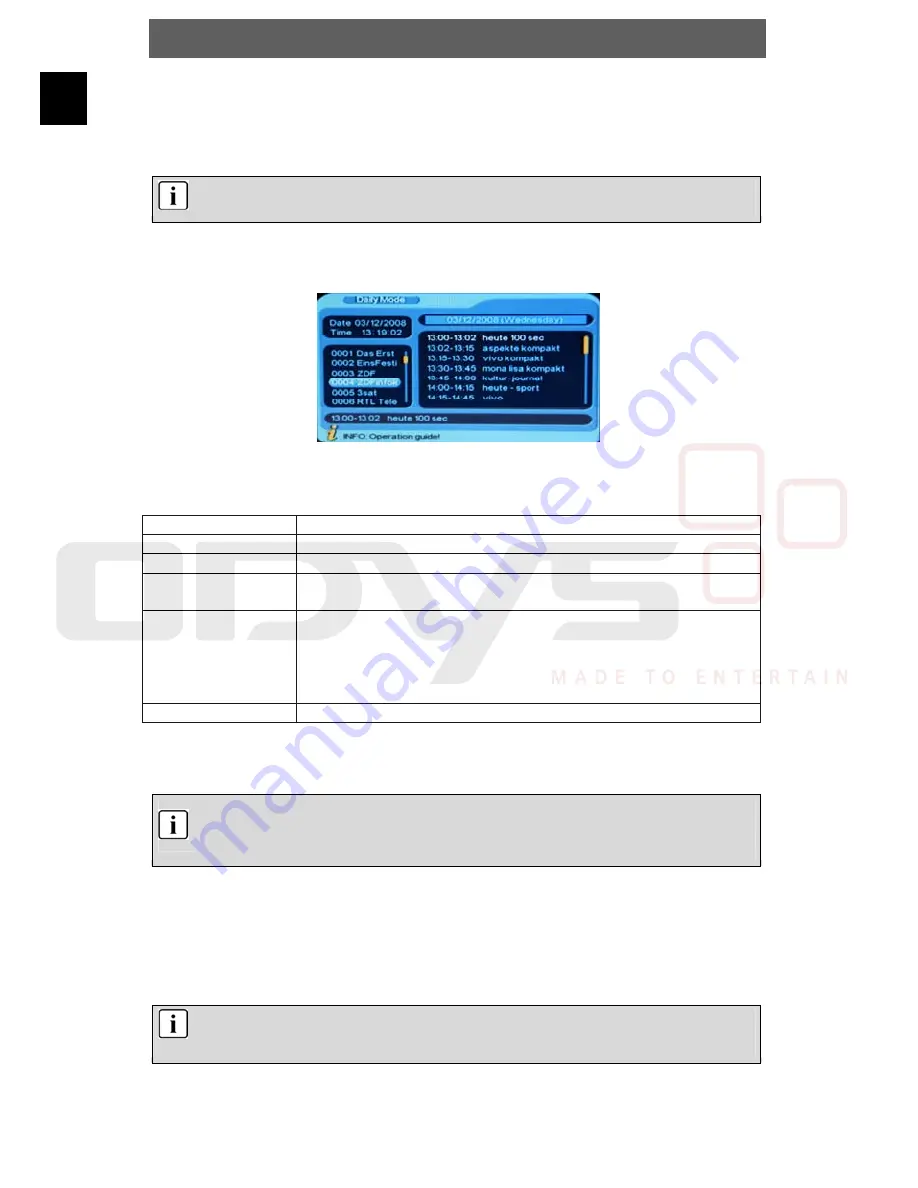
Press the EPG button to access the following menu: 


Press 

/

/

/

 to select stations and programs for EPG display. 

EPG Button Configuration 

Button Function 

/

/

/


Select stations and programs. 

ZOOM (Red) 

EPG display “daily“. 

REPEAT (Yellow) 

Access detail information for a selected program. 
Press navigation buttons to select a program. 

ANGLE (Blue) 

Access timer setup. 
The timer allows you to program the unit to automatically 
access the station at program start. In this way also time-
controlled recordings are possible. 
See chapter 12.2.3 

A-B (Green) 

EPG display ”weekly“. 

SUB Button (Subtitle) 

Press the SUB button to display subtitle information of a program.  


Please note 

This function is only available if the corresponding information is broadcast; commonly 
this is not the case. 

Audio Button 

Press the AUDIO button to select the audio language of the program. Press 

/

 to 

select the soundtrack, if available. Press 

/

to select between stereo, left or right 

audio channel. 


Please note 

This function is only available if the corresponding information is broadcast; commonly 
this is not the case. 

Summary of Contents for TV 700-R

Page 1: ... 6 2 Charge Battery 18 7 DVB T Functions 19 7 1 TV Channel Selection 19 7 2 Program List 19 7 3 Advanced DVB T Functions 20 7 4 Media Playback in DVB T Mode 22 8 Analog TV Functions 25 8 1 TV Program Selection 25 9 Games 26 10 CD DVD Mode 27 10 1 Compatible Disc Formats 27 10 2 Handling of Discs 27 10 3 Startup in DVD Mode 28 10 4 Media Playback in DVD Mode 32 11 Recording Functions 37 11 1 Record...

Page 2: ...ngaged visible laser radiation can escape Avoid looking into the laser beam by all means Caution The product contains a low power laser device In order to ensure the safety of the laser device do not remove any cover and attempt to repair the unit If any service is needed please contact the distributor or its authorized service center To reduce the risk of electric shock do not remove the cover or...

Page 3: ...ion as this may restrict the air from properly circulating around the device The device may not be excessively heated or operated near heat sources e g heaters Malfunctions damage smoke and fires can occur as a result Connect the device only to mains sockets that are properly earthed protective earth The mains voltage must correspond to the operating voltage of the device indicated on the device h...

Page 4: ... around the steering wheel the pedals or any passenger s feet Tie the cables together If operating the device inside a vehicle do not set the volume level too high so that you are still able to hear sounds occurring on the inside and outside of your vehicle Otherwise accidents can occur Note DVD players and discs are coded by region Your DVD player will only play back discs whose region code match...

Page 5: ...ayback Functions Several playback speeds Fast Forward Rewind Time Search supports several audio languages and repeat functions several display formats and camera angles zoom in zoom out multilingual subtitles Save last stop position and resume next playback only if disc drive stays closed Parental lock lock certain scenes or complete discs Record DVB T programs Convert Audio CDs to MP3 files Suppo...

Page 6: ... mode DTV if necessary 2 Press to select menu item Digital TV 3 Press the OK button to access the menu 4 Press to select menu item Installation 5 Press to select the desired search procedure 6 We recommend selecting the option Country scan 7 Press the OK button to start station search 8 Press Exit to exit the menu and return to the previous level Please note If and how many station are received de...

Page 7: ...U button three times in case the menu has closed in the meantime The unit is configured for use in Germany In this case points 4 and 5 can be skipped 5 Press to select the option and press to change the value C System France SECAM Rest of Europe PAL S System France L UK I Germany B G 6 PRESET press the MENU button four times Press the MENU button again to access the search and station settings Pre...

Page 8: ...dy made during DVB T initial installation 1 For DVB T mode settings switch to DVB T mode 2 Now press the Setup button 3 Select Digital TV and Configuration Press the OK button to confirm each selection 4 Press the OK button again to access the menu item OSD 5 Select the menu item OSD Language and press to access the country list 6 Mark English to select English as the menu language in the DVB T me...

Page 9: ...ontrol 2 x AAA Batteries for Remote Control 1 x User Manual 1 x Mains Power Adapter 1x Antenna 1 x Audio Video Cable Carry Bag All pictures are figurative Please note Accessories and respective part numbers can change due to technical improvement without prior notice ...

Page 10: ...rt playback or Pause 7 OPEN disc drive 8 OK button Confirm selected menu item DVB T short press Stations list DVB T long press Start recording 9 Return button Return to previous menu level 10 Navigation buttons Select menu items Skip to next or previous DVB T station 11 Setup button Access DVD setup menu in DVD mode or Access DVB T setup menu in DVB T mode 12 Menu button Access system menu Please ...

Page 11: ...lume for speakers and earphones Please note In case the volume is set to minimum at the unit it cannot be set with the remote control the sound is muted 16 Earphones jack The speakers are automatically muted when the earphones are connected 17 Audio Video input Connect external source here 18 Audio Video output Connect external output device here 19 USB port USB port for USB device stick 20 SD MMC...

Page 12: ... 1 Tilt the display up in position A see left until it stands vertical on the control panel Pos B 2 Turn the display horizontally only clockwise You can turn it up to 180 Position C To return to the initial position turn counter clockwise Pos C 3 In position C you can flap the display down in position D see left Pos D 4 In end position D the display shows up and the rear rests on the control panel...

Page 13: ...VB T mode 6 TITLE FAV DVD mode Access DVD title menu DVB mode Access favorite list 7 Numeric buttons 0 9 Enter title chapter time etc directly 8 Info DVD mode Display disc info DVB T mode Display station info In DVB T menu Display navigation help 9 Vol Decrease volume based on set volume on the unit 10 Vol Increase volume based on set volume on the unit 11 STOP DVD mode Press once stop playback pr...

Page 14: ...p and system setup in analog TV mode 19 MEDIA DVD mode Toggle between DVD USB and SD if available 20 OK General Select functions and menu items DVB T mode Access favorite list 21 Navigation buttons Select menu items 22 REC Start recording please note the recording instructions 23 EXIT General Exit menu or setup DVB T mode Return to previous station 24 DVD mode Rewind 25 DVD mode Fast Forward 26 MO...

Page 15: ... Lifespan approx 1 year with normal use at room temperature Remote Control Use Instructions Point the remote control from max 3 m distance from the sensor in a 30 angle towards the front of the unit Do not place any obstacles between remote control and sensor do not place the remote control in direct sunlight Replace the batteries if the range decreases Notes about batteries Remove the batteries i...

Page 16: ... connections Connect the DVD player as shown via audio video cable to the TV s audio video input jacks Caution Please note that this function is only available in DVD mode There is NO output signal in DVB T or analog TV mode 5 2 Connect to External AV Source AV In Connect the DVD player as shown via supplied audio video cable to the external AV source e g DVD VCR Press the AV button on the DVD pla...

Page 17: ...ease to moderate volume level 5 4 Connect Antenna Connect the DVB T antenna or cable TV antenna at the antenna jack on the left side of the unit 5 5 Mains Power Adapter A mains power adapter is supplied with the DVD player Connect the adapter as shown to the DC 9V IN jack on the left side of the unit Connect the mains plug to an earthed wall outlet The indicator on the adapter lights up green Plea...

Page 18: ...e battery In charging mode the indicator lights up red if the unit is turned off After the charging process is completed it lights up green In on mode the LED lights up orange when charging With low battery status WARNING LOW BATTERY is displayed Some minutes later the DVD player will automatically turn off Please note Only charge the battery in off mode This significantly decreases the charging t...

Page 19: ...n the opposite side of the building Please note that this is no defect of this unit Suitable antennas are available from your specialized dealer Caution Please note that no AV output signal is available in DVB T or analog TV mode Turn the unit on and follow these steps Please observe chapter 2 for setup and station search 7 1 TV Channel Selection 1 Press the MODE button to select DVB T mode 2 Pres...

Page 20: ...rogram ANGLE Blue Access timer setup The timer allows you to program the unit to automatically access the station at program start In this way also time controlled recordings are possible See chapter 12 2 3 A B Green EPG display weekly SUB Button Subtitle Press the SUB button to display subtitle information of a program Please note This function is only available if the corresponding information i...

Page 21: ...on Program Info Press the INFO button to display information for the current program Press again to display further information This information is also displayed when changing the program Please note You can set the display duration in the system setup DVB Digital TV Configuration OSD OSD Timeout REPEAT Button yellow Recording List Press the REPEAT button to display all recordings Press to select...

Page 22: ...layback and press the OK button to confirm 7 Press the EXIT button to return to file selection 8 Press the SETUP button to return step by step to the main menu Compatible formats Audio mp3 Video avi mpg vob Photo jpg Please note You cannot use the USB port to connect a digital camera or other USB devices Please note that video playback of large files can be impaired Memory cards and USB devices wi...

Page 23: ...ia and press the OK button to access 13 Select a photo and press the OK button again 14 Press to access the previous next photo 15 Press the OK button to start the slide show Image Rotation Press to rotate the displayed image Press to rotate the displayed image clockwise Press to rotate the displayed image counter clockwise Press to mirror the displayed image horizontally Press to mirror the displ...

Page 24: ...Movie or Music press the OK button to confirm 3 Select the media with the video or music files and press the OK button again to confirm 4 Press to select the folder on the storage media and press the OK button to access 5 Select a file and press the OK button again 6 Press to access the previous next video or music file 7 The following options are available Start playback Pause playback Fast forwa...

Page 25: ... T or analog TV mode Turn the unit on and follow these steps Please observe chapter Fehler Verweisquelle konnte nicht gefunden werden for setup and station search 8 1 TV Program Selection 1 Press the MODE button to select analog TV mode 2 Press or CH and CH to access the stored TV channels in sequence 3 Set the volume with the volume control on the right side of the unit Please note In analog TV o...

Page 26: ...ove the blocks left and right Press to rotate the blocks and press to drop Hit Rat Try to hit the rat The fields in which the rat can appear correspond to the numeric buttons 1 to 9 Setup Games The side menu offers a variety of alternatives For the three games the menu varies slightly not all of the following options are available for all games Press the OK button to toggle between game and menu N...

Page 27: ... min DS DL 12 cm 74 min CD 8 cm 20 min MP3 12 cm 600 min JPEG 12 cm Disc functionality depends on the manufacturer Follow the instructions on the disc 10 2 Handling of Discs Handling Do not touch the playback surface when inserting or removing the disc see picture Do not stick labels on discs Cleaning Fingerprints and other contaminations reduce sound and image quality Only use a soft cloth for cl...

Page 28: ...VD mode is selected The DVD player automatically starts disc playback 6 Set the volume with VOL VOL Ensure that the volume was set before on the unit Operation You can control the unit with the buttons on the unit or with the remote control With the remote control you have advanced functions ZOOM button For DVDs cycle through 2x 3x 4x 1 2 1 3 1 4 zoom This function is not available for CDs Many DV...

Page 29: ... of the current track or chapter Press twice to skip to the beginning of the previous track or chapter Skip to the beginning of the next track or chapter Rewind Press repeatedly to cycle through 2x 4x 8x 20x speed Press to return to normal playback Fast Forward Press repeatedly to cycle through 2x 4x 8x 20x speed Press to return to normal playback INFO Display detail information for the current di...

Page 30: ...k ANGLE Press to cycle through the available camera angles of the same scene see picture This function is only available for DVDs recorded with several camera angles TITLE DVDs are often divided into several titles with several menus During playback press TITLE to display the title menu Press or the numeric buttons 0 9 to select the desired option Press the OK button to confirm This function is on...

Page 31: ...g of the previous track or chapter Fast Forward Press repeatedly to cycle through 2x 4x 8x 20x speed Press to return to normal playback Rewind Press repeatedly to cycle through 2x 4x 8x 20x speed Press to return to normal playback REPEAT Repeat current track all tracks or deactivate repeat function GOTO Select a position time or track to start playback In playback mode cycle through the following ...

Page 32: ...and press or OK to confirm 7 Press to select the desired file and press PLAY to start playback Remove your USB stick or SD card after JPEG or WMA playback The unit automatically returns to DVD mode Please note The USB1 1 port cannot be used to connect digital cameras or other USB devices Please note that video playback of large files may be impaired This player can play memory cards and USB device...

Page 33: ...ayer 4 Press to return to the previous directory Alternatively move the yellow cursor to the icon Confirm your selection with OK on the remote control or on the DVD player Please note Many CDs contain also other data besides photo files To display images press to select the center icon at the bottom of the screen Press the OK button to confirm PLAY PAUSE In playback mode press once to pause playba...

Page 34: ... repeat mode EXIT In playback mode press to return to root directory Press PLAY to resume normal playback Please note Set the display to 4 3 or 16 9 to view photos without distortion See chapter 12 3 1 Rotate Images Press to rotate the displayed image Press to rotate the displayed image clockwise Press to rotate the displayed image counter clockwise Press to mirror the displayed image horizontally...

Page 35: ...k Press again to resume playback Skip to next file Skip to previous file Fast Forward Press repeatedly to cycle through 2x 4x 8x 20x speed Press to return to normal playback Rewind Press repeatedly to cycle through 2x 4x 8x 20x speed Press to return to normal playback STOP In playback mode press once to stop playback press to resume playback In playback mode press twice to finally stop playback EX...

Page 36: ...INFO Display detail information for the current disc and deactivate info function SUB Select subtitle language if recorded on disc or turn subtitles off Please note Not all discs support subtitle camera angle or audio functions ...

Page 37: ... 3 5 seconds to start recording Press the button and select Yes to stop recording The unit creates a folder PVR on the card to save the recordings Recording format is MPG The file name of the recording depends on the selected channel and the recording time Recording format is MPG The file name of the recording depends on the channel number and the recording date It is only possible to record DVB T...

Page 38: ...n the PVR folder 11 3 Disc Manager Press the SETUP button You can access play and delete your recordings directly via the Disc Manager The current setting is displayed in the top left corner Mode Function Play Playback recording Delete one Delete marked recording Delete all Delete all recordings Button Function A B Green Activate delete function Toggle between DELETE ONE and DELETE ALL ZOOM Red Ac...

Page 39: ...ile copying 2x Double speed Only copying no listening Bit rate Set bit rate for converted MP3 file The higher the bit rate the higher the sound quality of the MP3 files Create ID3 Tag Additional ID3 Tag information if available Create Playlist Additional ID3 Tag playback information if available Tracks Display available CD tracks for conversion Select the tracks with the navigation buttons and con...

Page 40: ...utton twice to select OPTION Here you set the language for the system menu button Select language 12 1 3 System Menu SYSTEM System color settings can only be changed in analog TV ATV mode Other settings can only be selected in analog TV mode Press the MENU button three times to select SYSTEM Here you set the color system for analog TV ATV mode Press to select button Change setting S COLOR Color sy...

Page 41: ...Skip station After activating this function the current station is skipped during channel selection You can only select the station directly with the numeric buttons 12 2 DVB T Mode Setup Please note This menu is only available in DVB T mode Press the DVB button to access DVB T mode Here you change the settings for DVB T mode Select the desired setting and press the OK button to confirm Press to s...

Page 42: ...ifferent program number Press the REPEAT button Yellow to mark the channel Press to move the channel into the desired position and press the OK button to confirm Lock This function allows locking channels with a password The channel can only be accessed after entering the password See chapter 12 2 3 Parental Lock Del Delete channels from the channel list Deleted channels must be searched again to ...

Page 43: ...ics such as categorization are also deleted 12 2 2 Installation Channel Search Press the SETUP button to access the main menu Select Digital TV and press the OK button to confirm Select the option Installation and press the OK button again to confirm You can search for channels according to area Country scan manually Manual scan or automatically Auto Search Area search Press the OK button to selec...

Page 44: ...DVB T channels if available Please note Only few DVB T channels broadcast several languages In case none of the selected languages is available the default language of the station is played TV Display Setup Display Mode Color mode for AV output PAL or NTSC In Europe select PAL Aspect Ratio Adjust display to the aspect ratio of DVB T programs Please note Generally we recommend setting 16 9 For DVB ...

Page 45: ...ion search Please note Especially when using the built in speaker sound settings only show a limited effect Please note that images can be displayed no larger than in screen size Time Setup Time setting Select Automatic time setting via DVB T signal or Manual Date In manual time setting only you can enter the date Time In manual time setting only you can enter the system time Time zone Select the ...

Page 46: ... Record the channel can be defined which is played when the unit turns on Date On date for the active timer event On time On time for the active timer event Duration Defines the duration how long the unit stays turned on Please note Please note that this function cannot be used to turn the unit on Please note the notices for the recording function Parental Lock You can lock individual channels the...

Page 47: ...ess the DVD button to select DVD mode In this chapter we explain how to change the default settings according to your personal preference Please note Only change the system settings with no disc loaded and in stop mode Change the settings as follows 1 Select DVD mode and press the SETUP button on the remote control 2 The setup menu is displayed Select your System Setup Language Setup Audio Setup a...

Page 48: ...etween 4 3 PS 4 3 LB and 16 9 Password The parental lock is password protected Change the parental password with this option The default password is 0000 You can also use this password as super password Rat Info Set rating for parental lock DVDs can be categorized according to their contents This option allows you to lock certain scenes or the complete disc Select a suitable rating The default rat...

Page 49: ...c Audio Lang Set the audio language Select between English Standard French Spanish German etc Subtitle Lang Set the subtitle language Select between English French Spanish German etc and Off Standard Menu Lang Set the disc menu language Select between English Standard French Spanish German etc 12 3 3 Audio Setup The screenshot shows the options of this submenu Press and to mark the option Press th...

Page 50: ...ton or to select the option Press and to mark the desired setting and press the OK button to confirm Press to exit Brightness Set brightness as percentage value Contrast Set contrast as percentage value HUE Set hue in steps between 6 and 6 Saturation Set saturation in steps between 0 and 12 Sharpness Set sharpness in steps between 0 and 8 ...

Page 51: ... Titles chapters DVDs are divided into larger sections titles and smaller sections chapters The sections are numbered title number chapter number Track CD CDs are divided into sections called tracks The sections are numbered track number JPEG JPEG is a commonly used image format with small file sizes and mini mal loss of quality One disc can hold several hundred pictures that are saved in this for...

Page 52: ... disc Disc inserted the wrong way Insert disc with label facing up Disc dirty or deformed Clean disc or insert other disc Regional code of the player does not match the regional code of the DVD Purchase DVD with corresponding regional code The DVD player does not work Moisture on lens Remove disc and turn off DVD player for at least two hours Device not properly connected Check connexions and conn...

Page 53: ...insert other disc Obstacle between remote control and DVD player Remove obstacle Remote control not pointed at DVD player Point remote control directly at DVD player Remote control battery inserted the wrong way Check the battery s polarity and if necessary insert battery correctly Remote control does not work Battery too low or completely discharged Insert new battery Other possible causes for pr...

Page 54: ...2 5 dB Audio S N ratio 85 dB Channel separation 70 dB 1 kHz Dynamic range 80 dB 1 kHz Audio Out Output level 1 V 0 20 impedance 10 kΩ Video Out Output level 1 VP P 0 1 impedance 75 Ω Mains voltage AC 100 240 V 50 60 Hz Power consumptio 10 W Dimensions 205 x 160 x 40 mm L x H x B Weight ca 860 g DESIGN AND SPECIFICATIONS SUBJECT TO CHANGE WITHOUT NOTICE ...

Page 55: ...he product that is sent in cannot be repaired within a reasonable time or at reasonable cost The product can also be exchanged for a different model of the same value Requests cannot be made for repairs to be carried out on site Parts that have been replaced or exchanged become our property 3 The warranty claim does not apply if repairs or other work is carried out by unauthorized persons or if ou...

Page 56: ...ible and clearly legible 3 You must enclose a copy of the sales slip as proof of purchase 4 Once AXDIA has received the product it will meet its warranty obligations in accordance with the warranty conditions and will return the product to the sender with carriage and insurance paid Service outside of warranty AXDIA can refuse any service claim made that is not covered by the warranty If AXDIA agr...

Reviews: