background image

ODYS  PDV 67003 DVB-T

37

EN

Operating the device and general buttons 

Depending on the situation, you can use the buttons on the device or 
remote control to operate the device. However, the remote control 
enables greater usage of the device functions. 

 MODE button 
(device)

To change brightness, contrast or colour. Adjust the 
values using the 

/

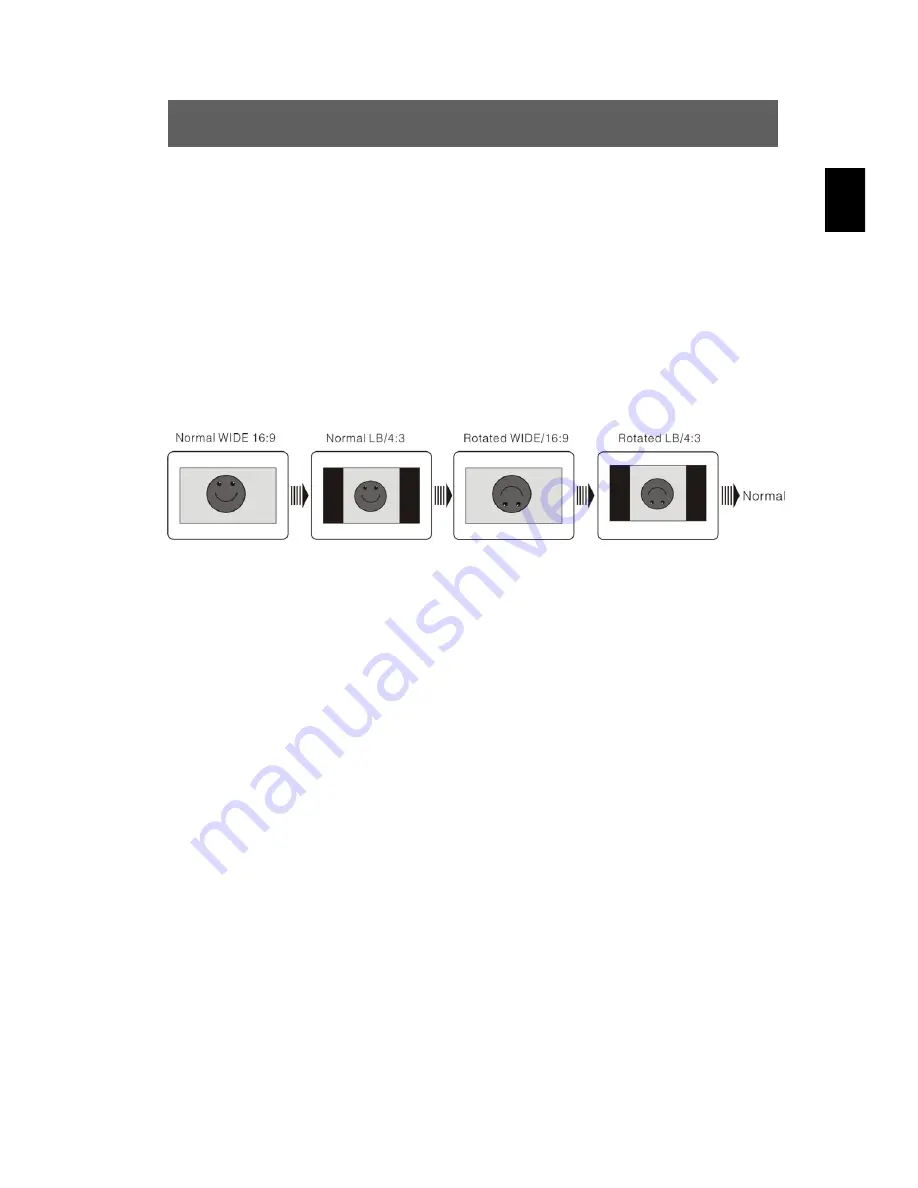
buttons. If you hold down the 

button for 1-2 s, the aspect ration toggles between 
16:9, 4:3 and reversed picture (see illustration). 

ZOOM button 
(remote control) 

For DVDs the image size is successively changed to 
the following values compared to the normal size: 2x, 
3x, 4x, 1/2, 1/3, 1/4. 

This function is not available for CDs.

A-B button 
(remote control) 

Enables you to repeat playback of the section 
between points A and B multiple times while a disc is 
playing. 

Press this button once to set point A. 

Press the button a second time to set point B and 
start the looped playback.  

When you press this button during looped playback, 
you exit the loop mode. 

This function is not available for JPEG discs. 

Summary of Contents for PDV 67003

Page 1: ......

Page 2: ...using rechargeable batteries 22 5 2 Connecting the rechargeable battery pack 23 5 3 Charging the battery pack 23 5 4 Removing the rechargeable battery pack 24 6 DVB T functions 25 6 1 Using the Setup Wizard 25 6 2 TV programme selection and video text 27 6 3 Additional DVB T settings 27 7 Disc information 34 7 1 Compatible disc formats 34 7 2 Using discs 35 8 Playback operation 36 8 1 Getting star...

Page 3: ... with harmful effects to health if the device is used incorrectly or The exclamation point displayed in a triangle in the documentation indicates dangers when using and maintaining the device The information symbol in the documentation indicates useful information and tips for using and maintaining the device Caution The device is a class 1 laser product The corresponding label is located on the r...

Page 4: ...ng to qualified service personnel Unplug the product from the wall outlet before servicing or when it is unused for a long period of time The manufacturer should not hold responsibility for the damage caused by any substitutions and modifications of the product without authorization from the manufacturer or authorized unit Power supply Connect the power supply cable to the DC 9 5V IN jack on the r...

Page 5: ...occur as a result x Connect the device only to mains sockets that are properly earthed protective earth The mains voltage must correspond to the operating voltage of the device indicated on the device housing When connecting the device to other electric devices always follow the manufacturer s instructions x Make sure that the cables are not damaged stretched or twisted and that no short circuits ...

Page 6: ... a vehicle make sure that it does not inhibit the driver s forward or rear view and that it does not interfere with the safe operation of the vehicle Otherwise injuries or accidents may result The driver must not operate the device or look at the screen while driving Do not allow your children to loosen or disengage their safety belts to operate the device x Do not place the device near the airbag...

Page 7: ... technology for the protection of copyrights that is protected by patents in the United States of America and by other laws regarding the protection of intellectual property Use of this copyright protection technology must be approved by Macrovision This approval is granted exclusively for personal use and other limited visual presentations unless Macrovision has expressly permitted a more extensi...

Page 8: ...German etc x Shock resistance Electronic shock resistance allows the device to be operated in a vehicle Special playback functions x Various playback speeds fast forward fast reverse slow play Search By Time supports several playback languages and repeat functions Multiple display formats and camera perspectives zoom in zoom out multilingual subtitles x Remember the last playback position and resu...

Page 9: ...eable battery pack 1 x remote control 1 x battery for remote control 1 x operating manual 1 x mains cable with power supply unit 1 x audio video cable 1 x car adapter Note Accessories and their corresponding part numbers are subject to change without notice due to technological progress ...

Page 10: ...ODYS PDV 67003 DVB T 9 EN 3 Controls 3 1 DVD player Front view ...

Page 11: ...ral seconds to switch between 16 9 4 3 or reversed image 8 SETUP button Accesses the setting for the DVD or DVB mode 9 STOP button Stops playback 10 Direction buttons To select menu objects fast forward rewind during playback Jump to next previous chapter 11 ENT button For confirming selected menu items 12 PLAY PAUSE button Starts playback or activates the pause function 13 Sensor for remote contr...

Page 12: ...C card slot 4 Jack for audio input output and optical digital output For connecting an external amplifier audio source 5 Video In Out jack For connecting an external monitor video source 6 Power supply jack 9 5 V DC Power supply unit or car adapter connection Left view 1 DVB T Antenna Jack DVB T antenna connection 2 USB terminal USB connection to USB mass storage Sticks 3 Power on off switch for s...

Page 13: ...ODYS PDV 67003 DVB T 12 EN Bottom view 1 Connection for rechargeable battery see chap 5 2 ...

Page 14: ...rds into position A see left so the screen is perpendicular to the control panel Pos B 2 The screen may only be horizontally rotated clockwise by its axis You can rotate it by maximum 180 position C If you would like the screen in the initial position rotate it counterclockwise until it clicks Pos C 3 Starting from position C you can swing the screen down into position D see left Pos D 4 In stop p...

Page 15: ... DVD USB SD DVB button to access the desired playback mode USB SD The default setting is DVD The following display appears on the screen 7 Press the buttons to select the folder and confirm your selection using the ENT button 8 Press the buttons to select the desired file and start playback using PLAY 9 Press to the STOP button to stop playback Playback can now be continued again from the beginnin...

Page 16: ...f the disc contains subtitles 4 Direction buttonsn CH CH Selects the menu entries or channel both forwards and backwards DVB 5 ENTER For confirming your selection 6 SETUP Access to system settings for the DVD or DVB mode 7 Numerical buttons 0 9 To select the corresponding number for title chapter time etc 8 GAME Skips the track or chapter forward in DVD mode or switches to the game menu in DVB mod...

Page 17: ...g looped playback to exit the loop mode 15 MENU While in playback mode to display the menu of the DVD currently inserted 16 REP To repeat a chapter track title or the entire disc 17 STOP RETURN DVD Mode Press once Stops playback press PLAY to continue playback at this point press twice stops playback completely DVB mode access the channel viewed last 18 PLAY PAUSE Starts playback or activates Paus...

Page 18: ... use and room temperature Using Of Remote Control Point the remote control towards the main unit when operating The remote control works best at a distance less than 5 m and at an angle of up to 60 to the front of the unit No obstacles may stand in the way between remote control and infrared sensor and do not place the remote control in direct sunlight If the remote control unit fails to work even...

Page 19: ...en connecting audio and video cables 4 1 Connecting to a television set Audio video connectors Using the audio video cables connect the DVD player to the A V inputs of the television set as shown in the illustration 4 2 Connecting to an amplifier Prior to connecting the DVD player to an external audio device read the operating instructions for the respective device Connect the DVD player to the A ...

Page 20: ...e When external audio signals are received during DVD playback this can lead to disturbing noise in the loudspeakers If this is the case disconnect the audio cable 4 4 Connecting headphones Connect the headphones to the headphone jack on the right side of the device The loudspeakers are automatically deactivated Caution Excessively high volume can damage your hearing Turn the volume down before co...

Page 21: ...h a power supply unit Connect the power supply cable to the DC 9 5V IN jack on the right side of the device as shown below Connect the power plug to an earthed socket The power supply indicator lamp lights up red Note Turn off the DVD player before you unplug the mains cable from the socket When the DVD player operates on mains power the LCD screen lights up brighter than when it operates on batte...

Page 22: ...he DVD player and the cigarette lighter of the vehicle Caution The driver must not operate the device or look at the screen while driving Position the device in a way that ensures an uninhibited view Remove the rechargeable battery pack before connecting the device using the car adapter If possible disconnect the car adapter cable while starting the vehicle to the cigarette lighter socket ...

Page 23: ...argeable batteries to high temperatures or direct sunlight Do not throw the battery into water or fire Ensure adequate air circulation around the device Do not place the device on soft furniture carpets or other materials while in operation as this may restrict the air from properly circulating around the device Do not short circuit the contacts of a rechargeable battery Do not disassemble the rec...

Page 24: ... Hold on to the device with one hand Position the battery s plastic pins so that they are aligned with the matching notches on the DVD player and push the battery inside the device until it audibly locks into place 5 3 Charging the battery pack Use the power supply unit provided for charging the rechargeable batteries In doing so connect the power supply unit to the DVD player as described in chap...

Page 25: ...ultimately discharges the battery Turn off the DVD player before you remove the rechargeable battery as described below 1 Press and hold the rechargeable battery lock toward arrow as displayed on the right 2 Carefully slide the rechargeable batter toward arrow 3 Carefully remove the rechargeable battery and store it in a suitable place if it is not to be used for an extended time period Note Remov...

Page 26: ... Setup Wizard Navigating through the menu In this menu you can select the NO YES options using the direction arrows Select YES for switching to the next menu and confirm using ENT or ENTER Select NO to exit the menu Perform your desired settings for the three options Country Language and Time zone see below in this menu To continue using the Setup Wizard select NEXT using and confirm using ENT Sel...

Page 27: ...u you can select the BACK YES NO options using Select YES for the automatic scan for TV channels and confirm using ENT Storing the search results In this menu you can select the YES NO options using Select YES to store the search results and confirm using ENT Select NO to cancel the search results If you have selected NO in the previous menu confirm the deletion of the channel list again with YES ...

Page 28: ...e control on the ride side of the device Video text 1 Press the TELETEXT button on the remote control to switch to the video text 2 Enter the three digit number for the desired video text page directly using the key numbers 0 9 3 You can also navigate through the available video text pages as follows 100 pages down 100 pages up One page up One page down 4 To return to normal TV operation press the...

Page 29: ... setting Press to select the TV setting option confirm using ENT The following menu is displayed Navigate through this menu as displayed above and perform your desired settings for the three options TV Norm Video Norm and Screen Mode see below TV System Press to select the TV System option and confirm using ENT Using select the setting appropriate for you from the NTSC PAL 60 PAL Auto values e g u...

Page 30: ...rast colour setting Press to select one of the options and confirm using ENT Using to select the desired value between 0 12 and confirm using ENT Tone Press to select the Tone option and confirm using ENT Using to select the desired value between 6 6 and confirm using ENT Audio setting Press to select the Audio setting option confirm using ENT In this menu you set an analogue SPDIF OFF or one of t...

Page 31: ...e lock Press to select the Change lock option and confirm using ENT Enter the valid PIN password and confirm with ENT Time setting Press to select the Time setting option and confirm using ENT The following menu is displayed Navigate through this menu and perform your desired settings for the two options see below Time zone Press to select the Time Zone option and confirm using ENT Using select th...

Page 32: ...nd confirm using ENT Using the SETUP button you return to the previous menu Automatic channel search Auto Scan Press to select the Auto Scan option and confirm using ENT The following menu is displayed Navigate through this menu and perform your desired settings for the two options see below Select Country Press to select the Select Country option confirm using ENT and select the desired country u...

Page 33: ...Scan Type Start Channel and Start Scan see below Country Press to select the Select Country option confirm using ENT and select the desired country using Germany England Spain Italy France etc Scan type Press to select the Scan type option confirm using ENT and select the desired scan type individual channel channel range using Start channel Press to select the Start channel option confirm using E...

Page 34: ...lect the Default setup option and confirm using ENT The following menu is displayed Press to select the OK and confirm using ENT To cancel the dialog and to return to the previous menu select Cancel 4 Game Press to select the Game option and confirm using ENT The following menu is displayed In this menu press to select the desired game BoxMan Burning Tetris Hit Rat and confirm using ENT You can pl...

Page 35: ...s layers 133 min SS SL 242 min SS DL 266 min DS SL 12 cm 484 min DS DL 41 min SS SL 75 min SS DL 82 min DS SL DVD 8 cm 150 min DS DL 12 cm 74 min CD 8 cm 20 min MP3 12 cm 600 min JPEG 12 cm DivX 12 cm The discs mode of operation depends on the manufacturer Observe the corresponding notes for the respective disc ...

Page 36: ...nd the video Use a soft clean cloth for cleaning that can be moistened with a neutral diluted cleaning agent if the disc is very contaminated Do not wipe in circular motion risk of static noises instead always wipe from the centre of the disc toward the outer edge see illustration Note on storage Do not expose the discs to direct sunlight or high temperatures CAREFULLY READ THE FOLLOWING INSTRUCTI...

Page 37: ...ower supply indicator lamp lights up green and a welcome screen is displayed 3 Press the OPEN button insert a disc with the printed side facing up and close the disc cover see illustration 4 The DVD player automatically starts with the playback 5 Adjust the volume to the desired level using the VOLUME controller on the right side 6 Press the PWR button on the remote control The DVD player switches...

Page 38: ...etween 16 9 4 3 and reversed picture see illustration ZOOM button remote control For DVDs the image size is successively changed to the following values compared to the normal size 2x 3x 4x 1 2 1 3 1 4 This function is not available for CDs A B button remote control Enables you to repeat playback of the section between points A and B multiple times while a disc is playing Press this button once to...

Page 39: ...g back the disc altogether Continue at the start of the disc using MENU Press this button once during playback to display the menu on the screen Press this button a second time to resume playback In menu mode select the desired option using the buttons 0 9 and 10 on the remote control Then press ENT or ENTER button Press this button once to jump to the beginning of the current track or chapter Pre...

Page 40: ...s button repeatedly you call up the following settings SUBTITLE 1 N Subtitle 1 is displayed SUBTITLE 2 N Subtitle 2 is displayed SUBTITLE N Subtitle is displayed SUBTITLE OFF No subtitles N represents the total number of subtitle tracks included This function is only available for DVDs that contain multiple subtitle tracks REP button To repeat a chapter a title or the entire disc GOTO button Enabl...

Page 41: ...d title or the desired option Confirm with ENTER or ENT 8 3 CD playback Audio MP3 VCD SVCD When you insert a CD in the DVD player while the power is on the tracks are played in the preset order Use the or button to play a specific track PLAY PAUSE Press this button once during playback to pause playback Press this button a second time to resume playback STOP Press this button once during playback ...

Page 42: ...revious track or chapter button To jump to the beginning of the next track or chapter GOTO button Enables you to select a position time or track at which to start playback During CD playback the following options are displayed successively Disc Go To Track Go To Select Track N N is the number of tracks on the disc You can select the desired option directly using the buttons 0 9 on the remote contr...

Page 43: ...tion using one of the following buttons ENTER on the remote control or PLAY on the remote control or the DVD player 4 Press the button to return to the previous folder You can also move the light yellow bar to the icon Confirm your selection using one of the following buttons ENTER on the remote control or PLAY on the DVD player Note Apart from image files many CDs also contain other data PLAY PAU...

Page 44: ...k all files of the current folder Repeat All Repeatedly plays back all files of the current folder in the original order Repeat Off Exits the repeat mode MENU button During playback To go to the root folder To resume normal playback press the PLAY button GOTO button During playback To select a file using the numerical keys 0 9 Confirm your selection with ENTER remote control or ENT DVD player Duri...

Page 45: ...cture clockwise as shown below Press the button to rotate the current picture anti clockwise as shown below Press the button to flip the current picture horizontally as shown below Press the button to flip the current picture vertically as shown below Note In some picture CDs the functions for rotating and zooming pictures are not available due to design limitations ...

Page 46: ...eo including DivX 6 with standard playback of DivX media files 1 Insert a DivX CD The DVD player automatically starts with the playback 2 The root folder is displayed Select a folder using the buttons on the remote control 3 Start of playback Confirm your selection using one of the following buttons ENTER PLAY on the remote control or PLAY ENT on the DVD player PLAY PAUSE Press this button once du...

Page 47: ... the root folder Continue playback at normal speed using REP button Press this button once to play back the content of a file folder in loop mode Press this button repeatedly to cycle through the following options Repeat One Repeat Dir Repeat All Repeat Off SLOW button Press the button for slow playback When you press this button the playback speed is successively reduced to 1 2 1 3 1 4 1 5 1 6 an...

Page 48: ...nformation on the inserted disc and switches the information display off again SUBT button To select a language for subtitles if available on disc or turn off the subtitles Note Not all discs support the functions for subtitles camera perspectives or audio effects ...

Page 49: ...as follows 1 Press the SETUP button on the remote control or on the DVD player 2 The Setup menu is displayed In this menu you can define general settings loudspeaker settings Digital settings as well as other default settings You can leave the Setup menu at any time by pressing the SETUP button again 3 Use the and buttons on the remote control or on the DVD player to select the desired submenu 4 U...

Page 50: ...PS 4 3 LB and 16 9 default Use the and buttons to highlight the desired setting and confirm with ENTER Press to exit the option s setting OSD Language To set the language for the on screen menu Highlight the option using the and buttons Switch to the option s setting by pressing ENTER or Possible settings are English default German Spanish French etc Use the and buttons to highlight the desired se...

Page 51: ...vate subtitles Highlight the option using the and buttons Switch to the option s setting by pressing ENTER or Possible settings are ON default and OFF Use the and buttons to highlight the desired setting and confirm with ENTER Press to exit the option s setting Screen Saver To activate deactivate screen saver Highlight the option using the and buttons Switch to the option s setting by pressing ENT...

Page 52: ...ngs are ON and OFF default Use the and buttons to highlight the desired setting and confirm with ENTER Press to exit the option s setting 9 2 Audio Setup The illustration shows the options available in this submenu Downmix To activate the downmix mode Highlight the option using the and buttons Switch to the option s setting by pressing ENTER or Possible settings are LT RT and Stereo default Use th...

Page 53: ... the and buttons Switch to the option s setting by pressing ENTER or Use the and buttons to highlight the desired setting and confirm with ENTER Press to exit the option s setting 9 3 Digital Setup Dual Mono To set the channel output mode Highlight the option using the and buttons Switch to the option s setting by pressing ENTER or Possible settings are Stereo default L Mono R Mono und Mix Mono Us...

Page 54: ... and confirm with ENTER Press to exit the option s setting 9 4 System Setup The illustration shows the options available in this submenu You only have access to the system setup when there is no disc in the DVD player TV System To set the TV system type NTSC PAL Auto Highlight the option using the and buttons Switch to the option s setting by pressing ENTER or Use the and buttons to highlight the ...

Page 55: ...ht the option using the and buttons Switch to the option s setting by pressing ENTER or Possible settings are English French Spanish German etc and OFF default Use the and buttons to highlight the desired setting and confirm with ENTER Press to exit the option s setting Menu Lang To set the language for the disc menu Highlight the option using the and buttons Switch to the option s setting by pres...

Page 56: ...etting Password The parental control feature is password protected You can use this option to change the password for the parental control feature The default password is 0000 Highlight the option using the and buttons Switch to the option s setting by pressing ENTER or Enter the desired password and confirm with ENTER Press to exit the option s setting Rating To set parental controls Depending on...

Page 57: ... buttons to highlight the desired setting and confirm with ENTER Press to exit the option s setting Default Use this option to reset the device settings to their defaults Highlight the option using the and buttons Switch to the option s setting Restore by pressing ENTER or Press ENTER again to reset the device to its default settings ...

Page 58: ...d on the right and on the left Titles chapters DVDs are divided into larger sections titles and smaller sections chapters The sections are numbered title number chapter number Track CD CDs are divided into sections called tracks The sections are numbered track number JPEG JPEG is a commonly used image format with small file sizes and mini mal loss of quality One disc can hold several hundred pictu...

Page 59: ...rt disc Disc inserted the wrong way Insert disc with label facing up Disc dirty or deformed Clean disc or insert other disc Regional code of the player does not match the regional code of the DVD Purchase DVD with corresponding regional code The DVD player does not work Moisture on lens Remove disc and turn off DVD player for at least two hours Device not properly connected Check connexions and co...

Page 60: ... insert other disc Obstacle between remote control and DVD player Remove obstacle Remote control not pointed at DVD player Point remote control directly at DVD player Remote control battery inserted the wrong way Check the battery s polarity and if necessary insert battery correctly Remote control does not work Battery too low or completely discharged Insert new battery Other possible causes for p...

Page 61: ...V 0 2 1 0 impedance 10 k Video Out Video Out Output level 1 VP P 0 1 impedance 75 Asymmetrically negative Mains voltage AC 100 240 V 50 60 Hz Power consumptio 25 W Dimensions without battery pack 195 mm x 149 mm x 38 5 mm L x B x H Weight without battery pack ca 820 g DESIGN AND SPECIFICATIONS SUBJECT TO CHANGE WITHOUT NOTICE Manufactured under licence of Dolby Laboratories Dolby and the double D ...

Page 62: ...y claim does not apply if repairs or other work is carried out by unauthorized persons or if our products are equipped with additional parts or accessories that are not approved for our products 4 Warranties that have been activated do not cause the warranty period to be extended nor do they trigger a new warranty period The warranty period for any replacement parts installed ends with the warrant...

Page 63: ...IA can refuse any service claim made that is not covered by the warranty If AXDIA agrees to provide a service outside the warranty the customer will be invoiced for all repair and transport costs AXDIA will not accept any packages that have not first been approved by AXDIA by means of an RMA Return Material Authorization International charges to Germany depend on the selected service provider www ...

Reviews: