background image

ODYS  LCD-TV 17” DVD

22

EN

Search

Press the 

Ÿź

 button to select the 

Search

, press the 

Ź

 button to start searching. 

Color System 

Press the 

Ÿź

 button to select the 

Color System

. Use the ENTER button to select the PAL option. 

Fine Tune 

Press the 

Ÿź

 button to select the 

Fine Tune

, press the 

Ź

 or 

Ż

 button to start fine tuning forward 

or backward. Press the MENU button to return to the previous menu. 

Store 

Press the 

Ÿź

 button to select the 

Store

, press the ENTER button to store the fine tuning effect.   

Language

Press the 

Ÿź

 button to select the 

Language

, press the ENTER button to enter the setup, press 

the

Ÿź

 button to select item, press the ENTER button to confirm. Press the MENU button to return 

to the previous menu.   

Factory Reset 

Press the 

Ÿź

 button to select the 

Factory Reset

. Use the 

Ÿź

 buttons to select YES and press 

the ENTER button to restore the default settings or select NO. 

SCART Mode 

Press the 

Ÿź

 button to select the 

SCART Mode

, press the ENTER button to enter the setup, 

press the 

Ÿź

 button to select item, press the ENTER button to confirm. Press the MENU button to 

return to the previous menu.   

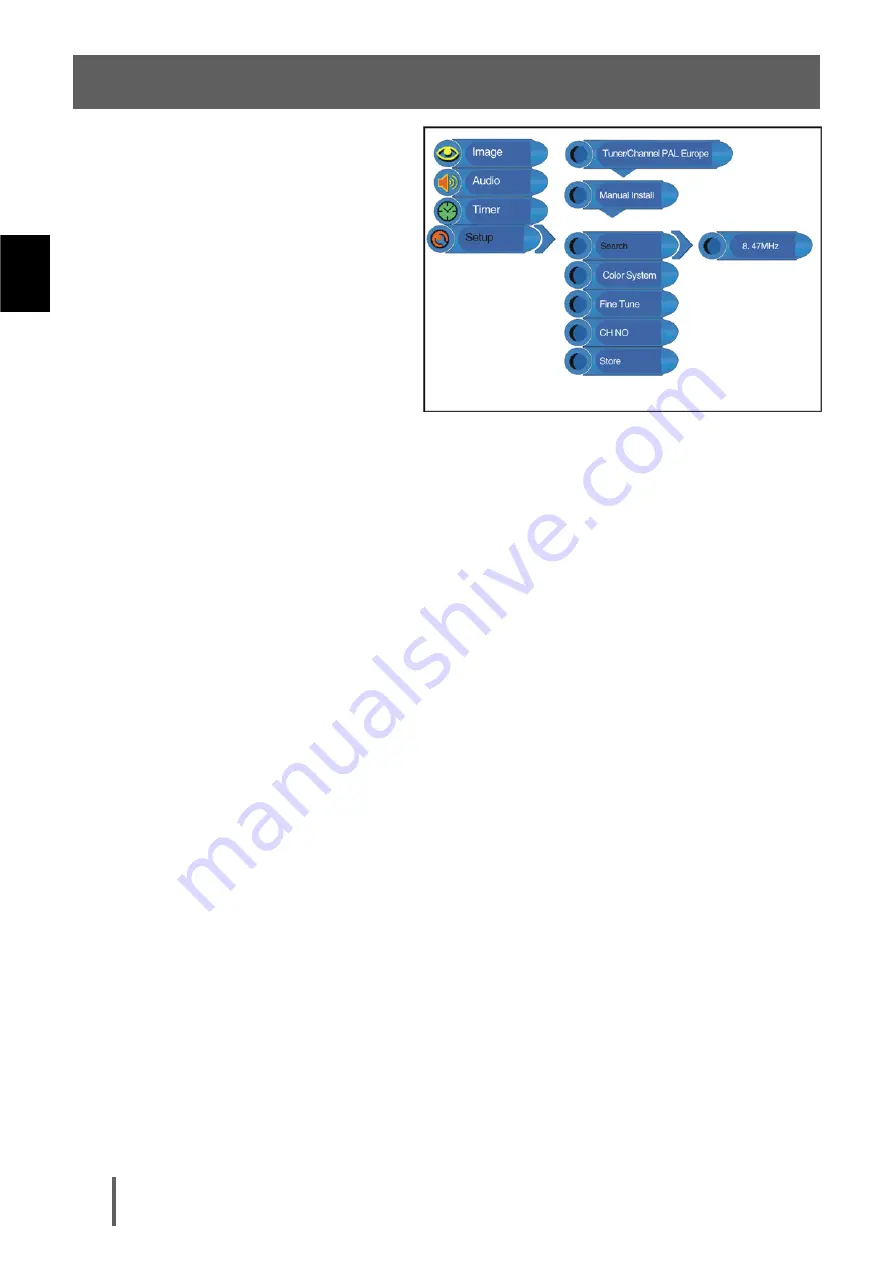
Manual Install 

Press the 

Ÿź

 button to select the 

Manual Install

, press the ENTER 

button to enter the menu as shown on 
the right. Press the 

Ÿź

 button to select 

the desired items. Press the MENU 
button to return to the previous menu, 
press the EXIT button to exit the setup 
menu.

Summary of Contents for DVD-DE250806

Page 1: ...DE EN FR NL PT ES IT LCD TV 17 DVD BENUTZERHANDBUCH USER MANUAL MANUEL D UTILISATION GEBRUIKSHANDLEIDING MANUAL DE INSTRUÇÕES MANUAL DEL USUARIO MANUALE PER L UTENTE ...

Page 2: ...onnecting to Power Adapter 16 4 5 Connecting to Earphones 16 4 6 Connecting to an External Unit AV Input 17 5 System Setup and Operation 18 5 1 Image Setting 18 5 2 Audio Setting 19 5 3 Timer Setting 20 5 4 Setup Setting 20 6 Playback operation 23 6 1 Switching Standby Operation On and Off 23 6 2 DVD Playback 24 6 3 CD Playback 25 6 4 JPEG Playback 26 7 DVD Setup Menu 27 7 1 Setup Menu 27 7 2 Gene...

Page 3: ...istributor or its authorized service center 2 To reduce the risk of electric shock do not remove the cover or back No user serviceable parts inside Refer servicing to qualified service personnel Unplug the product from the wall outlet before servicing or when it is unused for a long period of time 3 The manufacturer should not hold responsibility for the damage caused by any substitutions and modi...

Page 4: ...the power cord from being walked on or pinched particularly at plugs convenience receptacles and the point where they exit from the apparatus 13 Only use attachments accessories specified by the manufacturer 14 Use only with the cart stand tripod bracket or table specified by the manufacturer or sold with the apparatus When a cart is used use caution when moving the cart apparatus combination to a...

Page 5: ... that is protected by U S patents and other intellectual property rights Use of this copyright protection technology must be authorized by Macrovision and is intended for home and other limited viewing uses only unless otherwise authorized by Macrovision Reverse engineering or disassembly is prohibited ...

Page 6: ...le playback LCD Liquid Crystal Display Designed with 17 color TFT liquid crystal display clearly shows the data Stereo amplifier Built in 2 x 5 W speakers provide high quality sound Teletext Supports teletext and several teletext functions are available Advanced Playing Features Compatibility DVD CD CD R CD RW and JPEG discs compatible All Playback Functions Fast forward and reverse slow playback ...

Page 7: ...truction manual of the disc z The DVD Player will play most recordable CD R or erasable CD RW CDs but playback of CD R or CD RW discs created on a computer requires proper formatting and finalization of the disc for audio playback Some computers and or software programs may not be capable of creating compatible discs About Disc Terms Title Generally pictures or music compressed on a DVD are divide...

Page 8: ...CE button Press to select the modes DVD VGA TV SCART CVBS S VIDEO 2 MENU button Press to enter or exit setup menu 3 CH button Press in TV mode to page up or down through channels 4 VOL button Press to decrease or increase the volume 5 PLAY button Press to play the disc under DVD mode ...

Page 9: ...itch on or off the device enter or exit the standby mode 9 Disc Tray Slot Used to load disc 10 17 inch color TFT screen Presents high resolution picture 11 Speakers Two speakers output high quality stereo sound 12 CARD Input Slot Insert SD or MS card into this slot 13 USB terminal USB connection to USB mass storage Sticks 14 Remote Sensor Remote sensor window for the remote control 15 Power Indica...

Page 10: ... SCART Jack Connecting for SCART signal 5 S VIDEO Input Jack Connecting for S VIDEO signal input 6 L R Audio Input Jack Connecting for the external audio input 7 VIDEO Input Jack Connecting for the external video signal input 8 Earphone Jack When connected to earphone the internal speakers will automatically turn off 9 Video and Audio Output Jack 10 Antenna Input Jack Connected to external antenna...

Page 11: ...e OSD menu 11 Direction buttons ŸźŻŹ Press the direction buttons to select menu options or settings 12 ENTER button Press to confirm selection in the setup menu 13 SOURCE button Press to select the modes DVD VGA TV SCART CVBS und S VIDEO 14 PLAY button Press to play the disc under DVD mode 15 PAUSE button Press to pause the playback Press the PLAY button to resume normal playback 16 button Press t...

Page 12: ...PLAY button to resume normal playback under DVD mode Press the button twice to stop playback completely 35 Next Skip button Press to skip to the next chapter track for some discs under DVD mode 36 Previous Skip button Press once to skip to the beginning of the current chapter track Press twice repeatedly to skip to the previous chapter track for some discs under DVD mode 37 REPEAT EXWWRQ Press to ...

Page 13: ...te 3 Softly press the back cover to close it Under normal use the battery will last for six months Take out battery when the remote is not in use for a long time Using of Remote control Point the remote control unit from no more than about 7 m from the remote control sensor and within about 60 degrees of the front of the unit The operating distance may vary depending to the brightness around Do no...

Page 14: ...ternal AV signal source Connect the unit and the external AV signal source to the respective jacks with the S video or SCART cable Ensure that you observe the color cord when connecting audio and video cables After connection turn on the power of the unit and the external AV signal source Then press the SOURCE button to change to SCART or S video mode so that the AV signal can be shown ...

Page 15: ... to the VGA input jack on the rear panel of the unit 2 Connect the other end to the PC 3 Connect one end of the audio cable to the PC audio input jack on the rear panel of the unit 4 Connect the other end to the PC audio output jack After connection turn on the unit and the PC press the SOURCE button to shift to VGA mode Set the screen resolution on your PC to 1280x1024 60 Hz ...

Page 16: ...V Signal Input Connect the TV signal cable the antenna cable for example to ANT INPUT on the back of the unit so that you can receive television programmes After connection turn on the power of the unit press the SOURCE button to shift to TV mode ...

Page 17: ...on the rear panel of the unit the other end to the AC100 240V wall outlet 4 5 Connecting to Earphones This unit can be connected to an earphone for listening music privately See the below figure for details Insert the headphone plug in the headphone jack on the back of the unit After connecting to the earphone the internal speakers output will turn off automatically ...

Page 18: ...LCD TV 17 DVD 17 EN 4 6 Connecting to an External Unit AV Input The unit supports the AV signal output function so that it can also be used as an external screen for playback See the below figure for details ...

Page 19: ...htness press the ŻŹ button to adjust the value Press the MENU button to return to the previous menu Contrast Setup Press the Ÿź button to select Contrast press the ŻŹ button to adjust the value Press the MENU button to return to the previous menu Saturation Setup Press the Ÿź button to select Saturation press the ŻŹ button to adjust the value press the MENU button to return to the previous menu Sh...

Page 20: ...n to return to the previous menu Balance Setup Press the Ÿź button to select Balance press the ŻŹ button to adjust the level press the MENU button to return to the previous menu Auto Volume Setup Press the Ÿź button to select Auto Volume press the ENTER button to enter press the Ÿź button to select items press the ENTER button to confirm Press the MENU button to return to the previous menu Sound M...

Page 21: ...to return to the previous menu press the EXIT button to exit the setup menu Press the MENU button to enter the setup menu then press the Ÿź button to select Setup press the ENTER button to enter the menu shown on the right In the setup menu press the Ÿź button to select the desired items press the ENTER button to enter the item Press the MENU button to return to the previous menu press the EXIT bu...

Page 22: ...T button to exit Skip Press the Ÿź button to select the Skip press the ENTER button to enter the set the item on or off When the skip function is activated the channel is skipped Press the MENU button to return to the previous menu Swap From Ch Press the Ÿź button to select the Swap From Ch press the ENTER button to enter the setup Enter the channel number you want to swap using the number buttons...

Page 23: ...p press the Ÿź button to select item press the ENTER button to confirm Press the MENU button to return to the previous menu Factory Reset Press the Ÿź button to select the Factory Reset Use the Ÿź buttons to select YES and press the ENTER button to restore the default settings or select NO SCART Mode Press the Ÿź button to select the SCART Mode press the ENTER button to enter the setup press the Ÿ...

Page 24: ...press the ENTER button Normally the DVD jacket contains additional information on the DVD content 6 Push the STOP button once to interrupt playback The screen displays the message Press Play Key To Continue The player has saved the position where the playback was interrupted Use the PLAY button to resume play If you press the STOP button twice the unit stops completely and loses the last played po...

Page 25: ...isc cannot be played This player s default code is region 0 Stop Press this button once to stop playback and then press PLAY button to resume it Press the button twice to stop playback completely Pause Press the PAUSE button to pause playback Press the button twice to start step by step playback Repeat Use the REPEAT button to repeat a chapter a title or all and also to cancel repeat GOTO During D...

Page 26: ...ectives In this case you ll usually find a marking on the DVD sleeve When playing a DVD containing various camera angles the camera symbol appears on the screen Press the ANGLE button repeatedly until the desired perspective is shown The picture will be adjusted in 1ಹ2 seconds 6 3 CD Playback The player will play all tracks on a CD disc by default You can use the and PREV NEXT skip buttons or numb...

Page 27: ...isc in For JPEG disc there will be a root menu displayed on the screen Use the ENTER button and the Left Right direction button to select a submenu with picture and then use the Up Down direction button to select the contents Many discs have other contents besides pictures For Picture CD disc it will display the pictures automatically Many discs have other contents besides pictures Stop Press this...

Page 28: ...V is connected Select WIDE when using a 16 9 screen on the unit Angle Mark This is where you can change the camera angel of the scenes being played if the DVD this function is available ON A camera symbol appears on the screen If there are alternative view angles a corresponding message appears OFF No camera symbol is displayed OSD Lang Please select preferred language for the OSD menus Captions Y...

Page 29: ...ons are OFF 1x 2x 7 4 Video Setup Page Sharpness This menu allows the settings for the sharpness of the picture high medium or low Select low for a soft image and high to improve a blurry image Brightness and Contrast Used to set the brightness and contrast of the image to conform to the surrounding light and according to individual preferences 7 5 Preference Page Audio Subtitle and Disc Menu If a...

Page 30: ...dirty or damaged Clean the disc or skip the section There is no picture or picture move up and down unsteady Check if the connections with the external AV signal source are correct Correctly set the items in the picture menu Check if the video type input signal is not corresponding to the unit Make sure the unit is turned on and in correct video type The remote control does not work Make sure ther...

Page 31: ... W Dimensions 485 mm 333 mm 380 mm L x W x D Weight about 7 35 kg DESIGN AND SPECIFICATIONS ARE SUBJECT TO CHANGE WITHOUT NOTICE Manufactured under license from Dolby Laboratories Dolby and the double D symbol are trademarks of Dolby Laboratories Confidential unpublished works 1992 1997 Dolby Laboratories Inc All rights reserved ...

Page 32: ...nty period The warranty period for any replacement parts installed ends with the warranty period for the entire product 5 Any other or further claims are excluded especially those for replacement due to damage caused outside of the product provided there is no obligatory legal liability We therefore accept no liability for accidental indirect or other consequential damage of any kind which leads t...

Page 33: ...ODYS LCD TV 17 DVD 32 EN ...

Reviews: