Oculus Rift | Getting Started with the Demos | 9
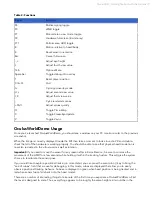
Table 2: Functions
Key(s)
Function
F4
Multisampling toggle
F5
sRGB toggle
F7
Mono/stereo view mode toggle
F9
Hardware full-screen (low latency)
F11
Performance HUD toggle
E
Motion relative to head/body
R
Reset sensor orientation
Esc
Cancel full-screen
-, +
Adjust eye height
L
Adjust fourth view value
Tab
Options Menu
Spacebar
Toggle debug info overlay
T
Reset player position
Ctrl+Q
Quit
G
Cycle grid overlay mode
U, J
Adjust second view value
I, K
Adjust third view value
;
Cylce rendered scenes
+Shift
Adjust values quickly
O
Toggle Time-Warp
C
Toggle FreezeEyeUpdate
V
Toggle Vsync
OculusWorldDemo Usage
Once you’ve launched OculusWorldDemo, you should see a window on your PC monitor similar to the previous
screenshot.
When the image is correctly displayed inside the Rift then take a moment to look around in VR and double-
check that all of the hardware is working properly. You should be able to see that physical head translation is
now also recreated in the virtual word as well as rotation.
Important:
If you need to move the sensor for any reason after initial calibration, be sure to minimize the
movement of the HMD for a few seconds while holding it within the tracking frustum. This will give the system
chance to recalibrate the sensor pose.
If you would like to explore positional tracking in more detail, you can press the semicolon (;) key to bring the
“sea of cubes” field that we use for debugging. In this mode, cubes are displayed that allow you to easily
observe positional tracking behavior. Cubes are displayed in green when head position is being tracked and in
red when sensor fusion falls back onto the head model.
There are a number of interesting things to take note of the first time you experience OculusWorldDemo. First,
the level is designed to scale. Thus, everything appears to be roughly the same height as it would be in the

