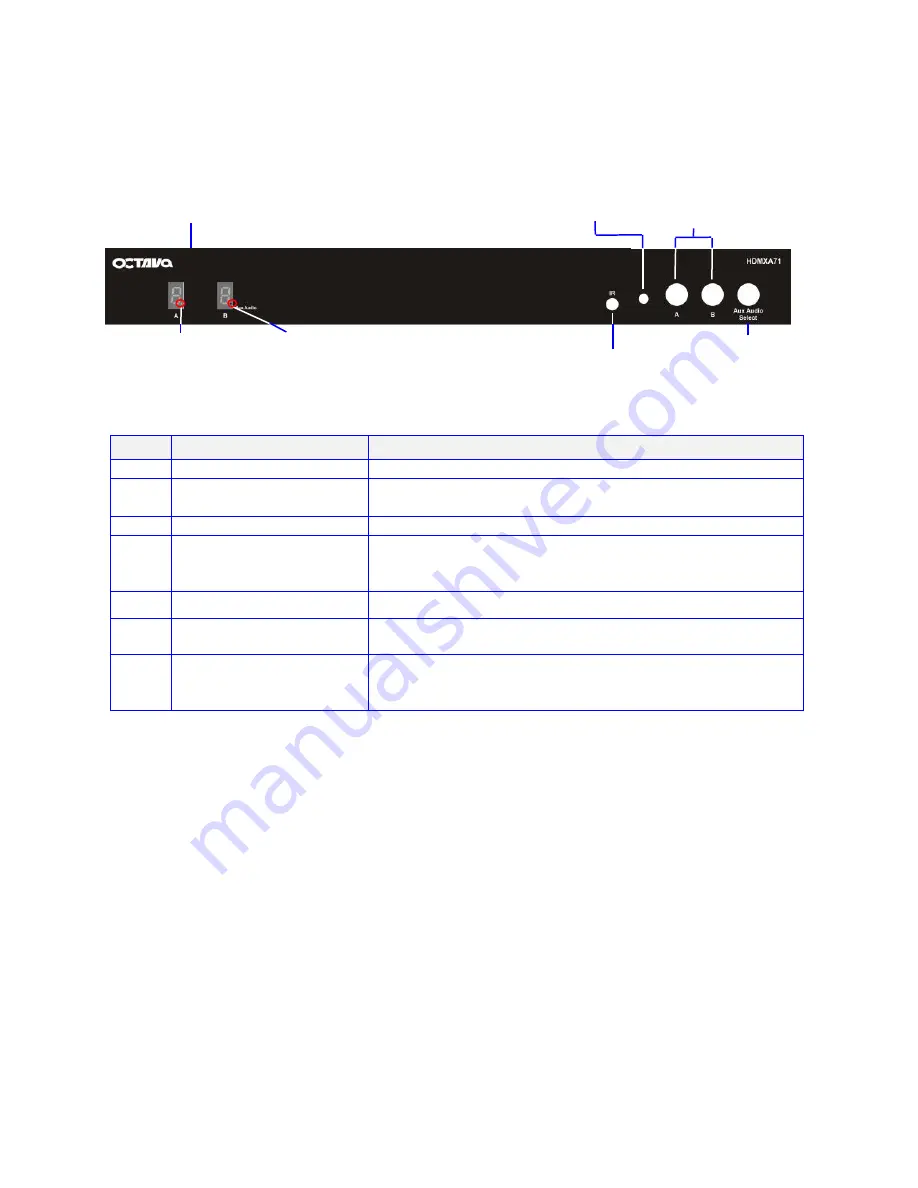
Octava HDMXA71 Pro HD Home Theater Series Installation Manual Download Page 6


4. Wired IR input 

7. Aux Audio 
    Select 

6. Input Select 

5. Infrared 

Detector 

2. Aux Audio 

Indicator 


1. Power 

Indicator 

3. Output A/B 

indicator 


Front View 


Function 


Power Indicator   


Aux Audio Input 
Indicator 

LED is illuminated if the Aux Input is selected ( loop thru 
mode) 

Output A/B Indicator 

Displays the Input selected   

Wired IR input 

connect Octava supplied IR Receiver Extension cable 
(optional) for hidden cabinet installs requiring line of sight   
for IR control. 

IR detector   

Senses IR from remote control 

Input select button 

Press to switch inputs for output A and B


Aux Audio Select 

Press to change the Analog Output Mode between :   
Aux Input or HDMI mode 


*Note 1: Analog output supports only LPCM audio format. Unit does NOT decode Dolby or 
DTS.   
 
Note 2: You must set your PS3, or source to LPCM mode in order to use the Analog Audio 
Output from HDMI. 
 
Note 3: Aux Input port allows connecting a 2nd analog audio source and "loop thru " to the 
Analog Audio Output. Does not convert Analog Audio to HDMI .


Summary of Contents for HDMXA71 Pro HD Home Theater Series

Page 1: ...1 Installation Guide Model HDMXA71 Rev i ...

Page 2: ...power supplies and the AC power cord before cleaning or removing any panels for servicing When adding or removing devices to or from the product disconnect all power cables from the existing product before you add a device Operation safety Install the product in a well ventilated location Keep ventilation opening free of obstructions Don t block any ventilation openings on the unit Avoid dust humi...

Page 3: ...ation 4 Description 5 Features 5 Remote Control Guide 8 Control Port 10 RS232 Control Commands 11 LAN Telnet IP control port 13 EDID Configuration 14 1 RU Rack mount 17 Disabling Enabling IR Remote Control Receiver 17 Warranty 18 Disclaimers 18 Specifications 19 ...

Page 4: ... Analog Audio Output from HDMI Note 3 Aux Input port allows connecting a 2nd analog audio source and loop thru to the Analog Audio Output Does not convert Analog Audio to HDMI Application Diagram Installation 1 Connect the Display s to the HDMI OUT ports 2 Connect the HDMI source to the HDMI INPUT 3 Connect audio cables optional 4 Connect the DC power adapter ...

Page 5: ...tput 8ch Note 1 2 Aux Analog Input port 8ch Note 3 Optical Toslink Digital Audio Output 2CH Bitstream Supports high resolution video 480 P 720 I P 1080 I P Seamless integration with your existing Audio Receiver Remote Control IR included Discrete Code allows direct channel control 1RU rack mountable Wired IR port for In cabinet installations RS232 port for PC or Control System operation USB servic...

Page 6: ...or hidden cabinet installs requiring line of sight for IR control 5 IR detector Senses IR from remote control 6 Input select button Press to switch inputs for output A and B 7 Aux Audio Select Press to change the Analog Output Mode between Aux Input or HDMI mode Note 1 Analog output supports only LPCM audio format Unit does NOT decode Dolby or DTS Note 2 You must set your PS3 or source to LPCM mod...

Page 7: ... HDMI Inputs Connect High Speed HDMI cables to Source device 4 7 1 Analog Audio Output Connect to Audio Amp receiver Note 1 2 HDMI Mode Analog Audio Output is from the selected HDMI source Note 1 2 Aux Input Mode Loop Thru Analog Audio Output is from the see 6 connected analog audio connection Note 3 5 Optical Digital Output Audio will play the Out A source selection 6 Aux 2ch audio input Routes t...

Page 8: ...as Logitech s Harmony Button Function Notes Increments Decrements to the next available Input 1 2 3 4 Selects the corresponding numbered Input Turns ON OFF the LED Turns ON soft Off standby the unit Other Not used ON soft Off standby Turns on off the LED Pressing 1 4 selects the corresponding numbered Input Pressing A or B selects the output to be controlled Select deselect AUX Audio 7 1 input ...

Page 9: ... and DISPLAY B to IN3 you simply follow this sequence Step 1 Display A 1 this will set Display A to Input 1 Step 2 Display B 3 this will set Display B to Input 3 Here are some more examples Output Selection Step 1 Input Selection Step2 Result DISPLAY A 2 Display A switches to Input 2 DISPLAY B 1 Display B switches to Input 1 DISPLAY A Display A increments to next available Input DISPLAY B Display ...

Page 10: ...tems via 1 RS 232 or 2 LAN Telnet control port The default mode is control with RS 232 To change control port see the following table Control Port Selection Press A and Aux Audio Select button simultaneously to toggle the control port between RS 232 or LAN TELNET RS 232 Mode LAN TELNET Mode ...

Page 11: ...s per the RS232 Command Table Basic controls Note The commands are in HEX No spaces between HEX codes 0x denotes HEX No need to enter 0x HEX CODE Port Status 0x02 0x30 0x30 0x31 0x03 Turn ON LED 0x02 0x30 0x30 0x33 0x03 Turn OFF LED 0x02 0x30 0x30 0x34 0x03 Turn ON Power 0x02 0x30 0x30 0x35 0x03 Turn OFF Power 0x02 0x30 0x30 0x36 0x03 Example Send Command 02 30 30 34 03 in Hex To turn off LED ...

Page 12: ...T A to Input port 4 0x02 0x32 0x31 0x34 0x03 Output B Switching Commands Select OUT B to Input port 1 0x02 0x32 0x32 0x31 0x03 Select OUT B to Input port 2 0x02 0x32 0x32 0x32 0x03 Select OUT B to Input port 3 0x02 0x32 0x32 0x33 0x03 Select OUT B to Input port 4 0x02 0x32 0x32 0x34 0x03 Switching Commands Note The commands are in HEX No spaces between HEX codes 0x denotes HEX No need to enter 0x ...

Page 13: ...2 out a 2 Select OUT A to Input port 3 out a 3 Select OUT A to Input port 4 out a 4 Output B Switching Commands Select OUT B to Input port 1 out b 1 Select OUT B to Input port 2 out b 2 Select OUT B to Input port 3 out b 3 Select OUT B to Input port 4 out b 4 Select ALL Output Switching Commands Select ALL Outputs A B to Input port 1 out all 1 Select ALL Outputs A B to Input port 2 out all 2 Selec...

Page 14: ... 4 selects the mode EDID switch position 5 is for program mode or LOCKED mode program mode is shown Mode Video Audio Settings 1 default 1080P 2CH PCM 1 2 3 4 5 EDID LOCK ON 2 1080P 2 0 5 1 7 1 LPCM DD DTS5 1 1 2 3 4 5 EDID LOCK ON 3 1080i 2CH PCM 1 2 3 4 5 EDID LOCK ON 4 4k 2CH PCM 1 2 3 4 5 ON EDID LOCK 5 4K 2CH PCM DD DTS5 1 1 2 3 4 5 ON EDID LOCK 6 Clone EDID of device connected to Output A 1 2...

Page 15: ...IP switches to the EDID you wish to program to Mode 6 shown as example 1 2 3 4 5 ON EDID LOCK Mode 6 shown as example 4 Plug in the 5V Power 5 Verify LED is indicating the EDID mode selected to program Mode 6 shown as example A B Mode 6 shown as example 4 Press the A button to start programming 5 The LED will count from 1 99 6 Wait until LED completes counting to 99 When LED shows 1 1 programing i...

Page 16: ...MXA71 USB port allows the unit to update EDID or functionality Please visit our support page https octavainc com support 20and 20updates html HDMXA71ip If you are unsure or need assistance please contact us at info octavainc com ...

Page 17: ...nstalled in a 1 RU rack by simply installing the rack mounts included Disabling Enabling Front Panel IR Remote Receiver To disable the front panel IR remote receiver insert the plastic plug into the IR jack as shown Front panel IR receiver disabled ...

Page 18: ...TS SUPPLIER S LIABILITY FOR ANY CLAIM WHATSOEVER EXCEED THE COST OF THE PRODUCTS GIVING RISE TO THE CLAIM WHETHER BASED IN CONTRACT WARRANTY INDEMNITY OR TORT INCLUDING WITHOUT LIMITATION NEGLIGENCE AND STRICT LIABILITY OR OTHERWISE IN NO EVENT SHALL OCTAVA INC OR ITS SUPPLIERS BE LIABLE FOR ANY SPECIAL INCIDENTAL CONSEQUENTIAL OR OTHER INDIRECT DAMAGES INCLUDING WITHOUT LIMITATION LOSS OF REVENUE...

Page 19: ...o the Analog Audio Output Does not convert Analog Audio to HDMI RS 232 1 LAN TELNET Control 1 RJ 45 USB Service Port 1 Dimension 15 07 x 4 12 x 1 67 inch 382 9 x 10⁴ 7 x 42 3 mm DC adapter included 5VDC 2 5A Rack mount capable 1RU Rack mounts included Remote control IR Infrared discrete code For Questions and support Email info octavainc com URL www octavainc com Copyright 2015 Octava Inc All righ...

Reviews: