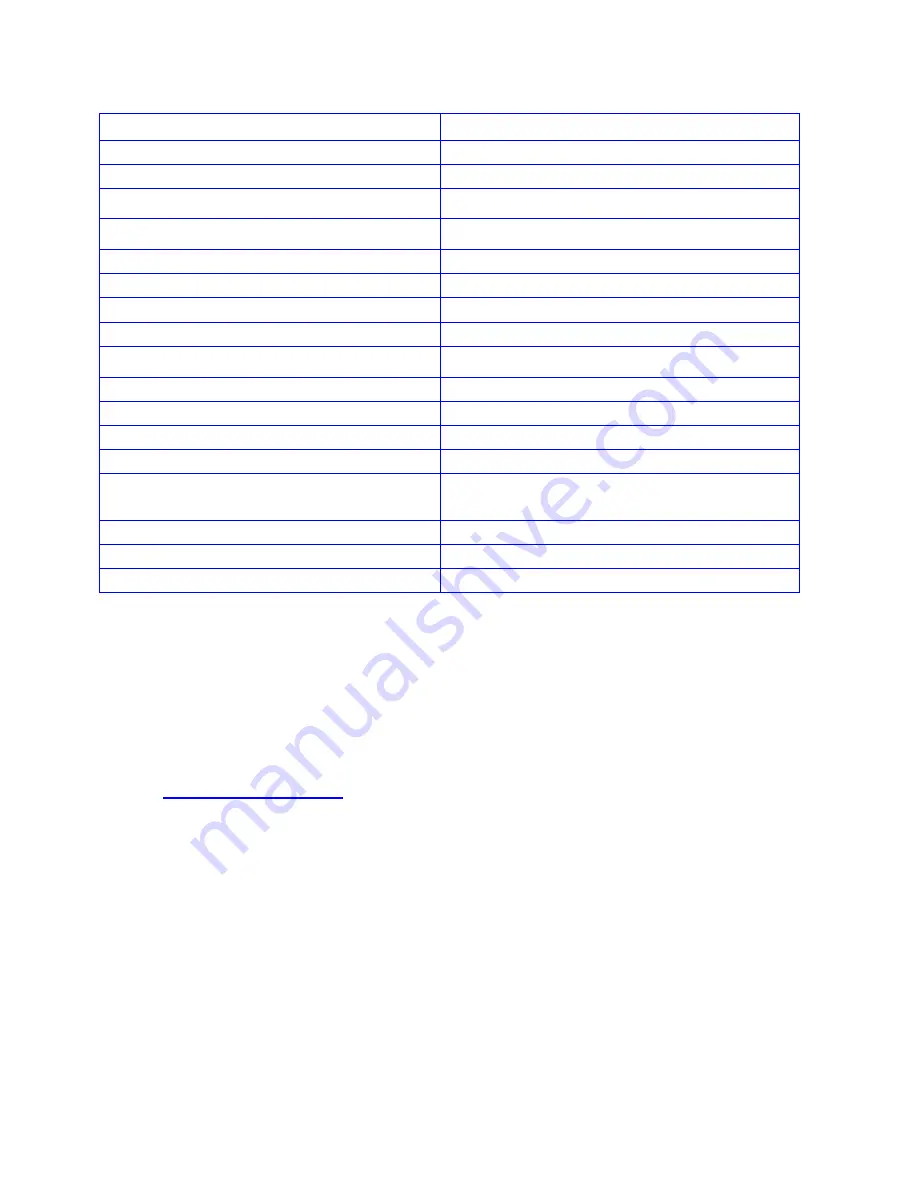
Octava HDHC44MX-V1.3 Installation Manual Download Page 17

17 


Rev.D 

Description 

Specifications 

Model 

HDHC44MX-V1.3 

HDMI Inputs 

HDMI Outputs   

RJ-45 CAT 5/6 output   

    4 

Version 

1.3 

HDCP 

Yes 

IN/Out Connectors 

19 pin HDMI female type-A 

RS-232 control port 

Display Selection 

Remote, Manual, Smart Scan,RS-232 

Video Resolution 

480 P, 720 I/P, 1080 I/P 

Video Data Rate 

6.75    Gbps 

Deep Color Support 

Yes 

Vertical Frequency Scan Rate 

24 / 50 / 60 Hz 

Dimension 

16.85 x 8.04 x 1.67 inch 

(427.9x 204.3 x 42.3 mm) 

DC adapter (included) 

9VDC, 2.5A 

Rackmount capable 

1RU, Rack mounts included 

Remote control (IR) 

Infrared, Discrete code 


For Questions and support: 
 
Email : 

[email protected]


URL:      www.octavainc.com


Copyright© 2011 Octava Inc.   All rights reserved.   
HDMI, the HDMI logo and High-Definition Multimedia Interface are trademarks or 
registered trademarks of HDMI Licensing LL.C 

All trademarks are the sole property of their respective companies 


Summary of Contents for HDHC44MX-V1.3

Page 1: ...1 Installation Guide Model HDHC44MX V1 3...

Page 2: ...Panel Control 6 Connecting Using CAT 5 6 outputs 7 Remote Control Guide 8 EDID Configuration 9 Changing EDID mode 10 RS232 Controls Commands 12 1 RU Rackmount 14 Disabling Enabling IR Remote Control...

Page 3: ...ows 256 viewing combinations 1 RU mountable RS 232 control Works with HDMI or DVI D HDCP enabled HDTV Supports high resolution video 480P 720I P 1080I P Clear EYETM design optimizes HDMI signal transm...

Page 4: ...figuration switch 1 to the down position 2 Re power the matrix Installation 1 Verify that the Configuration Switch is in the factory default mode 2 Connect the DC power adapter 3 Connect the Monitors...

Page 5: ...disable Smart Scan EDID MODE select EDID MODE select Programming LOCK Down Smart Scan Off Up Smart Scan ON Down EDID Programming mode Up Locked Display LED Indicators Manual Select Infrared Jack Infra...

Page 6: ...ontrol Source Selection You may use the front panel buttons to select the sources connected to each display For example To Set display A to Input 2 Simply press and release the A display button until...

Page 7: ...optional to the I R TX of HDMI Matrix 5 Connect the DC power adapter Ethernet CAT 6 cable is recommended for 1080P and best performance HD Matrix CAT 5 6 output Connect I R Transmitter cable optional...

Page 8: ...lect the Display that you wish to control followed by the Input DVD Settop that you wish to watch For example Pressing C4 will switch Input 4 to HDMI Out C Pressing ON OFF Turns On Off the HDMI Matrix...

Page 9: ...cription Switch settings 1 480P 720 I P 1080 I P PCM Bitstream Dolby Digital DTS Default Mode Internal EDID 2 Read EDID of all monitors receivers and set Video Minimum Resolution of devices connected...

Page 10: ...Scan switch to OFF 2 Disconnect all sources and display from Matrix 3 Set the Progam Lock switch 4 to program mode down 4 Set the EDID to the mode desired MODE 2 shown See page 8 for other EDID modes...

Page 11: ...will count from 000 to 100 while programming LED will count from 000 to 100 while programming 8 Wait Programming is complete when LED indicates 1 9 Set to LOCK Position 10 Connect all video sources a...

Page 12: ...g the HDHC44MX via RS232 can be done by send a series of commands per the RS232 Command Table Basic controls Note The commands are in HEX No spaces between HEX codes HEX CODE Port Status 0x02 0x30 0x3...

Page 13: ...put port 2 0x02 0x32 0x32 0x32 0x03 Select OUT B to Input port 3 0x02 0x32 0x32 0x33 0x03 Select OUT B to Input port 4 0x02 0x32 0x32 0x34 0x03 Output C Switching Commands Select OUT C to Input port 1...

Page 14: ...d in a 1 RU rack by simply installing the rack mounts included Disabling Enabling Front Panel IR Remote Receiver To disable the front panel IR remote receiver insert the plastic plug into the IR jack...

Page 15: ...e to the CAT 6 HDMI receiver as shown above 2 Connect the IR transmitter cables to the matrix IR TX 1 4 as shown above 3 Place and point a IR Transmitter to each video source as shown above Note No IR...

Page 16: ...ITS SUPPLIER S LIABILITY FOR ANY CLAIM WHATSOEVER EXCEED THE COST OF THE PRODUCTS GIVING RISE TO THE CLAIM WHETHER BASED IN CONTRACT WARRANTY INDEMNITY OR TORT INCLUDING WITHOUT LIMITATION NEGLIGENCE...

Page 17: ...t Yes Vertical Frequency Scan Rate 24 50 60 Hz Dimension 16 85 x 8 04 x 1 67 inch 427 9x 204 3 x 42 3 mm DC adapter included 9VDC 2 5A Rackmount capable 1RU Rack mounts included Remote control IR Infr...

Reviews: