background image

31

Time Shift


Function

This TV presents a function called "Time Shift" which allows recording of TV program onto a digital 
storage medium (e.g. USB stick or external hard disc, not supplied). You may then watch the program
at a later time that is more convenient to you. Want to put the television on pause? It is now possible
with the "Time Shift" function, which records the TV program during your phone call or your coffee 
break. With "Time Shift", you will not miss anything anymore!
Note: This Function only works in DVB-T mode.      

HOW TO USE THE SERVICE TIMESHIFT

1

)

Please insert a USB key into USB port before you activate TIMESHIFT function.

2

)

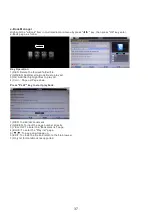
Press the button TIMESHIFT once, it will pop up below menu,  choose 

"

OK

"

 to con rm Time Shift.

Note on Use of the Time Shift Function 

The Time Shift function requires a high data transfer rate between the USB device and the unit. Indeed, 
a recording and a (deferred) playback simultaneously take place on the USB device. Certain USB 
sticks, even some new USB 2.0 devices, may lead to shaky image or choppy sound. If you encounter 
this problem, it is necessary to change the USB device. External hard drives, self-powered by mains, 
provide the highest transfer rates and allow you to use the Time Shift function optimally. 
In case of recording quality problems or playback problems such as choppy or blocked image, you may 
also try to format your USB device.

- The loading time of the USB device is too long: When you insert a USB support, the loading 

time can sometimes be a minute or more. This depends on the size of your support, the number 
of  les on it and above all, the complexity of its directories. You can reduce loading time by 
avoiding the use of multiple sub- directories in your USB disk. Avoid such multiple-subdirectories 
like “Directory/Subdirectory/Sub-subdirectory/....” and store  les in a single simple directory. 

USB Device Recognition Problems 

- After connecting your USB device to the unit, you may need to turn the device on before it can 

be detected. 

- This unit does not support direct USB connection with computer. It is necessary for you to transfer 

your data/ les on a USB stick or MP3 player. 

- If you are using an external hard drive to be connected via USB, you must connect the hard drive 

simultaneously with a power source and with the unit. If you are using a portable video player with 
hard drive, you must make sure that the internal battery is fully charged.

- Verify that the  le system of your USB device is properly formatted in FAT 32. USB media formatted 

in NTFS is not compatible with this unit. Please refer to the manual of your USB device to ensure 
that formatting is possible without altering its functionality. 

- The USB device used may not be fully compatible with USB 2.0. In this case, try a different USB 

stick in order to identify the problem. 

Recording Quality 

- If your recording is shaky or choppy  The data stream to be recorded is very important. Certain USB 

sticks, even some new USB 2.0 ones, do not allow suf cient data transfer rate. If this happens, try 
with a newer USB device or with an external hard drive. With external hard drives, data transfer rate 
is suf ciently high and this problem should be solved. 

The broadcasting TV program is stopped and the image is frozen on screen. 
During this time, the TV program is being recorded and you can take a break.

3) Press      button to resume the TV program from the point is was paused, 
and the recording will continue. During playback, you can:
- Press PAUSE button to pause the playback, press PLAY button to resume playback.
- Press      or      to scan backward or forward.
- If you want to stop the recording and playback, please press STOP button.

Message

Do you want to start

TimeShift?

OK

Cancel

Message

Do you want to stop

TimeShift?

OK

Cancel

Summary of Contents for OCEALED3219B2

Page 1: ...32 HD LED TV User manual OCEALED3219B2...

Page 2: ...the electric cord is damaged it must be replaced by the manufacturer or quali ed after sales personnel in order to avoid any danger The product must be installed in accordance with local laws Damaged...

Page 3: ...In case this television set is to be relocated to a different location please keep in mind and apply the above safety instructions Do not expose the product to high temperatures moisture water and du...

Page 4: ...remote control to switch the unit back to operation mode This logo set on the product means that the recycling of this apparatus comes within the framework of the directive 2012 19 EU of July 4 2012 c...

Page 5: ...4 TV Safety...

Page 6: ...5...

Page 7: ...nstructions Page 9 IV Connecting Cables Page 10 V Remote Control Page 11 VI Antenna Connections Page 13 VII Watching Television Programs Page 14 VIII First Time Installation Page 16 A Picture Page 17...

Page 8: ...ort cut key enter into the next menu and adjust OSD options increasing The command buttons are at the back of the TV Introduction for Each Key Enter exit the main menu Channel downwards short cut key...

Page 9: ...s from the machine Figure 2 1 Place the machine at on a desktop Caution put a foam cushion under the machine to avoid it from scratching 2 Align the screw holes on stand and TV bottom Figure 2 3 Fix t...

Page 10: ...rent screws as speci ed will damage the wall mounting support and will be outside the scope of product guarantee Contact a professional technician for assistance when wall mounting your TV Do not wall...

Page 11: ...tible video signal 480P 576P 720P 1080i 1080P 9 YPbPr IN Component input terminal 10 AV IN Connect to the left right RCA video out connection of any vide resource 11 CI SLOT Insert a CI common interfa...

Page 12: ...EAL AUDIO DISPLAY Display the system state information set by active user TEXT SIZE Change the size of current page SUBPAGE Display the current sub page HOLD Hold the current page and prevent again Di...

Page 13: ...take out the batteries and place in a shady cool and dry place if you will not use the remote control for long time Please treat damaged or leaking batteries with care Please wash your hands with soap...

Page 14: ...te the television will enter into lower power sleep state standby state to conduct power saving and protection after several minutes with no signal inputs Power saving protection mode antenna antenna...

Page 15: ...channel 12 Channel select 1 Use the buttons on the television panel to conduct channel selection First press CH buttons on the front panel to enter into channel selection mode state then press CH butt...

Page 16: ...15 INFO INFO...

Page 17: ...amic Standard Mild Setup 1 Move Enter OK Exit Exit Message Are you sure OK Cancel The rst time you switch on the TV you will be prompted to search channels OK First you will be prompted to choose the...

Page 18: ...le only in User picture mode Colour The colour saturation value of picture can be adjusted from 0 100 Tint This item is used to adjust the tone of color in NTSC system from 0 100 Colour Temperature Th...

Page 19: ...le is adjustable only in User sound mode Balance This item is used to adjust the audio output between left and right speaker from 50 to 50 Surround Press the p q button to select the Surround item and...

Page 20: ...items OK Cancel Move Exit Exit Channel Channel Manager No Channel Name X 0001 0002 0003 0004 0005 0006 0007 0008 0009 C02 C04 S05 S06 C09 C11 C12 S13 S30 Del Skip Swap MENU Return CH Page OK OK C Cha...

Page 21: ...n selected country automatically User can skip digital search to analog search directly by pressing EXIT key and can also stop auto scanning directly by pressing EXIT during analog scanning Digital Mo...

Page 22: ...z Enter Enter SECAM L Current Channel Current Channel Save Fine Tune Press u to ne tuning when the signal of the current channel is weak Fine Tune Adjust Return Auto search mode for all channels displ...

Page 23: ...Lock item and then use OK button or u button to enter Default password is 0000 Password Change Pin Code Hotel Mode Feature Child Lock Picture Sound Channel Feature Setup Enter Enter Move Enter OK Retu...

Page 24: ...nguage Sleep Timer Press the p q button to select the Sleep Timer item and then use u button to select sleep Time 10min 20min 30min 60min 90min 120min 180min 240min or off Auto Power Off In order to s...

Page 25: ...F The screen background will turn blue at very weak or no signal condition if Blue is ON Colour Mode This item allows you to change the screen brightness effect Reset TV Setting This item is used to r...

Page 26: ...25 INFO 0015 NT1 576i TTX Subtitle 07 28 F DVB T...

Page 27: ...rt p q u OK t u OK Picture Sound Channel Feature Setup Channel Move Enter OK Return Menu Exit Exit Channel Management Country Auto Search DTV Manual Search ATV Manual Search Enter France Enter Enter E...

Page 28: ...ograms with the gestures and symbols on the screen while the signal is available CI Info Ensure a CI card is inserted in the slot provided Press button to select CI Info then press OK button or button...

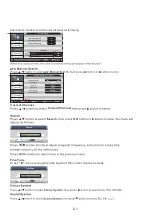
Page 29: ...remove your USB stick Immediate Recording Insert a compatible USB device which has been previously formatted by the TV please refer to previous section Wait for about 5 seconds until the device is re...

Page 30: ...me and duration You can also program one or more weekly recordings Press button to select Timer then press OK button or button to enter Tips You can press TIMER button on the remote control to enter I...

Page 31: ...ing in HD quality identical to the signal received To play your recordings on another multimedia device it may be necessary to install a compatible video codec If you want to record a lm or a long pro...

Page 32: ...rectory Subdirectory Sub subdirectory and store les in a single simple directory USB Device Recognition Problems After connecting your USB device to the unit you may need to turn the device on before...

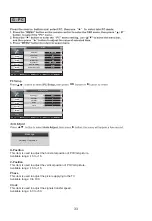
Page 33: ...32 Program List CH LIST p q OK Subtitle DTV Subtitle ENG Move Channel List Move Enter OK t u p q OK OK Multi Audio Right English Dutch AD Move p q t u 1 TF1 2 FRANCE 2 3 FRANCE 3...

Page 34: ...nel Feature Setup 0 0 0 0 p q u OK Adjusting Please wait H Position This item is used to adjust the horizontal position of PC VGA picture Available range 16 to 16 V Position This item is used to adjus...

Page 35: ...ly loaded Check that the les system of your USB device is formatted into the FAT 32 format USB device formatted into NTFS are not compatible with this unit Caution if you attempt to modify your le sys...

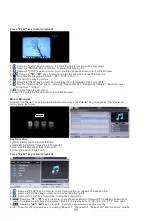
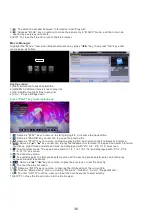
Page 36: ...playback Music Manager Highlight the Music item in multimedia main menu by press t u key then press OK key enter music page as follow Key Operation 1 RED Delete the focused folder le 2 GREEN Add Del...

Page 37: ...playing le and return to the le browser interface 4 Same as key on remote to play fast backward or forward The speed can switch to twice four times eight times and sixteen times and displayed with X2...

Page 38: ...Del all e Book les to play list 3 OK Add Del highlight les to play list 4 CH Page up Page down e Book Press PLAY key to start playback 1 RED To add del bookmark 2 GREEN To input the page number direc...

Page 39: ...ize Resolution No of Bright or Dark Sub Pixels No of Bright or Dark Pixels White or Black Continuous Line Color Pixels 32 Technical Data Sheet Sheet of houeshold television according to EU directive 1...

Page 40: ...34 32 80 50 OCEALED3219B2 OCEANIC 39...

Page 41: ...watch CANAL using this product carry out DVB T channel search when CANAL is unsarambled Form 12 30 p m to 1 30 p m From 7 00 p m to 8 30 p m Solutions 5 seconds Solutions X Troubleshooting For any ot...

Page 42: ...esence of insects 3 Any incident relating to abuse misuse alteration or unauthorized disassembly or repair 4 Improper maintenance improper use of the product or incorrect voltage connection 5 Any use...

Page 43: ...www oceanic eu...

Reviews: