background image

20

Océ TDS300 User Manual

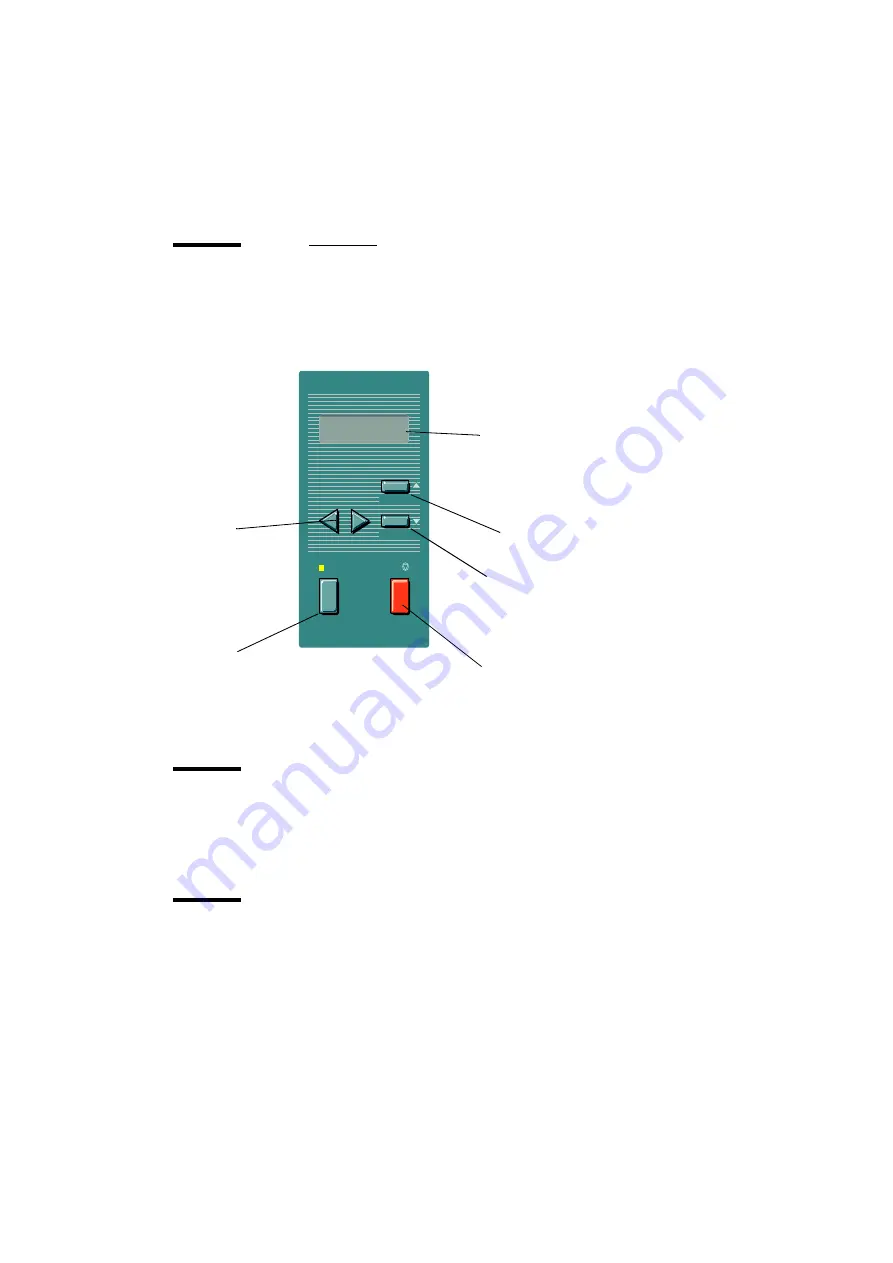
Printer operator panel

The operator panel on the right hand side is easy to use (see figure 4). Th
panel has keys and a display.

[4] Printer operator panel

Display

The display shows the feedback about print job status and error messages see 
page 33 and page 34 in normal mode. In off-line mode it shows the ‘off-line’ 
menu (see figure  on page 36).

Menu level indicator

The menu level indicator indicates the current position in the menu. Press the 
Previous key to scroll through the menu.

nästa/välj

föregående

on-line

stopp

Stop key

On-line

key

Browse 

keys

Next/select

key

Previous

key

Alphanumeric display

Summary of Contents for TDS300

Page 1: ...Oc TDS300 User Manual...

Page 2: ...Oc Technologies B V US This manual contains a functional and task oriented description of the Oc TDS300 multifunctional digital system release 1 0 Trademarks Products in this manual are referred to by...

Page 3: ...6 Chapter 2 Use the Oc TDS300 to print Printer operator panel 20 Display 20 Menu level indicator 20 Keys 21 How to turn on and turn off the Oc TDS300 printer 22 Cancel a print 22 Menu structure 23 Med...

Page 4: ...ver originals after scanning 48 Enable automatic feed of the original 48 Define settings for the next original 49 Copy on pre cut sheets 49 Stop a copy job 52 Set synchro or standard cut 52 Adjust the...

Page 5: ...sword 81 Automatic logon 81 Language 82 Help 82 How to perform actions from the Oc Settings Editor 82 Key Operator settings 84 System Administrator settings 85 Chapter 6 Printer supplies and maintenan...

Page 6: ...y information 116 Radio interference 116 Symbols 116 Instructions for safe use 117 Safety data sheet for the Oc TDS300 119 Safety data sheet Oc TDS300 printer 120 Safety data sheet Oc TDS300 printer a...

Page 7: ...7 Oc TDS300 User Manual Chapter 1 Introduction This chapter describes the main features the options and the software applications provided with the Oc TDS300 system...

Page 8: ...TDS300 The Oc TDS300 is a wide format black and white multifunctional system The Oc TDS300 offers a range of print and copy functionality The system includes a printer 1 or 2 rolls a controller and a...

Page 9: ...a printing speed of 1 8 A0 or 3 meters per minute You can perform a number of activities at the Oc TDS300 printer You can set the media type and size stop a print job or select your preferred languag...

Page 10: ...he print queue where they wait to be printed The job that is put first into the queue is printed first Network connectivity The Oc TDS300 controls a number of common network protocols The Oc TDS300 ca...

Page 11: ...vailable media are indicated on the operating panel Adobe PostScript 3 PDF The Oc TDS300 fully supports Adobe PostScript 3 for all supported languages Oc Print ExecTM LT Oc Print ExecTM LT is optional...

Page 12: ...printer settings for recurring print jobs Also the key operator defines all time settings such as panel time out and sleep mode time out See Oc Power Logic The Settings Editor on page 67 for more inf...

Page 13: ...osoft Windows 95 98 Windows printer driver for Microsoft Windows 2000 XP and NT 4 0 AutoCAD HDI driver and Adobe PostScript 3TM driver With this software PC users can access the Oc TDS300 remotely fro...

Page 14: ...PostScript or PDF optional Adobe PostScript 3 data it will generate a print with the settings as specified in the Oc Settings Editor Each print job has remote control commands to indicate the setting...

Page 15: ...to generate both a printable file e g HP RTL HP GL 2 and the appropriate header with RCF commands Please refer to the Windows AutoCAD Driver documentation Use the Oc job submission software like Oc Pr...

Page 16: ...e The operator panel of the scanner is activated in the following conditions you feed an original a key on the operator panel is pressed Turn on the printer 1 Set the ON OFF switch at the rear of the...

Page 17: ...the Oc Power Logic Controller 1 Press the button on the front of the controller to turn on the controller Turn off the Oc Power Logic Controller 1 Press the button on the front of the controller to t...

Page 18: ...18 Oc TDS300 User Manual...

Page 19: ...19 Oc TDS300 User Manual Chapter 2 Use the Oc TDS300 to print This chapter explains how to print with the Oc TDS300...

Page 20: ...back about print job status and error messages see page 33 and page 34 in normal mode In off line mode it shows the off line menu see figure on page 36 Menu level indicator The menu level indicator in...

Page 21: ...ext select key the Previous key and the Browse key to go through the menu If the green light above the On line key is on the printer is on line if this light is off the printer is off line Next select...

Page 22: ...nter see chapter How to turn on and turn off the Oc TDS300 on page 16 Cancel a print Cancel a print before you start the print or during the print Cancel a print 1 Press the Stop key 2 The printer sto...

Page 23: ...ntenance on page 87 If you activate this function the machine automatically switches to the other roll if the used one becomes empty The switch only occurs if the kind of media and the width of the ma...

Page 24: ...the media type settings 1 Press the On line key to put the printer off line 2 Select the Media settings item with the or key 3 Press Next select to enter the Media settings menu 4 Select Roll 1 Roll...

Page 25: ...the time out for manual feed Default is 1 minute 1 Press On line to put the printer off line 2 Select the Media settings item with the or key 3 Press Next select to enter the Media settings menu 4 Sel...

Page 26: ...Media settings item with the or key 6 Press Next select to enter the Media settings menu 7 Select Cut media with the or key 8 Press Next select to cut the paper 9 Open the paper drawer 10 Remove the s...

Page 27: ...Press Next select to print the configuration report 6 Press On line to put the printer on line again to print the report Print the menu card You can print the menu of the printer to guide you through...

Page 28: ...he printer off line 2 Select the Print info item with the or key 3 Press Next select to enter the Print info menu 4 Select the Demo print item with the or key 5 Press Next select to print the demo pri...

Page 29: ...S300 has 2 network adapters To set the network settings you must enter the network data in 4 fields Use DHCP server The Dynamic Host Configuration Protocol DHCP is a protocol to automate the assignmen...

Page 30: ...P address 1 Press the On line key to put the printer off line 2 Select the System item with the or key 3 Press Next select to enter the System menu 4 Enter password 5 Select Network sett with the or k...

Page 31: ...with the or key 17 Press Next select to confirm 18 Press On line to put the printer on line again To set the Default gateway 1 Press the On line key to put the printer off line 2 Select the System it...

Page 32: ...o put the printer on line again Clear set memory The set memory indicates the available memory If an error occurs for example the set memory reaches its limits you must clear the set memory Clear set...

Page 33: ...he printer detects that the required media is not available on roll 2 Fill roll 2 with the indicated media Manual feed A2 Paper The printer detects that the required media is not available in the manu...

Page 34: ...ess on line Roll 1 empty Open roll unit The paper on roll 1 is empty Open the roll unit and replace it Roll 2 empty Open roll unit The paper on roll 2 is empty Open the roll unit and replace it Error...

Page 35: ...ary withdraw roll and rewind Press on line Deposit error Press on line An error in the compact output stacker occurred The compact output stacker stops The print process continues Press on line Illega...

Page 36: ...ansparent 110g Vellum Material Film 3 5 Film 4 5 Manual feed Translucent Time out 67 seconds Cut media Cutting Configuration Printing Print info Menu card Printing Demo print Printing UK English Langu...

Page 37: ...37 Oc TDS300 User Manual Chapter 3 Use the Oc TDS300 to copy This chapter contains a description how to copy with the Oc TDS300...

Page 38: ...menu options 7 Scanner operator panel starta avbryt kant exponering inmatning utmatning extra upps ttning fil zooma ark kopiering superior inferior rulle 1 rulle 2 manuell material Input key Extra ke...

Page 39: ...or a trailing strip The icon flashes Use the browse keys left right up down to change the value The icon remains on if you press another settings key and select a different value than the default valu...

Page 40: ...mmunication Scanner asleep The scanner is in low power mode Scanner running The scanner scans Please wait The scanner downloads the languages Remove original Press cancel There is an original on the t...

Page 41: ...l indicator The menu level indicator indicates the current position in the menu Press the Previous key to scroll through the menu 8 Menu level indicator on the scanner operator panel inmatning utmatni...

Page 42: ...ndard cut mode the copy is cut at a standard length see Set synchro or standard cut on page 52 The automatic exposure gives background free copies from most line drawings Select the correct original t...

Page 43: ...e any settings the settings of the previous copy job are used or the default settings of the machine are used number of copies 1 use roll 1 zoom 100 synchro cut no leading or trailing strip auto expos...

Page 44: ...r to a defined position 2 Specify the number of copies with the or keys 3 Press the media key to select a roll or to select manual feed 4 Press the zoom key to specify a reduction or an enlargement fa...

Page 45: ...el The display shows the number of copies Select the use of roll 1 or roll 2 or manual feed You can select between two rolls or manual feed with the media key When a roll is selected the copy material...

Page 46: ...s key one of the indications above the key flashes If the adjustment is different from the default setting the indication lights Select the zoom factor with 1 zoom steps 1 Press the zoom key The indic...

Page 47: ...ct Original with the or key 3 Press the key to enter the Original menu 4 Select Background comp with the or key 5 Press the key to enter the Background comp menu 6 Select on or off with the or key 7 P...

Page 48: ...e the output at the rear side of the scanner if your originals are thick very thin damaged in a carrier sheet The rewind setting will return to default when the Cancel key is pressed the panel time ou...

Page 49: ...ll the needed settings for the next original 2 Insert the next original Copy on pre cut sheets If you copy a job on a media type and or size that is not available on one of the paper rolls you can man...

Page 50: ...the copy material forward in the cut of the roller A paper bulge must appear over the full width of the page 10 Hold the paper with your hands until the printer pulls in the first part of the sheet Th...

Page 51: ...em with the or key 3 Press next select to enter the media settings menu 4 Select manual feed with the or key 5 Press next select to enter the manual feed menu 6 Select the time out with the or key 7 P...

Page 52: ...hro cut mode In standard cut mode the copy is cut at a standard format length portrait You select the length of the standard format with the browse keys Example select 36 inches means select a format...

Page 53: ...iling strip to show on the copy select a negative leading or trailing strip The adjustment steps are indicated on the operator panel expressed in millimeters or 0 1 inches for systems in the US Adjust...

Page 54: ...and trailing strip to eliminate or add a filing strip Leading and trailing strips can be extended up to 400 mm or shortened up to 400 mm see figure 11 11 Example of adjusting the leading and trailing...

Page 55: ...e next figure 12 Example of a mirror image copy To make a mirror image copy 1 Press the Extra key 2 Select Paper copy with the or key 3 Press the key to enter the Paper copy menu 4 Select Mirror with...

Page 56: ...94x841 mm A2 420x594 mm A3 297x420 mm E 34x44 tum D 22x34 tum C 17x22 tum Sk rningsl ngd B 11x17 tum E 36x48 tum D 24x36 tum C 18x24 tum B 12x18 tum 30x42 tum Papperskopia B1 707x1000 mm B2 500x707 mm...

Page 57: ...57 Oc TDS300 User Manual Chapter 4 Install and start Oc Remote Logic on a workstation This chapter describes how to install and start Oc Remote Logic on a workstation...

Page 58: ...58 Oc TDS300 User Manual Introduction Oc Remote Logic to access the Oc Settings Editor Oc Power Logic The Settings Editor on page 67 from a remote workstation...

Page 59: ...m The installation procedure for Remote Logic is quite simple and self explanatory When you select the Install remote applications option on the CD ROM a Wizard starts to guide you through the install...

Page 60: ...installation of Oc Remote Logic When the installation is complete you can start the applications by selecting them from the specified folder in the Start menu To work with Oc Settings Editor you first...

Page 61: ...links to JRE s for various UNIX platforms 2 Unpack the contents of the file RemoteLogic_vX tar from the directory Products remotelogic UNIX to a subdirectory on the system 3 Use tar xvf RemoteLogic_v...

Page 62: ...time engine for use with Oc Remote Logic is the 1 1 8 version HP UX For HP UX 10 20 and 11 00 the runtime engine can be downloaded from http www unix hp com java The preferred version of the Java runt...

Page 63: ...Oc Remote Logic in general 1 Install Java Virtual machine preferred 1 1 8 or higher 2 Extract RemoteLogic_vX tar or RemoteLogic_vX zip from the Oc Remote logic CD ROM 3 Set the environment variable RL...

Page 64: ...guration file to use server server Sets the specified server as the server to connect to language1 lang Specifies the first language in combination with the parameter country1 country country1 country...

Page 65: ...emote Logic applications with the configuration file Myconfig cfg connected to the MyTDS300 server The first language is set to Japanese and the second to French C Program Files Remote Logic Bin AL ex...

Page 66: ...66 Oc TDS300 User Manual...

Page 67: ...300 User Manual Chapter 5 Oc Power Logic The Settings Editor This chapter gives information about the Oc Settings Editor For details about specific settings refer to the on line help on the Oc Setting...

Page 68: ...68 Oc TDS300 User Manual Introduction Use the Oc Settings Editor to set the default settings of the Oc TDS300 according to your companies requirements...

Page 69: ...or on a remote client after you installed the software see Install and start Oc Remote Logic on a workstation on page 57 Start Oc Settings Editor on a remote workstation 1 Select Oc Remote Logic via t...

Page 70: ...system you want to connect to in the Systems text box 4 Click Add The system is added to the list You can add as many systems Note You can also remove an Oc Remote Logic system Select one in the list...

Page 71: ...allows authorized users to configure default printer language PDL settings and printer pen settings It also allows the System Administrator to configure system and connectivity settings These groups...

Page 72: ...72 Oc TDS300 User Manual 14 Oc Settings Editor General structure The Oc Settings Editor is structured as follows Menu bar Top toolbar Left toolbar Settings area Status bar...

Page 73: ...cation The Automatic logon option allows you to start the Oc Settings Editor application automatically in the specified user mode View The View menu allows you to switch between the display languages...

Page 74: ...Note All settings in the current view mode are saved not only the ones that are currently visible A few special files are available here Default kos Default sas These files contain the factory default...

Page 75: ...ghlight is used to indicate which button is activated 17 Left toolbar Settings area The settings area consists of two parts a setting tree and an update area Tree structure Most settings are displayed...

Page 76: ...icular setting the update area is grayed and no changes can be made Note that a few settings such as basic card and pen settings are not edited from the tree structured but are accessed directly from...

Page 77: ...mation left to right System status icon for connected or disconnected The following icons are used The Oc Settings Editor is connected to a system The Oc Settings Editor is not connected to a system S...

Page 78: ...0 User Manual Use the Oc Settings Editor The Oc Settings Editor enables you to change the default settings of the system Only authorized users are allowed to change the default settings in the Oc Sett...

Page 79: ...ed to view and change settings in the key operator view The key operator is also allowed to view system administration settings but is not able to change them In system administrator mode the operator...

Page 80: ...re case sensitive Change the passwords after your first log on How to log on 1 From the File menu select Log on 2 Select the correct user name 3 Enter the Password 4 Click OK Note You must log on into...

Page 81: ...in the Password text box 5 Enter the new password in the New password text box 6 Enter he new password in the Confirm new password text box and click OK to confirm the new password Automatic logon If...

Page 82: ...ditor You can perform a number of activities from the Oc Settings Editor These activities include Save settings to file Load settings from a file Save and load settings All Key Operator and System Adm...

Page 83: ...es contain the version of the settings for the Key Operator and System Administrator after the last Apply When an Apply is performed first the contents of the current settings is copied to the backup...

Page 84: ...ted Key Operator a password is required to access them The service engineer will provide this password to you upon installation Note When you are finished make certain you log off from the Key Operato...

Page 85: ...Administrator settings you have to access the SA settings in the Oc Settings Editor There are two types of System Administrator settings see figure 20 Printer System 20 System Administrator settings i...

Page 86: ...itor 3 Click on one of the top buttons to display the desired group of settings 4 Select the setting you want to update in the tree structure 5 Update the setting in the update area as required Note A...

Page 87: ...S300 User Manual Chapter 6 Printer supplies and maintenance This chapter describes how to Load media Refill toner and replace the waste toner bag Clean the glass platen and the reference roller of the...

Page 88: ...of the size and type of the new print material is required to Enable the automatic media switch function to work correctly Support auto format functions The paper rolls When a roll is empty during a...

Page 89: ...l holder from the drawer see figure 22 22 Removing the roll holder from the drawer 3 Remove the empty core from the roll holder while pressing the knob see figure 23 4 Slide the roll holder in the new...

Page 90: ...knob This line has to be completely visible 6 Place the roll holder with the material in the drawer see figure 24 24 Reposition the roll 7 Feed the material between the input guide plates against the...

Page 91: ...ial type refer to Media type and size on the printer on page 23 If you want to cut the paper to get a straight leading strip refer to Cut media on page 25 Otherwise continue with the next step 10 Clos...

Page 92: ...portant to have the knob at the right hand side and the paper as shown in figure 23 5 Align the roll with the appropriate lines on the roll holder while you press the knob Place the roll holder with t...

Page 93: ...er compartment 8 Press the On line key How to program media settings If you insert a new roll with another material or with a different width set the new roll specifications The width of the material...

Page 94: ...dia Setting Plain paper 64 g m2 55 g m2 Paper 64g Plain paper 75 g m2 110 g m2 Paper Biotop paper 80 g m2 Paper 75g Green label 80 g m2 Paper 75g Transparent paper 75 g m2 Transparent 75g Transparent...

Page 95: ...ately Attention Use only B5 toner Refill toner 1 Turn off the printer 2 Unscrew the knurled nut at the left hand side of the printer and open the left cover see figure 30 30 Unscrew the knurled nut an...

Page 96: ...ure 32 32 Add toner 6 Tap the toner out of the bottle 7 When the toner bottle is empty return the bottle to the original position 8 Unscrew the toner bottle anti clockwise Replace the waste toner bag...

Page 97: ...33 Replace the waste toner bag 10 Slide a new waste toner bag over the holder 11 Close the cover and tighten the knurled nut 12 Press the On line key to resume printing Note Replace the toner waste b...

Page 98: ...rence roller be careful not to damage the sensors on the scanner How to clean the glass platen and reference roller 1 Switch off the scanner 2 Unlock the top cover by pushing the front side of the cov...

Page 99: ...rence roller 5 Lower the top cover 6 Lock the cover by pushing the front side of the cover down and pushing it back to the rear until you hear a click Note Make sure that the cover is closed correctly...

Page 100: ...100 Oc TDS300 User Manual...

Page 101: ...101 Oc TDS300 User Manual Appendix A Summary and tables...

Page 102: ...0 User Manual The Oc TDS300 36 The Oc TDS300 system 1 Printer operating panel 2 Printer 3 Manual feed 4 Integrated Receiving Tray 5 Rolls 6 Scanner 7 Scanner feed table 8 Scanner operating panel 1 3 2...

Page 103: ...103 Printer operator panel n sta v lj f reg ende on line stopp 1 2 3 5 6 4 1 The graphics display 2 The Previous key 3 The Next select key 4 The Stop key 5 The Browse keys left right 6 The On line key...

Page 104: ...s Confirm key Strip key Copy quantity display Cancel key key Zoom key Exposure key key Start key Media key Extra key Output key Input key starta avbryt kant exponering inmatning utmatning extra upps t...

Page 105: ...sources 1 roll version with manual feed 2 roll version with manual feed 2 roll version with manual feed Output sizes From A3 to A0 and 36 a maximum of 15 meters long Media types Plain translucent tra...

Page 106: ...be PostScript 3 Interfaces Standard Ethernet 10 100 Mb with RJ45 Optional Ethernet 10 Mb with BNC and SubD Token Ring 4 16 Mb Network protocols TCP IP Novell IPX SPX FTP LPD Adobe Postscript 3 PDF Ena...

Page 107: ...ueprint Media selection Manual selection of roll 1 or 2 or manual feed Input mode Single sheet Set sets processing set collation Functionality Multi copy mode 1 99 copies scan once print many Pre prog...

Page 108: ...l Wheeled delivery tray with blower unit Capacity Up to 150 sheets media type dependent from A3 to A0 Types of media Plain paper transparent paper film vellum polyester and translucent Dimensions 1170...

Page 109: ...material types are available for the Oc TDS300 The following material sizes are available for the Oc TDS300 Material Types Materials Weight Plain paper 64 g m2 55g m2 Plain paper 75 g m2 110g m2 Plain...

Page 110: ...ture A1 594 841 A0 841 1189 8 5 inch range Material Width inch Length inch 11 inch B 11 17 17 inch C 17 22 22 inch D 22 34 34 inch E 34 44 22 86 cm range Material Width inch Length inch 12 inch B 12 1...

Page 111: ...xt table shows which format the Oc TDS300 controller chooses if you print a specific format on a chosen range Automatic format selection Paper series DIN DIN carto 21 59 cm Mixed 8 5 and 9 5 inch DIN...

Page 112: ...the DIN carto paper series Original A0 A1 A2 A3 91 44 cm B1 B2 A0 100 71 50 35 109 83 59 A1 141 100 71 50 153 118 84 A2 200 141 100 71 218 167 119 A3 283 200 141 100 308 236 168 91 44 cm 107 65 46 32...

Page 113: ...B 100 109 154 164 200 218 273 309 327 12 B 92 100 142 150 183 200 250 283 300 17 C 65 71 100 106 129 141 176 200 212 18 C 61 67 94 100 122 133 167 189 200 22 D 50 55 77 82 100 109 136 155 164 24 D 46...

Page 114: ...114 Oc TDS300 User Manual...

Page 115: ...115 Oc TDS300 User Manual Appendix B Safety information...

Page 116: ...ed in a commercial environment This equipment generates uses and can radiate radio frequency energy and if not installed and used in accordance with the user manual may cause harmful interference to r...

Page 117: ...ctly reserved for properly qualified and trained service technicians Power connection If unforeseen circumstances force you to re install the machine without the assistance of Oc Service make sure tha...

Page 118: ...f materials and equipment maintenance Do not place the machine in a room which is subject to excessive vibration Do not place the machine in a room that is too small and insufficiently ventilated See...

Page 119: ...evise this safety data sheet as new information becomes available It is the user s responsibility to determine the suitability of this information for the adoption of the appropriate safety precaution...

Page 120: ...DWLRQ 7 9 OLVW RI HDW HPLVVLRQ 6WDQG E DW FRQWLQXRXV RSHUDWLRQ N 2 RQH HPLVVLRQ PJ PLQ DW FRQWLQXRXV RSHUDWLRQ 5RRP YROXPH 5HFRPPHQGDWLRQ PLQ P 5RRP YHQWLODWLRQ 5HFRPPHQGDWLRQ PLQ P K QDWXUDO YHQWLODW...

Page 121: ...LPLW 9DOXHV IRU 89 9LVLEOH DQG 5 UDGLDWLRQ 7 9 OLVW RI HDW HPLVVLRQ 6WDQG E DW FRQWLQXRXV RSHUDWLRQ N 2 RQH HPLVVLRQ PJ PLQ DW FRQWLQXRXV RSHUDWLRQ 5RRP YROXPH 5HFRPPHQGDWLRQ PLQ P 5RRP YHQWLODWLRQ 5H...

Page 122: ...the power consumption of certain functions is automatically reduced to save energy The copier enters low power mode 30 minutes after the last copy is made1 This default time can be adjusted by the ke...

Page 123: ...123 Oc TDS300 User Manual Appendix C Miscellaneous...

Page 124: ...hrough all phases of performing the operation Figures and tables Figures and tables are titled and numbered sequentially throughout this manual Figures include pictures of product components screen du...

Page 125: ...his manual convenient in size easy to read and layed out well Yes No Did you find the information you were looking for Always Most of the times Sometimes Not at all How did you find the information yo...

Page 126: ...me optional Occupation Company Phone Address City Country Please return this sheet to Oc Technologies B V Attn ITC User Documentation P O Box 101 5900 MA Venlo The Netherlands Send you comments by E m...

Page 127: ...eng Chaoyang District Beijing 100028 China Oc esk republika s r o Hanusova 18 14021 Praha 4 Pankr c Czech Republic Oc Danmark A S Vallensbaekvej 45 DK 2605 Br ndby Denmark Oc France S A 32 Avenue du P...

Page 128: ...548 Oc Espa a SA Business Park MAS BLAU C Osona 2 2 3a Planta 08820 El Prat del Llobregat Barcelona Spain Oc Svenska AB P O box 1231 S 164 28 Kista Sweden Oc Schweiz AG S gereistrasse 29 CH8152 Glattb...

Page 129: ...controller 70 Connecting 70 Controller start up 17 copy process start 43 cut media 25 D demo print 27 Diagnostic mode 32 display printer Error messages 34 Status messages 33 Display language 82 Drive...

Page 130: ...and application software 107 Power Logic controller 106 Printer 105 Remote Logic software 107 program media settings 93 R refill toner 95 Remote Logic languages 82 repro operator settings 12 S Safety...

Page 131: ...al feed 25 top cover of the scanner 98 tree structure 75 turn off printer 16 turn off the printer 16 22 turn on printer 16 turn on the printer 16 22 U undo 74 Unix 61 update area 76 Use DHCP server 29...

Page 132: ...132 Oc TDS300 User Manual...

Reviews: