background image

15

» air «  inlay

inlay

cover

inlay oder » air « inlay 
 aufsetzen

put on inlay or » air « inlay

Summary of Contents for Mito alto side up

Page 1: ...Mito alto up Mito alto side up DALI Montageanleitung Mounting instructions...

Page 2: ......

Page 3: ...g mit dem Occhio air controller optional 59 Anhang 63 Pflegehinweise 64 Info Kontakt 65 Technische Daten 66 Safety precautions 05 Product description 06 Step 1 Changing the cover optional 09 Step 2 Co...

Page 4: ...rchgef hrt wer den Reparaturarbeiten d rfen nur von autorisiertem Fachpersonal oder dem Hersteller durchgef hrt werden Vor allen Arbeiten an der Leuchte Installation Reinigung etc diese unbedingt vom...

Page 5: ...arried out only by authorised qualified personnel or the manufacturer Before performing any work on the luminaire installation cleaning etc it must be disconnected from the mains supply This symbol dr...

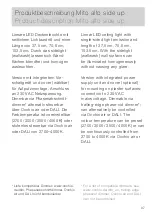
Page 6: ...2700 4000 K Linear LED ceiling light with single sided light emission and length of 36 5 cm 69 5 cm oder 102 5 cm There is a choice of the narrow light effect narrow glare free light for perfect illum...

Page 7: ...70 5 cm 103 5 cm With the sidelight wallwash wall surfaces can be illuminated homogeneously without causing any glare Version with integrated power supply unit and cover optional for mounting on plast...

Page 8: ......

Page 9: ...09 Wechsel des cover optional Changing the cover optional...

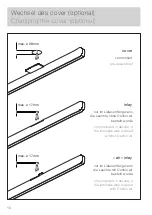
Page 10: ...Occhio air bestellt wurde only included in delivery if the luminaire was ordered with Occhio air max 98 mm max 17 mm max 17 mm cover vormontiert pre assembled inlay nur im Lieferumfang wenn die Leuch...

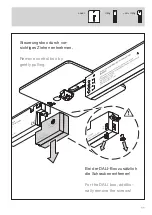
Page 11: ...inlay inlay cover Bei der DALI Box zus tzlich die Schrauben entfernen For the DALI box additio nally remove the screws Steuerungsbox durch vor sichtiges Ziehen entnehmen Remove control box by gently p...

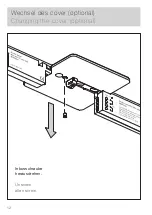
Page 12: ...12 Wechsel des cover optional Changing the cover optional Inbusschraube herausdrehen Unscrew allen screw...

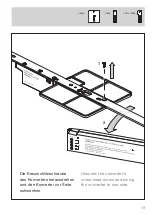
Page 13: ...13 air inlay inlay cover 1 2 Die Kreuzschlitzschraube des Konverters herausdrehen und den Konverter zur Seite schwenken Unscrew the converter s cross head screw and swing the converter to one side...

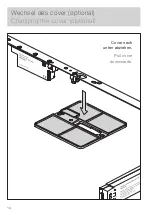
Page 14: ...14 Wechsel des cover optional Changing the cover optional Cover nach unten abziehen Pull cover downwards...

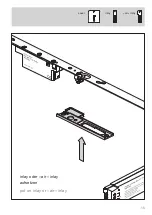
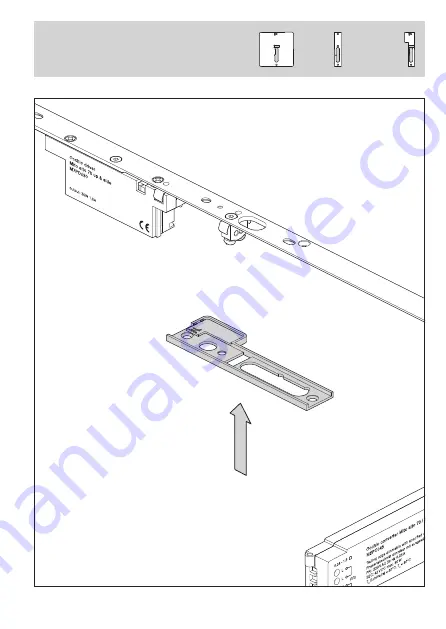
Page 15: ...15 air inlay inlay cover inlay oder air inlay aufsetzen put on inlay or air inlay...

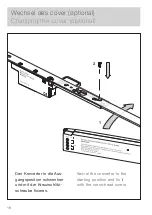
Page 16: ...cover optional Changing the cover optional Den Konverter in die Aus gangsposition schwenken und mit der Kreuzschlitz schraube fixieren Swivel the converter to the starting position and fix it with th...

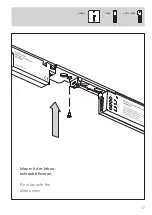
Page 17: ...17 air inlay inlay cover Inlay mit der Inbus schraube fixieren Fix inlay with the allen screw...

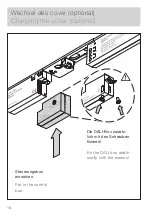
Page 18: ...Wechsel des cover optional Changing the cover optional Steuerungsbox einsetzen Put in the control box Die DALI Box zus tz lich mit den Schrauben fixieren Fix the DALI box additi onally with the screw...

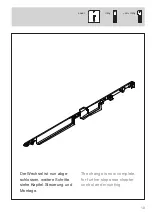
Page 19: ...19 air inlay inlay cover Der Wechsel ist nun abge schlossen weitere Schritte siehe Kapitel Steuerung und Montage The change is now complete for further steps see chapter control and mounting...

Page 20: ......

Page 21: ...ionen Steuerungsm glich keiten der Leuchte einstellen Control Set functions control options of the luminaire Mito set box standard Seite page 23 Mito air box optional Seite page 27 Mito DALI box optio...

Page 22: ......

Page 23: ...23 Mito set box standard...

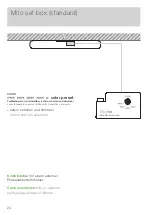
Page 24: ...hasenabschnittdimmer Can be combined with an external trailing edge phasecut dimmer color preset Farbtemperatur voreinstellbar extern schalten und dimmen color temperature pre settable switch and dim...

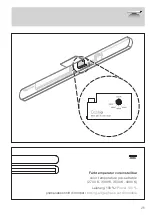
Page 25: ...25 track Farbtemperatur voreinstellbar color temperature pre settable 2700 K 3000 K 3500 K 4000 K Leistung 100 Power 100 phasenabschnitt dimmbar trailing edge phase cut dimmable...

Page 26: ......

Page 27: ...27 Mito air box optional...

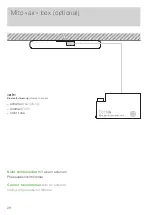
Page 28: ...ptional Nicht kombinierbar mit einem externen Phasenabschnittdimmer Can not be combined with an external trailing edge phasecut dimmer air Bluetoothsteuerung bluetooth control schalten switching dimme...

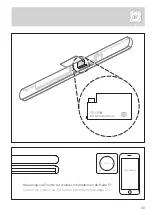
Page 29: ...29 Occhio air Steuerung via Occhio air weitere Informationen ab Seite 51 Control via Occhio air for further information see page 51...

Page 30: ......

Page 31: ...31 Mito DALI box optional...

Page 32: ...32 Mito DALI box optional DALI DALI steuerung DALI control schalten switching dimmen dim color tune...

Page 33: ...tatus von einzelnen Leuchten abzufragen Detaillierte Hinweise sind unter www occhio de dali zu finden A maximum of 64 Mito alto units can be assigned to each DALI circuit The Mito alto units can be or...

Page 34: ...evice Bei der Planung ber cksichtigen To be considered in the planning Steuerung der Helligkeit Control of the brightness DAPC EN62386 102 Steuerung der Farbtemperatur Control of the color temperature...

Page 35: ...35...

Page 36: ......

Page 37: ...37 Montage Mounting...

Page 38: ...38 Montage Mounting...

Page 39: ...l Konverter Treiber Steuerungsbox und cover mounting plate incl converter driver control box and cover D bel screw anchor Schrauben screws inlay Mito alto side up vormontiert pre assembled optional Mi...

Page 40: ...r der Montage alle stromf hren den Leitungen vom Stromnetz trennen Caution Before mounting disconnect all currentcarrying lines from the mains supply Ausrichtung bei Mito alto side up beachten Note al...

Page 41: ...41 6 mm 6 mm Achtung Auf den Verlauf von Strom leitungen achten Caution Check the routing of Check the routing of the the power cables...

Page 42: ...42 Montage Mounting...

Page 43: ...n L N PE set box Mito alto up side up set box Mito alto up side up air box Mito alto up side up air box Mito alto up side up DALI box Mito alto up side up DALI box Mito alto up side up Kabel wie abgeb...

Page 44: ...44 2 2 Montage Mounting 2 Montageseil einhaken Steckverbindung herstellen 2 hook up mounting cord connect plug Mito alto up side 70 100 up Mito alto up side 70 100 up...

Page 45: ...45 Montageseil befestigen Steckverbindung herstellen attach mounting cord connect plug Mito alto up side 40 up Mito alto up side 40 up...

Page 46: ...46 1 2 Montage Mounting Leuchte wie abgebildet einhaken Hook in the luminaire as shown...

Page 47: ...47 3 und das andere Ende nach oben einklipsen and clip the other end up Click...

Page 48: ...48 Festen Halt der Leuchte berpr fen Check that the luminaire is held in place firmly Montage Mounting...

Page 49: ...49 Die Leuchte ist nun fertig montiert The luminaire is now fully mounted...

Page 50: ......

Page 51: ...51 Steuerung mit der Occhio air App optional Control using the Occhio air app optional...

Page 52: ...llt A network my network is autom created Occhio air tutorials www occhio de air tutorials Quick guide Sento Occhio Mito sospeso Occhio Mito soffitto Occhio App installieren App ffnen und angeschlosse...

Page 53: ...eitigem Lichtaustritt luminaires with light emission on both sides Mito O QR Sca o o Mito soffitto Sento Mito sospeso eso to neue Ger te gefunden ound 3 new devices Benutzung nehmen minaires into use...

Page 54: ...tutorials www occhio de air tutorials my network Gruppe Group Bearbeiten Edit Mito soffitto Sento Mito sospeso Nutzung auf mehreren Ger ten Use on several devices Optional k nnen Sie nun ihr erstellte...

Page 55: ...Name my network Leuchten in der N he anzeigen Display luminaires near me Zeitzone Timezone Standort Location Europe Berlin Netzwerkkonfiguration Netzwerkeinstellungen Namen eingeben Sichern Network s...

Page 56: ...instellungen Settings Abbrechen Cancel Sichern Save Name my network Leuchten in der N he anzeigen Display luminaires near me Zeitzone Timezone Standort Location Europe Berlin Netzwerkkonfiguration Net...

Page 57: ...tor Passwort gesch tzt Password protected E Mail e mail Passwort Password john doe occhio de Netzwerkkonfiguration Freigabeoptionen Passwort gesch tzt Sichern Network setup Sharing settings Password p...

Page 58: ......

Page 59: ...59 Steuerung mit dem Occhio air controller optional Control using the Occhio air controller optional...

Page 60: ...ppen und Szenen Zum Einrichten des Occhio air controllers wird die Occhio air App ben tigt Eine Video Kurzanleitung kann unter www occhio de air tutorials aufgerufen werden To set up the Occhio air co...

Page 61: ...luminaires groups or scenes faden einzelne Leuchten Gruppen oder Szenen faden up down Verh ltnis ndern fades individual luminaires groups or scenes change up down relation color tune I I IIII IIII und...

Page 62: ......

Page 63: ...63 Anhang Appendix...

Page 64: ...chte ein trockenes Mikro fasertuch verwenden Detaillierte Pflegehinweise sind unter www occhio de de company faq zu finden Always allow the luminaire to cool down before cleaning To clean the luminair...

Page 65: ...65 Info Kontakt Information contact Weitere Fragen beantwortet gerne Ihr Occhio Fachh ndler Your Occhio specialist retailer will gladly answer any other questions www occhio de info occhio de...

Page 66: ...to 100 up L 1025 B 19 H 52 mm Mito alto side 40 up L 375 B 30 H 52 mm Mito alto side 70 up L 705 B 30 H 52 mm Mito alto side 100 up L 1035 B 30 H 52 mm Schutzklasse 2 Anschluss 230 V AC Dimmung via Ph...

Page 67: ...edingung max 30 C nur im Innenbereich betreiben Pr fzeichen 0 2m Technische Daten Leuchtmittel Leuchtmittel Occhio color tune LED Ausf hrung LED board Lebensdauer 50 000 Std Energieeffizienzklasse EEK...

Page 68: ...p L 1025 W 19 H 52 mm Mito alto side 40 up L 375 W 30 H 52 mm Mito alto side 70 up L 705 W 30 H 52 mm Mito alto side 100 up L 1035 W 30 H 52 mm Safety class 2 Connection 230 V AC Dimming via trailing...

Page 69: ...conditions max 30 C for indoor use only Test symbols 0 2m Technical data light source Light source Occhio color tune LED Version LED board Lifetime 50 000 h Energy efficiency class EEC A Disposal Disp...

Page 70: ...89 44 77 86 39 info occhio de www occhio de 010404295697195510 MA 97195 Mito alto up side 010404295697195510 MA 97195 Mitoaltoupside 2020 09 09 MA 97195 Mito alto up side Irrt mer und technische nder...

Reviews: