background image

13

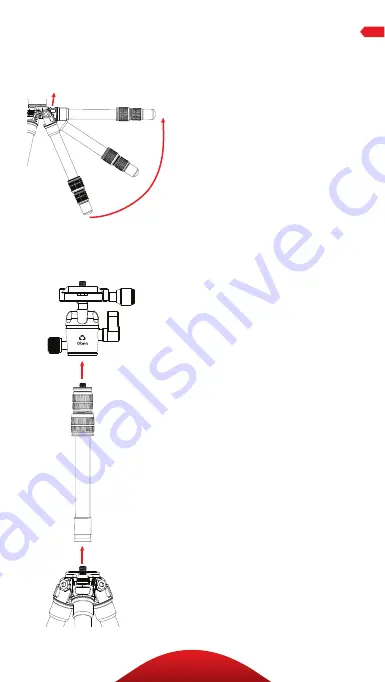
LEG ANGLE ADJUSTMENT

For stable support when 
shooting on an uneven surface, 
or for low-angle shots, each 
leg can be adjusted to 3 preset 
angles. To set the leg angle:

1. Lift the angle adjustment lock.

2. Set the angle of the leg to one 

of the three preset positions.

3. Press in the release 

lock to secure the leg at 
the desired angle.

ATTACHING THE EXTENDER

The included extender can be 
attached to add extra height to  
the tripod.

1. Unscrew the ballhead, 

and attach the extender 
by screwing it onto the 
tripod’s mounting post.

2. Attach the ballhead to the 

extender’s mounting post, or 
attach a camera or other piece 
of gear directly to the extender.

Note: The extender comes with 

an installed 3/8-16 to 1/4-20 

reducer bushing. To use it with a 

tripod that has a 3/8-16 threaded 

mounting post, remove the bushing 
from the extender’s socket.

OPERATION

To attach the extender:

Summary of Contents for CTT-1000

Page 1: ...CTT 1000 CTT 1000L 3 Section Carbon Fiber Tabletop Tripod You reonsteadyground Model CTT 1000 shown...

Page 2: ...ound weight capacity makes these tripods compatible with a range of devices from compact smartphones to full featured DSLRs The included ballhead is outfitted with an Arca compatible quick release pla...

Page 3: ...ingKnobOperation_____________________11 PanoramicBase ________________________________12 TripodOperation_________________________________12 14 LegLengthAdjustment__________________________12 LegAngleA...

Page 4: ...4 KEY FEATURES C E D B A...

Page 5: ...5 A 1 4 20mountingscrew B 3 anglelegadjustment C Legadjustmenttwistlocks D Rubber spikedFeet E Extender selfiestick AlsoIncluded 3 8 16to1 4 20reducerbushings 2 Hexkeys 2 KEY FEATURES...

Page 6: ...6 KEY FEATURES A B C F D H G E...

Page 7: ...7 KEY FEATURES Quick releaseplate 1 4 20mountingscrew Quick releaseknob Verticalbubblelevel 90 notch Lockingknob Panknob Panoramicbasewith360 markings A B F G H E D C...

Page 8: ...to be removed To mount it back onto the tripod 1 Align the ballhead socket with the tripod mounting screw 2 Rotate the ballhead clockwise onto the tripod and tighten it by hand Note To use the ballhe...

Page 9: ...release plate from the ballhead 2 Screw the plate onto the bottom of the camera 3 Use the D ring a slotted screwdriver or a coin to tighten the screw into the camera s socket Warning Some manufacture...

Page 10: ...Turn the quick release knob counterclockwise until it stops 2 Mount the camera to the ballhead by sliding one edge of the quick release plate into the clamp Then lower the other side until the quick r...

Page 11: ...adjusting the ballhead and make sure the lock is engaged before letting go of the camera Note To adjust the tension in a tight space or if something is blocking your ability to turn the knob pull the...

Page 12: ...nob counterclockwise to unlock the base 2 Rotate the base to the desired position and then lock the base by turning the knob clockwise LEG LENGTH ADJUSTMENT To independently adjust the height of each...

Page 13: ...ATTACHING THE EXTENDER The included extender can be attached to add extra height to the tripod 1 Unscrew the ballhead and attach the extender by screwing it onto the tripod s mounting post 2 Attach t...

Page 14: ...re for soft ground grass sand and uneven terrain To expose the spikes remove the rubber feet by pulling them off SPIKED FEET Important The extender reduces the stability of the tripod The extender sho...

Page 15: ...of reach of children To avoid injury always support your device or camera with one hand while adjusting height and locking the twist lock with the other hand All images are for illustrative purposes...

Page 16: ...www obensupports com Oben is a registered trademark of the Gradus Group 2019 Gradus Group LLC All Rights Reserved GG2...

Reviews: