3
INSTALLATION PROCEDURE
NOTE: ‘Wet-set’ is not required to support
the floor under an Oasis product due to the
encapsulated Balsa wood construction.
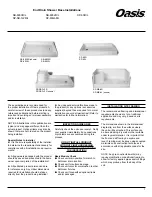
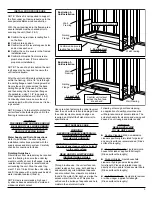
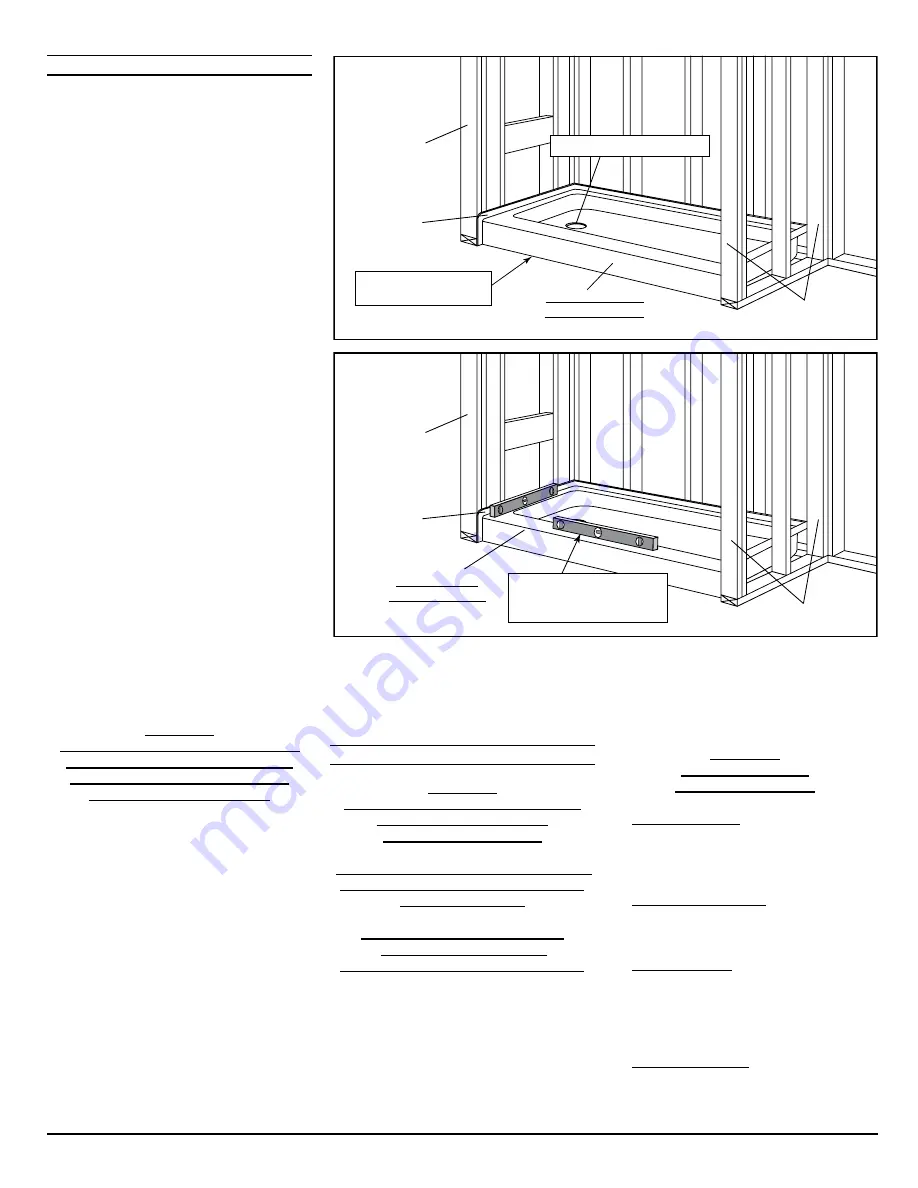
With the unit positioned in the framed area,
several details must be
checked prior to
securing the unit. (Illust. 2 & 3)
l
Confirm the apron/dam is resting flush
on the floor.
l
Confirm drain position.
l
Confirm the unit is level along each side
and across each end.
l
Confirm the unit is square in the framed
installation area.
l
Confirm both inside front corners are
plumb at each end. (This is critical for
proper door installation)
NOTE: The use of a shims behind the nail-
ing flange may be required to ensure the
unit remains square.
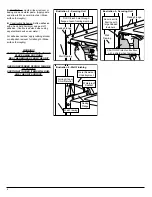
After the unit is confirmed level and square
within the framing, drill a 1/8” hole through
the nailing flange at each framing member.
Secure the unit in place across the back
nailing flange first, followed by the sides
and then along the front vertical flanges
(if applicable), using 1-1/4” long nails or
other appropriate fasteners (illust. 4 & 5).
Continually check to make sure the unit
remains plumb within the alcove as it is be-
ing secured.
NOTE: Usage of a thin shield to protect the
unit surface while fastening the unit to the
framing is recommended.
WARNING!
THE INSIDE UNIT SURFACE SHOULD
BE CLEAR OF ALL LOOSE DEBRIS
AND THE SURFACE PROTECTED
BEFORE STEPPING INSIDE.
Water Supply and Drain Connections
Refer to, and follow, the assembly and
installation instructions provided with the
supply valves and drain system. Carefully
check all connections for leaks.
Finishing Guidelines
Filler strips or filler material may be required
over the framing to ensure the under lay-
ment mounts flush over the flanges. A water
resistant under layment is recommended
surrounding the unit. Stop the under lay-
ment 1/16 to 1/8-inch from the unit surface,
and fill the space with a continuous bead of
water resistant sealant. (Illust. 6)
NOTE: Oasis recommends a high qual-
ity silicone based sealant with a mold and
mildew resistant content.
Use care when fastening the under layment
near the unit surface to avoid damage. Seal
the under layment seams and edges, as
required, and install the finish material to
specifications.
UNIT SURFACE CARE
WARNING!
NEVER USE ABRASIVE MATERIALS,
OR ABRASIVE CLEANERS
ON THE UNIT SURFACE!
EXTREME CAUTION is urged regarding
the use of any cleaner, acid or solvent
on the unit surface.
READ AND FOLLOW PACKAGE
INSTRUCTIONS FOR ALL
PURCHASED CLEANING PRODUCTS!
Through routine use, the unit surface can
collect residues from soap, bath additives
and natural body oils. Additional deposits
can also collect from minerals or particles
found in the water. After each use, wipe the
excess water from the unit.This practice
will reduce the buildup of deposits and help
maintain the natural unit lustre.
Following a thorough surface cleaning,
an application of quality automotive wax
will help reduce major accumulations. The
actual schedule for cleaning and waxing will
depend on unit usage and water quality.
WARNING!
NEVER APPLY WAX
TO THE UNIT FLOOR!
u
Routine Cleaning: Mild, non-abrasive
cleaner specifically formulated for gelcoat
and acrylic surfaces recommended. (Rinse
surface thoroughly)
u
Heavy Soap Deposits: Liquid ammonia
household cleaner, applied full strength.
(Rinse surface thoroughly)
u
Stubborn Stains: Liquid household
cleaner or hydrogen peroxide applied
full strength. Place a saturated clean rag
directly on stain and let stand several hours.
(Rinse surface thoroughly)
u
Hard Water Scales: Liquid scale remover
or white vinegar, applied full strength.
(Rinse surface thoroughly)
Nailing
Flange
Wall
Framing
2. Level Unit
In Framed Area
Confirm unit is level
across the front and
at each end.
Wall Framing
1. Position Unit
In Framed Area
Wall Framing
Confirm unit apron is
resting flush on floor.
Nailing
Flange
Wall
Framing
Confirm Drain Alignment
Illustration 2 -
Unit Installation
Illustration 3 -
Unit Installation

