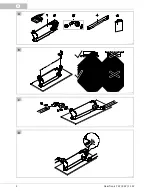
- EN -
9
COMMISSIONING/START-UP
Prerequisite
•
First switch on the pump, then the UVC clarifier.
•
Check all connections for leaks.
Switching ON/switching OFF
•
Switching on:
Insert the power plug into the socket.
–
The unit switches on immediately.
•
Switching off:
Disconnect the power plug.
Check the function.
D
•
The function display is lit when the UVC lamp is
switched on.
REMEDY OF FAULTS
Malfunction
Cause
Remedy
The performance of the unit is not satis-
factory
The water is extremely soiled.
Remove algae and leaves from the aquar-
ium, change the water.
The quartz glass is soiled.
Clean the quartz glass.
The UVC lamp capacity is exhausted.
The lamp must be replaced after 8000 op-
erating hours.
Flow rate is too high.
Reduce the pump capacity.
UVC lamp is not lit.
Power plug not connected
Connect the power plug.
UVC lamp defective
Replace the UVC lamp.
Connection defective
Check the electrical connection.
MAINTENANCE AND CLEANING
If necessary, clean the unit with clear water using a
soft brush.
•
Do not use cleaning agents or chemical solutions.
We recommend using OASE PumpClean for remov-
ing calcium deposits.
Dismantling the unit head
C A U T I O N
The ultra-violet radiation of the UVC lamp can burn
your eyes and skin.
•
Never operate the UVC lamp outside its casing.
•
Never operate the UVC lamp in a casing that is de-
fective.
Attention!
Breakable glass.
Possible consequences:
Injury to your hands
caused by cuts.
Protective measures:
Handle the quartz glass and
UVC lamp with care.
How to proceed:
E
1.
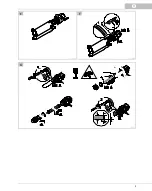
Turn the unit head counter-clockwise up to the stop
and carefully pull it out of the casing together with
the O ring.
2.
Clean the casing from the inside and the outside.
N O T E
For safety reasons, the UVC lamp can only be switched
on when the unit head has been correctly fitted into
the casing.
Fitting the unit head
How to proceed:
F
1.
Check the O ring at the unit head for correct seating.
–
Clean the O ring, replace if damaged.
2.
Carefully push the unit head into the casing up to
the stop while applying slight pressure.
–
Turn the unit head slightly so that the tenons and
grooves of the bayonet closure intermesh.
3.
Turn the unit head clockwise up to the stop.
–
The two arrows on the casing and unit head must
point towards one another.
Cleaning the quartz glass / Replacing the UVC lamp
Replace the UVC lamp after max. 8,000 operating
hours. This ensures optimum filtering performance.
Attention!
Breakable glass.
Possible consequences:
Injury to your hands
caused by cuts.
Protective measures:
Handle the quartz glass and
UVC lamp with care.
Prerequisite
•
The unit head is removed.
(→
•
Ensure that the identification and capacity data of
the UVC lamps used correspond to the information
on the unit type plate.
(→
How to proceed:
G
1.
Loosen the self-tapping screw until the the screw tip
is sunk in the housing of the clamping screw.
2.
Unscrew the clamping screw counter-clockwise.
3.
Remove the quartz glass including the O ring to-
wards the front with a slight turning movement.
Summary of Contents for ClearTronic 11 W
Page 1: ...ClearTronic 7 W 9 W 11 W 43263_Gebrauchsanleitung_ClearTronic indd 1 08 01 16 14 09...
Page 2: ...2 ClearTronic 7 W 9 W 11 W A VTC0023 B VTC0024 C VTC0025 D VTC0026...
Page 3: ...3 E F VTC0002 VTC0004 G VTC0027...
Page 73: ...BG 73 A A A 1 2 3 4 UVC 5 UVC UVC ClearTronic 7 W 9 W 11 W B C 1 2 3 UVC D UVC...
Page 77: ...UK 77 30 A A 1 2 3 4 5 ClearTronic 7 W 9 W 11 W B C 1 2 3 D...
Page 78: ...UK 78 ClearTronic 7 W 9 W 11 W 8000 OASE Pump Clean E 1 2 F 1 2 3 8000 G 1 2 3 4 5...
Page 81: ...RU 81 30 A 1 2 3 4 5 ClearTronic 7 W 9 W 11 W B C 1 2 3...
Page 82: ...RU 82 ClearTronic 7 W 9 W 11 W D 8000 OASE Pump Clean E 1 2 F 1 2 3 8000...
Page 85: ...CN 85 30mA A A A 1 2 3 4 UVC 5 UVC UVC ClearTronic 7 W 9 W 11 W B C 1 2 3 UVC D...
Page 88: ...88 ClearTronic 7 W 9 W 11 W VTC0028...
Page 89: ...43263 02 16...


