- EN -
26
8.1
Cleaning the pump
How to proceed:
J
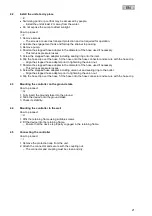
1. Screw off the stepped hose adapter.
2. Remove screws.
– The screws are used as transport protection and not required for operation.
3. Actuate the engagement hook and fold up the strainer top casing.
4. Remove pump.
5. Remove screws.
6. Remove the pump housing including its holding ring, sealing and impeller unit.
– Clean all components under running water using a soft brush, replace damage parts.
7. Reassemble the unit in the reverse order.
– Place the pump cable into the cable opening of the bottom strainer casing such that the cable will
not be crushed when closing the filter housing.
9
Wear parts
•
Impeller unit
10
Spare parts
The use of original parts from OASE ensures
continued safe and reliable operation of the unit.
Please visit our website for spare parts drawings
and spare parts.
www.oase-livingwater.com/spareparts
11
Storage/overwintering
The unit is not frost-proof and has to be removed and put into storage if minus temperatures are ex-
pected.
How to correctly store the unit:
•
Thoroughly clean the unit, check it for damage and replace any damaged parts.
•
Store the pump submerged and in a frost-free environment.
•
Protect open plug connections from moisture and dirt.
12
Repair
A damaged unit cannot be repaired and must be put out of operation. Dispose of the unit in accord-
ance with the regulations.
13
Disposal
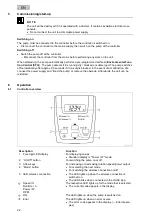
N O T E
Do not dispose of this unit with domestic waste.
•
Render the unit unusable beforehand by cutting the cables and dispose of the unit via the
return system provided for this purpose.
Summary of Contents for AquaMax Eco Classic 12000 C
Page 1: ...AquaMax Eco Classic 9000 C 12000 C 18000 C...
Page 2: ...2 A AMX0096 B AMX0090 C AMX0002 D AMX0003...
Page 3: ...3 E AMX0089 F AMX0094...
Page 4: ...4 G H AMX0091 AMX0092 I AMX0095...
Page 5: ...5 J AMX0093...
Page 204: ...BG 204 BG BG 8 30 mA...
Page 206: ...BG 206 1 2 A A 2 2 1 2 2 ICD 0 2 m 3 3 1 A 1 2 OASE AquaMax Classic Control 3 4 5 6...
Page 207: ...BG 207 3 2 4 B 4 1 C D 1 2 3...
Page 208: ...BG 208 4 2 E 2 F 1 2 3 4 5 6 7 8 9 4 3 G 1 2 3 4 4 H 1 2 4 5 I 1 2 5...
Page 212: ...BG 212 7 2 Er1 Er2 Er3 Er4 Er5 Er6 Er7 Er8 8 2 PumpClean OASE...
Page 213: ...BG 213 8 1 J 1 2 3 4 5 6 7 9 10 OASE www oase livingwater com spareparts_INT 11 12 13...
Page 215: ...UK 215 UK UK 8 30...
Page 217: ...UK 217 1 2 A 2 2 1 2 2 ICD 0 2 3 3 1 A 1 2 OASE AquaMax Classic Control 3 4 5 6...
Page 223: ...UK 223 7 2 Er1 Er2 Er3 Er4 Er5 Er6 Er7 Er8 8 2 PumpClean OASE...
Page 224: ...UK 224 8 1 J 1 2 3 4 5 6 7 9 10 OASE www oase livingwater com spareparts_INT 11 12 13...
Page 226: ...RU 226 RU RU 8 30...
Page 228: ...RU 228 1 2 A A 2 2 1 2 2 ICD 0 2 3 3 1 A 1 2 OASE App AquaMax Classic Control 3 4 5 6...
Page 229: ...RU 229 3 2 4 B 4 1 C D 1 2 3...
Page 230: ...RU 230 4 2 E 2 F 1 2 3 4 5 6 7 8 9 4 3 G 1 2 3 4 4 H 1 2 4 5 I 1 2 5...
Page 234: ...RU 234 7 2 Er1 Er2 Er3 Er4 Er5 Er6 Er7 Er8 8 2 PumpClean OASE...
Page 235: ...RU 235 8 1 J 1 2 3 4 5 6 7 9 10 OASE www oase livingwater com zapasnyechasti 11 12 13...
Page 237: ...CN 237 CN CN 8 30mA...
Page 239: ...CN 239 1 2 A A 2 2 1 2 2 ICD 0 2 m 3 3 1 A 1 2 OASE AquaMax Classic Control 3 4 5 6...
Page 240: ...CN 240 3 2 4 B 4 1 C D 1 2 3...
Page 241: ...CN 241 4 2 E 2 m F 1 2 3 4 5 6 7 8 9 4 3 G 1 2 3 4 4 H 1 2 4 5 I 1 2...
Page 245: ...CN 245 7 2 Er1 Er2 Er3 Er4 Er5 Er6 Er7 Er8 8 2 OASE PumpClean...
Page 246: ...CN 246 8 1 J 1 2 3 4 5 6 7 9 10 OASE www oase livingwater com spareparts_INT 11 12 13...
Page 248: ...75590 02 20...


