24
TROUBLESHOOTING
TROUBLESHOOTING
1.
Unplug power cord.
2.
The foot control is connected
to a junction box adjacent to the
control module located on the top
end of the Ultrasound table.
3.
Remove the locking clip on the plug.
4.
Pull firmly to remove the plug.
5.
Obtain the new foot control and
insert the cable plug into the junction box until firmly seated.
6.
Replace the locking clip.
7.
Reconnect power cord.
8.
Attempt to operate the table elevation functions from the foot control.
9.
Should this fail to return the Ultrasound table to an operating condition,
contact the customer service department.
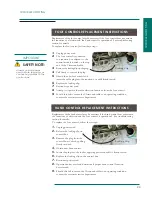
FOOT CONTROL REPLACEMENT INSTRUCTIONS
HAND CONTROL REPLACEMENT INSTRUCTIONS
Replacement of the foot control may be necessary if the foot control does not actuate
the functions of elevation and the hand control is operational. See troubleshooting
section for details.
To replace the foot control, follow these steps:
IMPORTANT
Always unplug power
cord before removing or
connecting cables to the
control box.
SAFETY NOTE:
1.
Unplug power cord.
2.
Release the locking clip on
control box.
3.
Remove the plug from the
control box socket by pulling
firmly outward.
4.
Obtain new hand control.
5.
Insert the plug into the socket, applying pressure until it is firmly seated.
6.
Replace the locking clip on the control box.
7.
Reconnect power cord.
8.
Operate hand control and determine if proper hand control function
has returned.
9.
Should this fail to return the Ultrasound table to an operating condition,
contact the customer service department.
Locking Clip
Locking Clip
Replacement of the hand control may be necessary if the hand control does not actuate
the functions of elevation and the foot control is operational. See troubleshooting
section for details.
To replace the foot control, follow these steps:


