6
NOTE: Retighten all bolts after 4 weeks; the wood will naturally experience slight shrinkage,
which can cause the bolts to loosen.
The tables are shipped complete in one box. Follow the step
below to fully assemble the table:
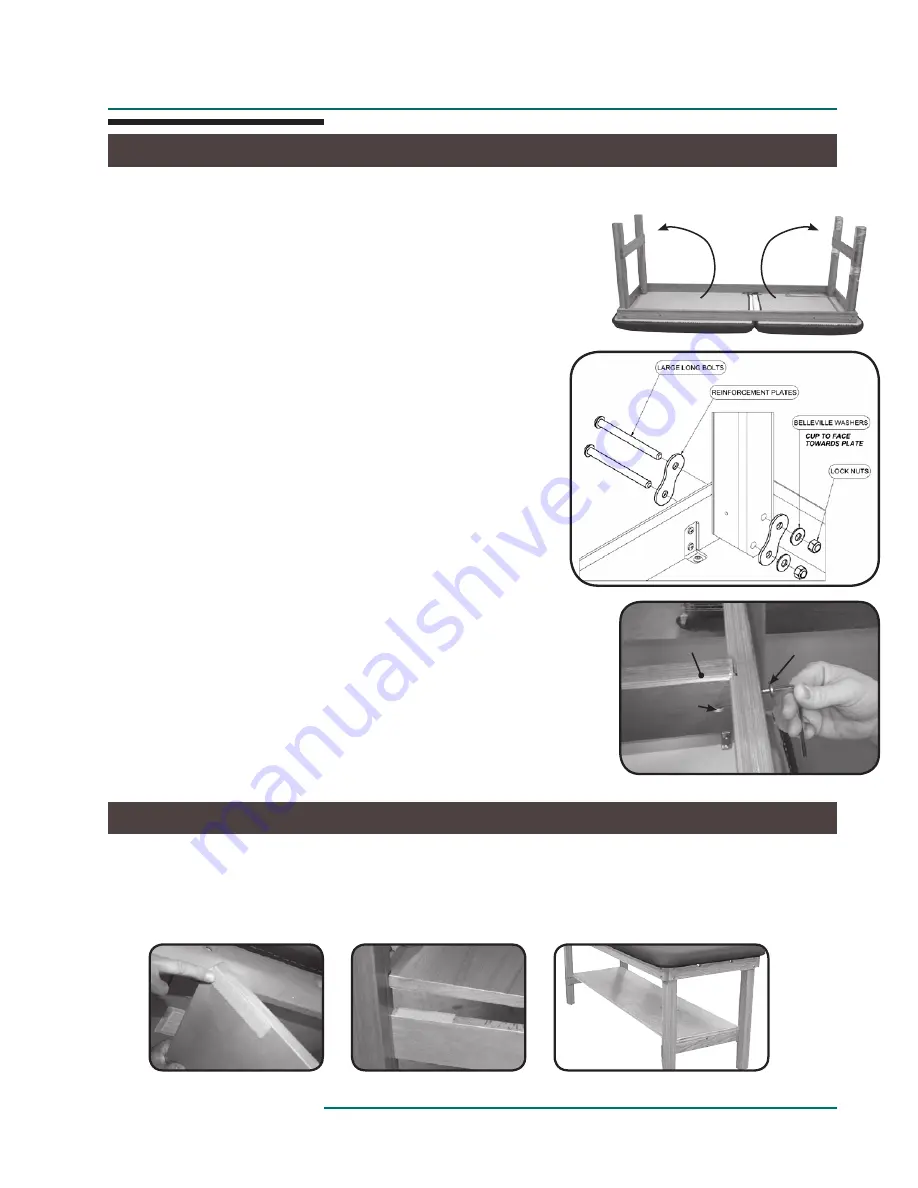
1. Remove the table from the box and place it down on the floor
with the top down. Remove all hardware and the Leg Brace.
2. Unfold the legs to a vertical position and remove any protective
wrappings.
3. Install the Long Large Bolts, Plates, Washers and nuts, as
shown, one bolt on each leg. Using the Large Allen Wrench and
Open End Wrench, tighten every bolt/nut connection -- 8 total --
as tight as possible.
4. Install the barrel nut into the Leg Brace being sure the screw slit
is horizontal. Install the Short Bolt through the leg rail. Start the bolt into
the barrel nut using your fingers first. After the bolt has started, tighten the
bolt using the small Allen Wrench. Make sure the Leg Brace is flush with
the adjoining rails while tightening bolts. Repeat on opposite end of the
Leg Brace.
5. Turn your table right side up. Get up on the table and rock back and
forth to check that all bolts are tight. The table should be very stiff. If
not, check and tighten the bolts as necessary with the supplied tools.
INSTALLATION
TABLE ASSEMBLY
Barrel Nut
Short Bolt
Leg Brace
SHELF ATTACHMENT
If you have ordered a shelf, drop the shelf into place with the finished side up. The shelf has groves at
both ends that enable it to be held firmly in place by the legs. If necessary, the shelf can be further sta-
bilized by installing the enclosed Velcro™ strips. Place strips on each corner of the shelf’s bottom side,
and on each end of the rails. Make sure not to mismatch Velcro™ strips; place all “hook” or all “loop”
pieces on either the rail or shelf.
LEG HARDWARE
8 -Reinforcement Plates
8 - Belleville Washers
4 - Long Large Bolts
4 - Lock Nuts
SUPPLIED PARTS:
LEG BRACE
1 - Wood Leg Brace
2 - Short Bolts
2 - Barrel Nuts
TOOLS
1 - Large Allen Wrench
1 - Small Allen Wrench
1 - Open End Wrench


