background image

5

WARNINGS

 / 

SA

fe

Ty

 warnIngs

WARNINGS & SAfeTy INSTRUCTIONS

 warnIngs & safety InstructIons

• 

Be certain that the table is completely lowered prior to   

discharging an ambulatory patient. The patient may lose   

balance and fall. Do not leave clients unattended when table is 

set at its highest level.

• 

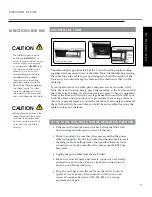
The table weighs as much as 225 lbs. (102 kg.) DO NOT lift 

or move the unit without using proper safely procedures or 

equipment. DO NOT turn the table on its side for any reason. 

To do so could cause damage to the base and will void the warranty. 

There are no serviceable items that require this action. Never 

lift the table by grasping the table top as the table top is not 

designed to hold the weight of the base and you could damage 

the table.

• 

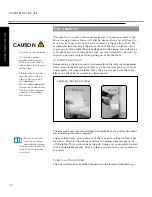
When operating the controls and making any and all adjustments 

to the table, move hands and feet away from the working mechanism 

of the table. 

• 

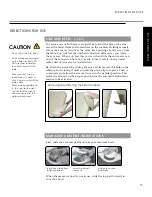
The optional arm rests can be repositioned to allow a client to get 

on and off the table easily. When making adjustments to the arm 

rests, make certain that the client’s arms are away from the working 

mechanism.

• 

DO NOT sit on arm rests, the elevated backrest or leg rest. DO 

NOT put excessive weight on the side arm rests. DO NOT use 

them in assisting the client on and off the table.

• 

DO NOT put excessive weight or pressure on the QuickLock


Face Rest. Excessive pressure can cause premature failure of the 

QuickLock

 Face Rest. Do Not extend the dowels of the Face Rest 

further than 3” from the table edge to ensure a stable connection.

• 

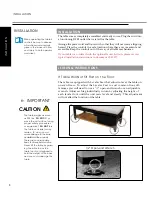
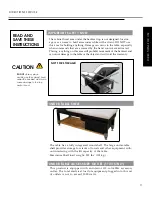
DO NOT store or place anything on the cabinet hood under the 

backrest as this can cause damage to the top and or hood and will 

void the warranty.

• 

Maximum Working Load Rating (client and accessories): 500 lbs. 

(226 kg.) 

• 

Every 3 months check nuts & bolts and physical connection points 

for any loose parts. Tighten as needed.

• 

Maximum Shelf load weight: 225 lbs. (102 kg.)

read and  

save these  

InstructIons

cautIons

Summary of Contents for Clodagh Libra

Page 1: ...Libra I N S T R U C T I O N M A N U A L www oakworks com 717 235 6807...

Page 2: ...nge without notice and should not be construed as a commitment by Oakworks Inc Oakworks Inc assumes no responsibility for any errors that may appear in this document nor does it make expressed or impl...

Page 3: ...eling Instructions pg 8 Directions for Use Adjusting Height pg 9 Adjusting the Top pg 10 Important Safety Note pg 11 Side Arm Rests pg 12 QuickLock Face Rest pg 14 Foot Bath pg 15 Foot Rest pg 16 How...

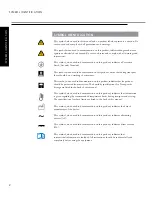
Page 4: ...product indicates that the product should be protected from moisture The humidity specifications for Transport Storage are listed in the back of this manual This symbol when used in documentation on...

Page 5: ...onnel and follow manual instructions when doing any authorized troubleshooting Before cleaning with any liquid cleaner be sure to un plug the power cord from the power outlet Do not operate the table...

Page 6: ...nd comfortable Should you experience any pain or discomfort while using the foot bath discontinue use immedi ately and consult your physician Consult your physician if you are diabetic have poor circu...

Page 7: ...echanism of the table The optional arm rests can be repositioned to allow a client to get on and off the table easily When making adjustments to the arm rests make certain that the client s arms are a...

Page 8: ...lt circuit for use in Europe The plug has a grounding pin in a pattern that varies by country as shown in the Product Identification section of this manual Make sure that the product is connected to a...

Page 9: ...ontrol Padding 4 Aero Cel standard 6 Aero Cel available Upholstery TerraTouch standard UltraTouch available Shelf 24 x 37 opening 11 3 4 x 32 For electrical specs see Specifications Chart measurements...

Page 10: ...common floor dif ferences you will need to use a 1 2 open end wrench or an adjustable wrench Adjust each leg individually in turn by adjusting the height of each leveler foot until the unit rests lev...

Page 11: ...ings as given in the manual Adjusting Height of the table When operating the controls and making any and all adjustments to the table move hands and feet away from the working mechanism of the table F...

Page 12: ...rgo nomics while staying parallel to the floor no matter what the position Adjusting the top When operating the table s controls be sure to observe all cautions and warnings given in the manual to pre...

Page 13: ...nty Do not store or place anything on the cabinet hood under the backrest as this can cause damage to the top and or hood Not for Storage important safety note under table shelf Read and Save These In...

Page 14: ...t automatically as you position the client for whatever procedure is needed There will be times when removal of the arm rests will be needed This feature is helpful when doing massage or helping someo...

Page 15: ...place Push it in securely and allow the arm rest to rest in the parallel position This resets the arm rest in the proper position for the automatic adjustment feature to be activated Do not place exc...

Page 16: ...Lock Face Rest Head Rest directions for use Do Not extend the dowels of the Face Rest further than 3 from the table edge to ensure a stable connection U S Patent 5 177 823 SAFETY NOTE Be sure to read...

Page 17: ...sink spout supplied fill hose To open foot section 1 Standing at the side of the table with both hands gently lift the moveable leg rest slightly and pull outward until it stops 2 Lower leg rest until...

Page 18: ...GFCI wall outlet for your protection from electrical shock 5 When the foot bath appears to be empty continue running the pump while removing it from the interior of the foot bath and place it in the s...

Page 19: ...lift the table from the base As when moving any piece of heavy equipment bend at the knee and lift with your legs beneath you and not with your back Be aware and use proper safe procedures for moving...

Page 20: ...or your table upholstery fabric involves more than just protecting it from general abrasions cuts and punctures We offer most of the products mentioned above Use only a mild solution of 4 1 diluted no...

Page 21: ...ases g Rinse all surfaces with tap water 2 Disinfection re assembly a Spray the jet assembly pieces jet cases and foot bath until thoroughly wet with cleaner disinfectant and allow then to set for one...

Page 22: ...g grounded North America 7791 03 220v 50 Hz Continental Plug Europe Italy 7791 04 220v 50 Hz Swiss plug Switzerland 7791 02 220v 50 Hz British plug United Kingdom 7791 06 220v 50 Hz Australian Plug Au...

Page 23: ...t the discretion of Oakworks All warranties exclude damage caused by improper set up accident abuse misuse neglect use for other than intended purpose or reasonable wear such as tears in the upholster...

Page 24: ...10 Printed in English Printed in USA I N S T R U C T I O N M A N U A L Contact Information Oakworks Inc 923 East Wellspring Road New Freedom PA 17349 Toll Free USA only 800 916 4613 Phone 717 235 6807...

Reviews: