background image

- 1 - 

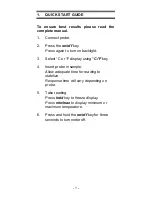
1. QUICK 

START 

GUIDE 


To ensure best results please read the 
complete manual.  

1. 

Connect probe.  

2. Press 

the 

on/off

 key.  

Press again to turn on backlight.


3. 

Select °C or °F display using 

°C/°F 

key. 

4. 

Insert probe in sample.  

Allow adequate time for reading to 
stabilize. 
Response time will vary depending on 
probe.


5. Take 

reading. 

Press 

hold

 key to freeze display. 

Press 

min/max

 to display minimum or 

maximum temperature.


6.  Press and hold the 

on/off

 key for three 

seconds to turn meter off. 

Summary of Contents for Temp-14

Page 1: ...Instruction Manual Temp 14 Single Input Thermistor Thermometer 68X481902 Rev 0 10 08 Part of Thermo Fisher Scientific...

Page 2: ......

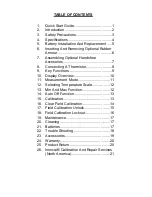
Page 3: ...mistor 8 9 Key Functions 9 10 Display Overview 10 11 Measurement Mode 11 12 Selecting Temperature Scale 12 13 Min And Max Function 12 14 Auto Off Function 13 15 Calibration 13 16 Clear Field Calibrati...

Page 4: ...on backlight 3 Select C or F display using C F key 4 Insert probe in sample Allow adequate time for reading to stabilize Response time will vary depending on probe 5 Take reading Press hold key to fr...

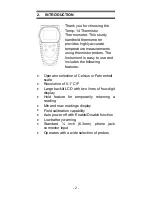
Page 5: ...ludes the following features Operator selection of Celsius or Fahrenheit scale Resolution of 0 1 C F Large backlit LCD with two lines of four digit display Hold feature for temporarily retaining a rea...

Page 6: ...his instrument is designed to accept low level signals supplied by standard 400 series thermistors Under no circumstances should the input voltage exceed the specified 10 v rms 1 Do not use or store t...

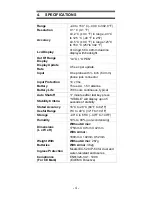
Page 7: ...hree AA 1 5V alkaline Battery Life 700 hours continuous typical Auto Shutoff 17 minutes after last key press Stability Criteria STABLE will display upon 5 seconds of stability Stated Accuracy 18 C to...

Page 8: ...n leak and cause damage to unit The typical battery life is about 700 hours Selected settings are stored in memory and will remain in memory even after power is turned off or while batteries are being...

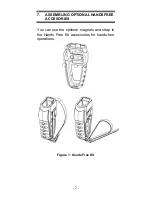
Page 9: ...r armor slide in from the top of meter before pushing the bottom edges of meter down to set it into position Lift up the stand at the back of meter for bench top applications if necessary 2 To remove...

Page 10: ...7 7 ASSEMBLING OPTIONAL HANDSFREE ACCESORIES You can use the optional magnets and strap in the Hands Free Kit accessories for hands free operations Figure 1 Hands Free Kit...

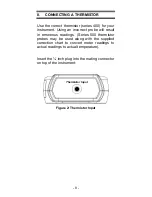
Page 11: ...probe will result in erroneous readings Series 500 thermistor probes may be used along with the supplied correction chart to convert meter readings to actual readings to actual temperature Insert the...

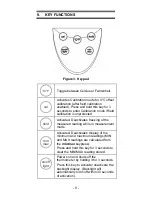
Page 12: ...vates freezing of the measured reading while in measurement mode min max Activates Deactivates display of the minimum and maximum readings MIN and MAX readings are calculated from the min max keypress...

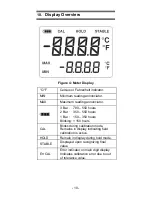
Page 13: ...00 550 hours 2 Bar 350 550 hours 1 Bar 150 350 hours Blinking 150 hours CAL Blinks during calibration mode Remains in display indicating field calibration is active HOLD Remain in display during hold...

Page 14: ...mum instrument accuracy allow one minute for ambient temperature stabilization If the unit has been stored at an extreme ambient condition more time will be needed A STABLE indicator appears at the to...

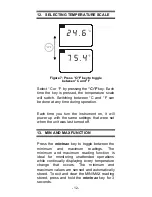
Page 15: ...nt on it will power up with the same settings that were set when the unit was last turned off 13 MIN AND MAX FUNCTION Press the min max key to toggle between the minimum and maximum readings The minim...

Page 16: ...The CAL function allows single point calibration of the thermometer at 0 C 32 F to compensate for probe offset error Use the field calibration feature to improve thermometer probe accuracy The Temp 14...

Page 17: ...the reading will be set to 0 C 32 F The CAL indicator will remain in display indicating that field calibration is now active If Err is displayed the displayed reading is outside the above limits 16 C...

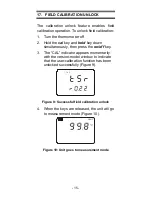
Page 18: ...key down simultaneously then press the on off key 3 The CAL indicator appears momentarily with the version model window to indicate that the user calibration function has been unlocked successfully F...

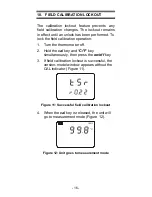
Page 19: ...operation 1 Turn the thermometer off 2 Hold the cal key and C F key simultaneously then press the on off key 3 If field calibration lockout is successful the version model window appears without the...

Page 20: ...NG TO PREVENT IGNITION OF A HAZARDOUS ATMOSPHERE BY ELECTROSTATIC DISCHARGE CLEAN WITH DAMP CLOTH Do not clean with abrasives or solvents Use mild detergents never immerse nor use excessive fluid 21 B...

Page 21: ...k condition of batteries Check that batteries are inserted properly Display shows Ur Measurement under range 40 C 40 F Display shows Or Measurement over range 150 C 302 F Display Shows OPEN No thermis...

Page 22: ...x 0 188 Dia 4 second time constant 93824 00 PTFE coated general purpose probe 10 L x 0 2 Dia 7 second time constant 93824 12 Penetration probe 4 L x 0 188 Dia sharp tip 6 second time constant 93824 30...

Page 23: ...s outside the warranty period or those resulting from product misuse or abuse may be invoiced to you 25 PRODUCT RETURN To limit charges and delays contact the seller or Manufacturer for authorization...

Page 24: ...05 accredited NIST Handbook 150 2000 Edition ANSI NCSL Z540 2 1997 NIST Technical Note 1297 ISO 9000 2000 Fast Service Our substantial inventory of replacement parts ensures a fast turnaround and prev...

Page 25: ...em certified condition of the item issue date identification of calibration procedure calibration date as found as left test data where applicable signature of technician statement of estimated uncert...

Page 26: ...tios at no extra cost Call us today and see why InnoCal is The Choice of Quality See our Scope of Accreditation for any limitations Calibration test points against NIST traceable standards Meter only...

Page 27: ......

Page 28: ...For more information on OAKTON Instruments Products please contact your nearest distributor or visit our web site listed below OAKTON Instruments P O Box 5136 Vernon Hills IL 60061 USA Tel in U S 888...

Reviews: