Instruction Manual
pH 11 & pH 110
Hand-held pH / mV / Temperature / RS 232 Meter
Technology Made Easy ...
68X361301
Rev. 2 - 11/03
Page 1: ...Instruction Manual pH 11 pH 110 Hand held pH mV Temperature RS 232 Meter Technology Made Easy 68X361301 Rev 2 11 03...
Page 2: ...f the pH 11 110 meters do not hesitate to contact the nearest Authorised Distributor It is recommended that all operators should read this manual prior to working with this instrument Eutech Instrumen...
Page 3: ...SET ONLY FOR PH 110 15 4 5 TEMPERATURE CALIBRATION 16 5 MEASUREMENT 17 5 1 AUTOMATIC TEMPERATURE COMPENSATION 17 5 2 MANUAL TEMPERATURE COMPENSATION 18 5 3 TAKING MEASUREMENTS 19 5 3 1 Taking measurem...
Page 4: ...DE 56 11 ELECTRODE CARE 57 11 1 ELECTRODE MAINTENANCE 57 11 1 1 Storage 57 11 1 2 After Use 57 11 1 3 Electrolyte Replacement for refillable electrodes only 57 11 2 ELECTRODE CLEANING 58 11 3 ELECTROD...
Page 5: ...es a temperature probe electrode holder built in meter stand and batteries Eutech Instruments Oakton Instruments offer a wide selection of pH and ORP electrodes Refer to Section 15 LIST OF ACCESSORIES...
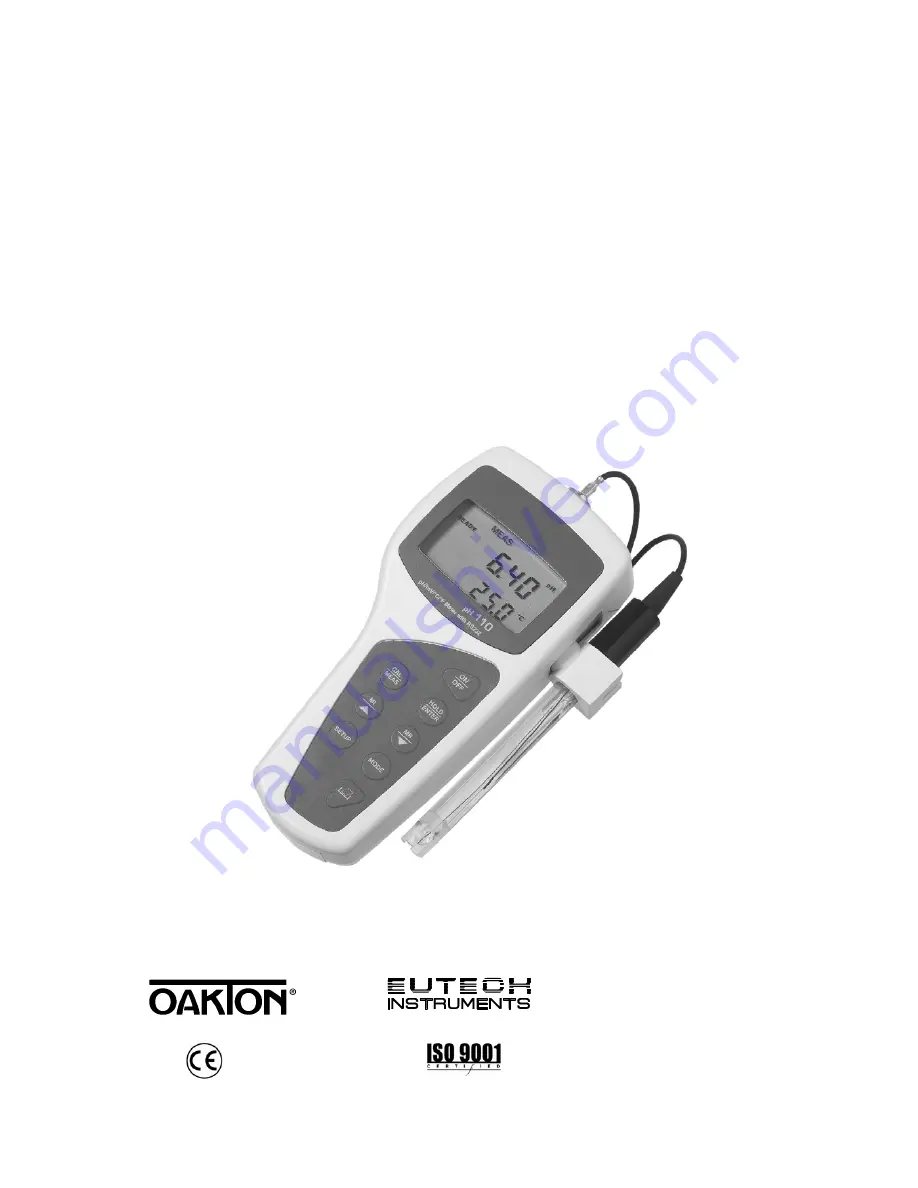
Page 6: ...16 17 18 Figure 1 Active LCD screen 1 SETUP Setup mode indicator 7 pH pH indicator 13 Low battery indicator 2 MEAS Measurement mode indicator 8 C F Temperature indicator 14 Electrode indicator 3 CAL C...
Page 7: ...in Calibration mode and the selection in SETUP and Print Function mode Scroll through the memory location and the stored data during memory recall MI MR MI Memory Input Captures the measured readings...
Page 8: ...uction Manual CyberScan pH 11 110 4 MODE MEAS CAL ENTER HOLD MR MI SETUP OFF ON MI MR SETUP MODE MEAS CAL ENTER HOLD OFF ON Keypad for pH 11 meter Keypad for pH 110 meter Figure 2 pH 11 and pH 110 key...
Page 9: ...outlined below 1 To open the battery compartment press down the catch of the battery cover See below 2 Note the polarity and insert the batteries into the battery compartment correctly 3 Replace the...
Page 10: ...electrode over the BNC connector socket on the meter 2 Make sure the slots of the connector are in line with the posts of the socket 3 Slide the BNC connector of the electrode over Figure 5 4 Rotate...
Page 11: ...r calibration For that purpose two electrode holders are provided They are designed for easy use and installation Care must be taken to avoid use of excessive force in the process of attaching these c...
Page 12: ...f the holder 3 If you are using a separate temperature probe insert the probe into the opening of the second holder until the ridge on the housing touches the top of the holder NOTE The holder is desi...
Page 13: ...r followed by the meter 3 4 Connecting the RS232C Cable Only for pH 110 The pH 110 meter provides a RS232C output for you to transmit your readings either to a printer or a computer via a cable This i...
Page 14: ...NO DESCRIPTION 1 2 Transmit Data 3 4 5 CTS Clear to Send 6 7 GND Ground 8 9 A one to one connection can be made with a 9 pin RS232C port of the computer 1 2 6 3 7 4 8 5 9 In case pH 110 meter s outpu...
Page 15: ...ast used For example if you shut the meter off in mV units the meter will read mV units when you switch the meter on Be sure to remove the protective electrode storage bottle or rubber cap of the elec...
Page 16: ...te internationally recognised buffer standards Select the buffer standard you require in section 9 2 2 P1 2 Select Calibration Buffer Options on page 35 This meter is capable of up to 6 point pH calib...
Page 17: ...ion buffer The end of the probe must be completely immersed into the sample Stir the probe gently to create a homogeneous sample 4 Press CAL MEAS key to enter pH calibration mode The CAL indicator wil...
Page 18: ...easurement mode automatically However if you wish to terminate the calibration without completing the number of points as set in the Unit Configuration Setup menu press CAL MEAS to return to pH measur...
Page 19: ...ative mV or if the meter has been reset the value shown in the primary display is the same as the absolute mV value R annunciator will appear once mV calibration is performed an indication of mV offse...
Page 20: ...sured temperature reading according to the last set offset1 and the secondary display shows the factory calibrated temperature measurement 5 Dip the ATC probe or electrode into a solution of known tem...
Page 21: ...the temperature to match your working conditions using a separate thermometer NOTE Remove the protective rubber cap or soaker bottle of the electrode before proceeding with measurement Take care not...
Page 22: ...d the secondary display shows the default temperature value of 25 C or indicates the last set temperature setting 4 Check the temperature of your sample using an accurate thermometer 5 Press the MI or...
Page 23: ...e 4 Allow time for the reading to stabilise Note the reading on the display 5 To toggle between pH and mV or Rel mV readings press the MODE key 5 3 1 Taking measurements with READY indicator selected...
Page 24: ...automatically 20 minutes after last key is pressed If the meter is shut off either automatically or manually the HOLD value will be lost For longer storage use the Memory functions described in page...
Page 25: ...nation of values For example you can store 17 pH and 19 mV values 7 1 Memory Input 1 During any measurement function MEAS press MI key to input any data into the memory 2 MEM Sto and memory number wil...
Page 26: ...lay next stored reading press HOLD ENTER key The display automatically moves to the next lower memory location screen 4 To view a stored reading in a specific memory location press MI or MR keys to lo...
Page 27: ...00 b Parity Bit None c Stop Bit One d Data Bit 8 e Flow Control None 3 Please refer to your printer s or computer s instruction manual for more information on its communication setup protocol 4 Use 9...
Page 28: ...ere are two options dAt CUr Print Data on Timed Interval basis You can print any data automatically based a pre set timing from 5 to 30 seconds dAt StO Print Stored Data from Memory This simply dumps...
Page 29: ...can range from 5 to 30 seconds 1 From pH or mV measurement mode press PRINT key 2 Select Dat Cur screen and press HOLD ENTER key 3 The Sec 5 screen appears The default value is 5 seconds time interva...
Page 30: ...l Figure 25 Print data on timed interval 8 2 3 Print Data from Stored Memory The pH 110 meter can print data that is stored in the memory You can print out all stored data or selected data based on it...
Page 31: ...r computer ATC C Prn display will keep flashing until all stored data are printed To stop press PRINT key Figure 26 Print all stored data To Print Selected Stored Data 1 From measurement mode press MR...
Page 32: ...cation Moves to next memory location MR pH pH MEM MEM MEM loc loc loc 2 0 1 0 9 MEM MEM 5 69 5 69 2 2 4 2 2 4 ENTER HOLD ENTER HOLD ATC C ATC C MI MR Flash for 0 5 seconds Figure 27 Print based on sel...
Page 33: ...H 110 meters feature different sub groups that organise all setup parameters The sub groups are For pH For mV P1 0 Unit Configuration P1 0 Unit Configuration P2 0 Calibration Points P2 0 Not available...
Page 34: ...SETUP pH C A L P2 0 SETUP E L E P3 0 SETUP C O F C O F P4 0 SETUP P5 0 SETUP P6 0 SETUP SETUP MI MR MI MR MI MR MI MR MI MR MI MR MEM SETUP E L E P3 0 SETUP P4 0 SETUP P5 0 SETUP P6 0 MI MR MI MR MI M...
Page 35: ...UP pH C A L P2 0 P2 0 View Previous pH Calibration Data View only P2 1 First calibration point P2 2 Second calibration point P2 3 Third calibration point P2 4 Fourth calibration point P2 5 Fifth calib...
Page 36: ...ts pH 110 only SETUP E L E P3 0 P3 0 View Electrode Data pH 110 only P3 1 Electrode offset in mV pH 110 only SETUP P4 0 A 0 P4 0 Select Auto Power On Off P4 0 Select auto power on or off SETUP P5 0 P5...
Page 37: ...Select between 2 buffer options 4 buffer options for pH 110 3 Select the number of pH calibration points 4 Select between C and F units for temperature readings for pH 110 meter only Figure 29 on the...
Page 38: ...urement mode 1 Press SETUP key to enter Set Up mode 2 At COF P1 0 parameter press HOLD ENTER key to select parameter P1 1 3 Press the MI or MR keys to select the configuration you require OFF switches...
Page 39: ...WB Low Ionic pH 4 10 and 6 97 From measurement mode Press SETUP key to enter Set Up mode 1 Press the MI or MR keys to scroll through subgroups until you view parameter P1 0 2 Press the HOLD ENTER key...
Page 40: ...SETUP key to enter Set Up mode 2 Press the MI or MR keys to scroll through subgroups until you view parameter P1 0 3 Press the HOLD ENTER key three times to select parameter 1 3 4 Press the MI or MR k...
Page 41: ...Set Up mode 2 Press the MI or MR keys to scroll through subgroups until you view parameter P1 0 3 Press the HOLD ENTER key four times to select parameter 1 4 4 Press the MI or MR keys to toggle betwe...
Page 42: ...oups until you view parameter P2 0 3 Press the HOLD ENTER key repeatedly to view previous calibration data See Figure 34 4 When you have scrolled through all calibration data you will automatically re...
Page 43: ...scroll through subgroups until you view parameter P3 0 3 Press the HOLD ENTER key 4 The display shows the electrode offset value It is the mV offset at pH 7 00 If you have not calibrated at any buffer...
Page 44: ...e 2 From mV measurement mode press the SETUP key to enter Set Up mode 3 Press the MI or MR keys to scroll through subgroups until you view parameter P3 0 4 Press the HOLD ENTER key 5 The display shows...
Page 45: ...ess the SETUP key to enter Set Up mode 2 Press the MI or MR keys to scroll through subgroups until you view parameter P4 0 3 Press the HOLD ENTER key 4 Press MI or MR keys to select options YES Meter...
Page 46: ...r Set Up mode 2 Press the MI or MR keys to scroll through subgroups until you view parameter P5 0 3 Press the HOLD ENTER key 4 Press the MI or MR keys to toggle between NO and YES NO retains current s...
Page 47: ...rogram P5 0 rSt press HOLD ENTER key three times to P5 2 2 Press the MI or MR keys to scroll through subgroups until you view parameter P5 0 NO retains current settings YES resets to factory default s...
Page 48: ...mode 2 Press the MI or MR keys to scroll through subgroups until you view the parameter P6 0 3 Press the HOLD ENTER key 4 Press the MI or MR keys to toggle between NO and YES NO retains current memor...
Page 49: ...rocessing can be eliminated or reduced To download this software visit www eutechinst com 10 1 System Requirements To run the DAS program the following is required 1 PC IBM Compatible XT and above wit...
Page 50: ...Instruction Manual CyberScan pH 11 110 46 Figure 42 Click on Browse button and locate CD ROM drive Figure 43 Locate the CyberComm Portable Setup program in the CD ROM under Eutech DAS directory...
Page 51: ...Instruction Manual CyberScan pH 11 110 47 Figure 44 Select Portable Meters directory to go to CyberComm Portable Figure 45 Open CyberComm Portable to enter to the Setup program...
Page 52: ...Instruction Manual CyberScan pH 11 110 48 Figure 46 Select SETUP EXE program and click the OPEN button Figure 47 InstallShield Wizard dialog box appears...
Page 53: ...Instruction Manual CyberScan pH 11 110 49 Figure 48 Click on Next button Figure 49 Key in your name and company name and click NEXT button...
Page 54: ...anual CyberScan pH 11 110 50 Figure 50 To select another Destination Directory to install the program click on BROWSE button Otherwise click NEXT button Figure 51 Creating a new program folder Click o...
Page 55: ...Instruction Manual CyberScan pH 11 110 51 Figure 52 Click on NEXT button Figure 53 The CyberComm Portable DAS program is fully installed Click on FINISH button to end installation...
Page 56: ...g the DAS program please ensure that the RS232 cable is connected between the computer s serial port and the meter s port See section 3 4 Connecting the RS232C Cable Only for pH 110 on page 9 Figure 5...
Page 57: ...te stamp when collecting the data Time and date information comes from the computer Figure 56 Under File Menu setting you can change various parameters Under ABOUT menu details of Eutech Instruments c...
Page 58: ...0 meter Please refer to Section 8 1 Using pH 110 Meter With Printer or Computer on page 23 for the settings 10 3 3 Communication Settings Connect Using For selecting communication port Select 1 Baud R...
Page 59: ...232C Cable Only For pH 110 on page 9for connection procedure 2 Switch on the pH 110 meter and run the Data Acquisition software 3 Click ENABLE CONNECTION button 4 With the pH 110 meter switched on pre...
Page 60: ...between the Data Acquisition program and the meter The COM port number in the Data Acquisition program is wrong Change the COM port number 1 or 2 in the Data Acquisition program Your computer s COM p...
Page 61: ...ve or stopper cap Necessary for only refillable electrodes 3 Store the electrode as mentioned above Storage section 11 1 1 or as recommended by the manufacturer 11 1 3 Electrolyte Replacement for refi...
Page 62: ...o cool while immersed in some unheated KCl solution d Protein Deposits Prepare a 1 pepsin solution in 0 1M HCl Allow the electrode to stand in this solution for five to ten minutes Rinse the electrode...
Page 63: ...ase NaOH for 5 minutes 6 Leave for 15 minutes in tap water 7 Test with standard calibration buffer solutions CAUTION Proper eyewear and gloves must be worn when preparing these chemicals and performin...
Page 64: ...CORRECTIVE ACTION Err Annunciator Wrong keypad input Wrong input in selected mode Release key Select valid operations depending on mode Secondary Display Toggles Continuously between Calibration Buffe...
Page 65: ...rence electrolyte in electrode 2 Broken electrode 3 External noises or induction e g electrical noise caused by a nearby motor 4 Dirty electrode 1 Fill electrode with reference electrolyte 2 Replace e...
Page 66: ...ass electrode is an internal electrode that contains a reference solution of pH 7 When the electrode is placed in a pH 7 solution the pH values within and outside the electrode are the same and no pot...
Page 67: ...ference solution To reduce these factors it is important to ensure that the temperature of the standard calibrating solution and the sample solution are the same 14 2 Use of Standard pH Buffers Standa...
Page 68: ...nate pH 12 45 Saturated Calcium Hydroxide Solution 0 1 67 4 01 7 12 10 32 13 43 5 1 67 4 01 7 09 10 25 13 21 10 1 67 4 00 7 06 10 18 13 00 15 1 67 4 00 7 04 10 12 12 81 20 1 68 4 00 7 02 10 06 12 63 2...
Page 69: ...C FC72521 01B General purpose epoxy body pH combination electrode double junction 12x110 mm 1 m cable length EC FC72522 01B 3 in 1 pH Temperature ATC combination epoxy body electrode single junction 1...
Page 70: ...ody electrode single junction 12x110 mm 1 m cable length 35811 71 All in 1 pH Temperature ATC combination epoxy body electrode double junction 12x110 mm 1 m cable length 35811 72 Combination ORP elect...
Page 71: ...20 pcs EC BU 7BS 35653 02 pH 10 01 buffer sachets 20 ml x 20 pcs EC BU 10BS 35653 03 pH De ionised water rinse sachets 20 ml x 20 pcs EC RIN WT 35653 00 pH sachet assortment pack 5 each of pH 4 01 pH...
Page 72: ...ng Only P 2 3 Third calibration point Viewing Only Viewing Only P 2 4 Fourth calibration point Viewing Only Viewing Only P 2 5 Fifth calibration point Viewing Only Viewing Only P 3 0 View electrode da...
Page 73: ...Viewing Only P 2 4 Fourth calibration point Viewing Only Viewing Only P 2 5 Fifth calibration point Viewing Only Viewing Only P 2 6 Sixth calibration point Viewing Only Viewing Only P 3 0 View electr...
Page 74: ...IST pH 1 68 4 01 6 86 9 18 12 45 USA pH 1 68 4 01 7 00 10 01 12 45 NIST pH 1 68 4 01 6 86 9 18 12 45 DIN pH 1 09 3 06 4 65 6 79 9 23 12 75 PWB pH 4 10 and 6 97 pH Buffer Options USA NIST USA NIST DIN...
Page 75: ...ustomer Unauthorised modification or misuse Operation outside of the environment specifications of the products 19 RETURN OF ITEMS Authorisation must be obtained from our Customer Service Department o...
Page 76: ...ow Oakton Instruments P O Box 5136 Vernon Hills IL60061 USA Tel 1 888 462 5866 Fax 1 847 247 2984 E mail info 4oakton com Web site www 4oakton com Eutech Instruments Pte Ltd Blk 55 Ayer Rajah Crescent...