NXP Semiconductors KITPF3000FRDMEVM User Manual Download Page 13

KTPF3000FRDMEVMUG, Rev. 2.0

Freescale Semiconductor

13

Installing the Software and Setting up the Hardware

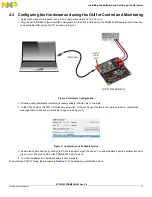
4.3 Configuring the Hardware and using the GUI for Control and Monitoring

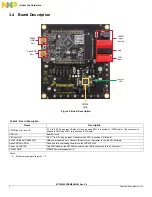
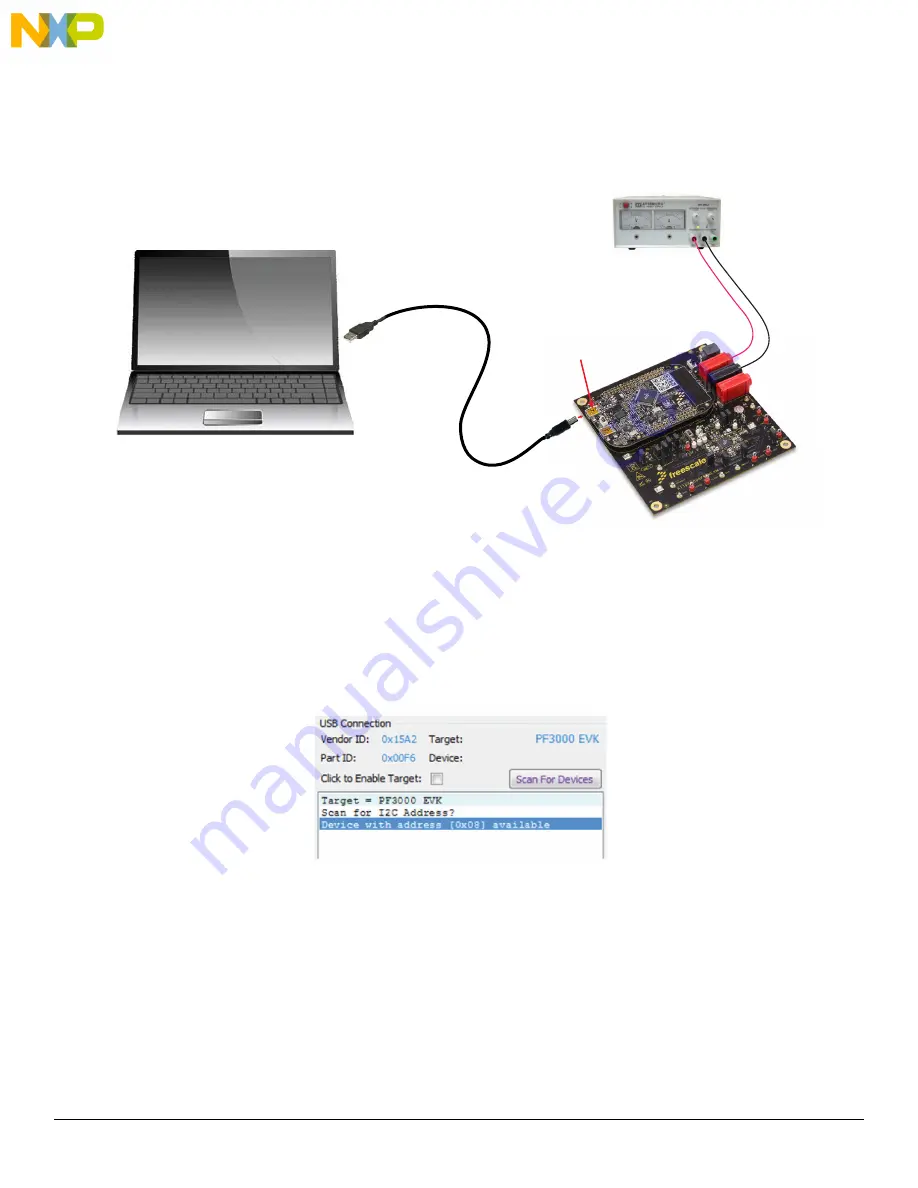
1.  Apply input voltage to the board: use a 5.0 V supply connected to J2 (+) and J3 (-).
2.  Plug the mini-USB side of the mini-USB to USB cable into the KL25Z USB port on the FRDM-KL25Z board and the other end 

to an available USB port on the PC as shown in 

Figure 8

.

Figure 8. Hardware Configuration

3.  Windows will automatically install the necessary drivers. Wait for this to complete.
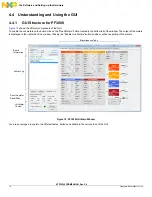
4.  In the PF3000 GUI or PF3001 GUI window, click on the "Scan For Devices" button in the top-left portion. A confirmation 

message that a valid device is available is logged (see 

Figure 9

).

Figure 9. Confirmation of Available Device

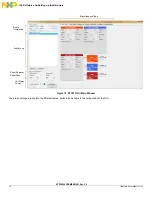
5.  Enable the communication by clicking the "Click to Enable Target" check box. You will immediately see the window turn from 

grey to color. The green LED on the FRDM-KL25Z also turns on.

6.  The GUI installation and hardware setup is now complete.

To emulate the PF3001, follow the procedure in 

Section 5

 for the hardware modification details.

(-)

(+)

KITPF3000FRDMEVM

KL25Z

USB

Port

USB Cable

Summary of Contents for KITPF3000FRDMEVM

Page 1: ...onductor Inc 2015 All rights reserved Freescale Semiconductor User s Guide Document Number KTPF3000FRDMEVMUG Rev 2 0 8 2015 KITPF3000FRDMEVM Board for PF3000 Evaluation and PF3001 Emulation Figure 1 K...

Page 2: ...of Contents 1 Important Notice 3 2 Getting Started 4 3 Getting to Know the Hardware 5 4 Installing the Software and Setting up the Hardware 10 5 How to Emulate the PF3001 17 6 Schematics Board Layout...

Page 3: ...e reserves the right to make changes without further notice to any products herein Freescale makes no warranty representation or guarantee regarding the suitability of its products for any particular...

Page 4: ...and improved performance in powering state of the art systems Go to www freescale com KITPF3000FRDMEVM Review your Tool Summary Page Look for Download documents software and other information Once th...

Page 5: ...ply through banana jacks Integrated FRDM KL25Z as communication link between the EVB and a PC Two 1 Amp E Loads with configurable current 3 3 Device Features This evaluation board features the followi...

Page 6: ...th GND J3 Board Ground VIN Input J4 2 8 V 2 to 4 5 V Supply input Use only when SW1 in position 2 VIN path KL25Z USB port USBKL25Z USB communication port Connect this port to your computer to use the...

Page 7: ...T 1 8 V VLDO1_SEQ 4 VLDO2_VOLT 1 5 V VLDO2_SEQ 4 VLDO3_VOLT 3 3 V VLDO3_SEQ 3 VLDO4_VOLT 3 3 V VLDO4_SEQ 3 V33_VOLT 3 3 V V33_SEQ 3 VCC_SD_VOLT 3 3 V 1 85 V VCC_SD_SEQ 4 PU CONFIG SEQ_CLK_SPEED 2000 s...

Page 8: ...efinitions Figure 3 shows the location of jumpers and switches on the KITPF3000FRDMEVM evaluation board Table 4 describes the function and settings for each jumper and switch Default settings are show...

Page 9: ...r logic input pins 1 2 Uses VSNVS as pull up voltage for logic input pins 2 3 Uses VDDIO as pull up voltage for logic input pins J13 VDDIO voltage source 1 2 Uses on board discrete LDO as VDDIO voltag...

Page 10: ...rom https www freescale com webapp sps site prod_summary jsp code KITPF3000FRDMEVM 2 Extract all the files to C Freescale PF3000GUI or any other desired folder on your PC 3 Run setup exe and click on...

Page 11: ...PF3001GUI on your Computer 1 Download PF3001GUI zip from https www freescale com webapp sps site prod_summary jsp code KITPF3000FRDMEVM 2 Extract all the files to C Freescale PF3001GUI or any other d...

Page 12: ...e Semiconductor Inc Installing the Software and Setting up the Hardware 4 The GUI installation is complete and the window shown in Figure 7 appears Do not click on anything until the board is plugged...

Page 13: ...will automatically install the necessary drivers Wait for this to complete 4 In the PF3000 GUI or PF3001 GUI window click on the Scan For Devices button in the top left portion A confirmation message...

Page 14: ...board click on the Read Meters button located in the bottom left of the window The output of the meters is displayed in the right side of the window Clicking the Enable Live Meters button enables con...

Page 15: ...0 using the selected configuration click on the Restart PMIC button Alternatively you can toggle the PWRON button to initiate the startup The startup sequence can be monitored on an oscilloscope and w...

Page 16: ...e Software and Setting up the Hardware Figure 12 PF3001 GUI Main Window You are encouraged to explore the different tables buttons and sliders in the various tabs of the GUI Miscellaneous Tabs Board I...

Page 17: ...ale Semiconductor 17 How to Emulate the PF3001 5 How to Emulate the PF3001 To emulate the PF3001 1 Add a 0 Ohm resistor R13 and remove L4 as shown in Figure 13 Figure 13 Schematic Change for PF3001 Fi...

Page 18: ...00FRDMEVMUG Rev 2 0 18 Freescale Semiconductor Inc How to Emulate the PF3001 2 Make sure the Jumper J5 is connected as shown in Figure 15 Figure 15 J5 TBB Jumper Connection 3 Download and use the PF30...

Page 19: ...ut and Bill of Materials Schematics Board Layout and Bill of Materials KITPF3000FRDMEVM board schematics board layout and bill of materials are available in the Download section of the KITPF3000FRDMEV...

Page 20: ...Support Pages Description URL KITPF3000FRDMEVM Tool Summary Page http www freescale com webapp sps site prod_summary jsp code KITPF3000FRDMEVM Schematic BOM Board Layout http www freescale com webapp...

Page 21: ...Freescale Semiconductor 21 Revision History 8 Revision History Revision Date Description of Changes 1 0 5 2015 Initial release Added caution to note 5 in Table 4 2 0 8 2015 Added Section 4 2 Added Sec...

Page 22: ...ion consequential or incidental damages Typical parameters that may be provided in Freescale data sheets and or specifications can and do vary in different applications and actual performance may vary...

Reviews: