


6
7
freescale.com
Quick Start Guide
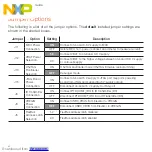
Jumper
Option
Setting
Description
J11
MCU Power
Connection
ON
Connect on-board 3.3 V supply to MCU
OFF
Isolate MCU from power (connect an ammeter to measure current)
J12
VBAT Power
Selection
1-2
Connect VBAT to on-board 3.3 V supply
2-3
Connect VBAT to the higher voltage between on-board 3.3 V supply
or coin-cell supply
J13
OSJTAG
Bootloader
Selection
ON
OSJTAG bootloader mode (OSJTAG firmware reprogramming)
OFF
Debugger mode
J15
JTAG Board
Power
Connection
ON
Connect on-board 5 V supply to JTAG port (supports powering
board from JTAG pod supporting 5 V supply output)
OFF
Disconnect on-board 5 V supply to JTAG port
J6
IR Transmitter
Connection
ON
Connect PTD7/CMT_IRO to IR Transmitter (D3)
OFF
Disconnect PTD7/CMT_IRO from IR Transmitter (D3)
J3
VREGIN
Power
Connection
ON
Connect USB0_VBUS from Elevator to VREGIN
OFF
Disconnect USB0_VBUS from Elevator to VREGIN
J5
FlexBus
Address Latch
Selection
1-2
FlexBus address latch disabled
2-3
FlexBus address latch enabled
Jumper Options
The following is a list of all the jumper options. The
default
installed jumper settings are
shown in the shaded boxes.
Downloaded from
Downloaded from
Downloaded from
Downloaded from