background image

6

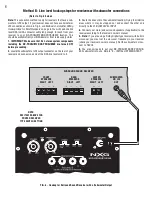
FIG. 4 - Hookup for Surround Sound Receiver with a Subwoofer Output

(Refer to Fig. 4 below)

Note:

This connection method is only for receivers that have a sub-

woofer or LFE output. If your receiver does not have a subwoofer or

LFE connection as shown in Fig. 4, use 

Method A – Amplifier Wiring

Hookup Steps for Most Receivers 

on page 5. You will need one line

level RCA to RCA connector cable long enough to reach from your

receiver  to  your  NX-PROSUB125/NX-PROSUB300  location.  This

should be available from your NXG dealer or from radio supply stores. 

1.  IMPORTANT: Make  sure  that  ALL  stereo system  components 

including  the  NX-PROSUB125/NX-PROSUB300 are  turned  OFF

before proceeding.
2. 

Locate the subwoofer or LFE output connector on the rear of your

receiver and connect one end of the RCA line level cord to it. 

3. 

Route the line cord to the subwoofer location (trying to minimize

areas  where  it  may  be  stepped  on)  and  connect  the  other  end

directly to the LFE/LOW LEVEL INPUT.

4. 

Connect your main (and surround speakers if applicable) to the

receiver according to the receiver’s owner’s manual.

5.  Note:

If you are using a Dolby Digital type receiver with built-in

crossover, you must set the crossover frequency in your receiver

(check your receiver’s owner’s manual). Set the subwoofer’s cross-

over to 180 Hz.

6. 

You are now ready to put your NX-PROSUB125/NX-PROSUB- 

300 subwoofer into use. Skip to “E – INITIAL LISTENING TEST.”

Method B: Line level hookup steps for receivers with subwoofer connections

FRONT

SPEAKERS

RIGHT   LEFT

REAR

SPEAKERS

RIGHT   LEFT

CENTER

SPEAKERS

RIGHT   LEFT

SUBWOOFER

OR LFE

OUT

SURROUND SOUND RECEIVER

NOTE: 

SEE ITEM 5 ABOVE FOR

PROPER RECEIVER

TYPE SWITCH SETTING

Summary of Contents for NX-PROSUB125

Page 1: ...Owner s Manual Model NX PROSUB125 10 125 watt Powered Subwoofer Model NX PROSUB300 12 300 watt Powered Subwoofer...

Page 2: ...serted to prevent blade exposure Pour pr evenir les chocs lectriques ne pas utiliser cette fiche polarise avec un prolonga teur un prise de courant ou une autre sortie de courant sauf si les lames peu...

Page 3: ...oofer and main speakers determines the phase setting that will sound best at your main listening position If this requires using the 180 mode don t worry there is nothing abnormal about it 6 LFE LOW L...

Page 4: ...wavelengths they are influenced by proximity to a boundary such as a wall or floor See Fig 2 When you place the NX PROSUB125 NX PROSUB300 well away from a wall it will produce bass at a certain level...

Page 5: ...out a Subwoofer Output RECEIVER OR INTEGRATED AMPLIFIER FRONT SPEAKERS LEFT RIGHT COLOR TOP SHAFT STRIPPED END 1 2 WIRE To connect wire 1 Unscrew counter clockwise the top color portion 2 Place the st...

Page 6: ...of your receiver and connect one end of the RCA line level cord to it 3 Route the line cord to the subwoofer location trying to minimize areas where it may be stepped on and connect the other end dire...

Page 7: ...nge the CROSSOVER FREQUENCY control for Dolby Pro Logic receivers to higher and lower settings If the CROSS OVER FREQUENCY control is set too high you ll start to hear low midrange voices and instrume...

Page 8: ...B125 NX PROSUB300 can eliminate this problem Please refer to Item 10 in the Safety Instructions for conditions that ALWAYS require service by qualified personnel If you have tried all the above and st...

Reviews: