HARDWARE INSTALLATION
9
8
HARDWARE INSTALLATION
03
5
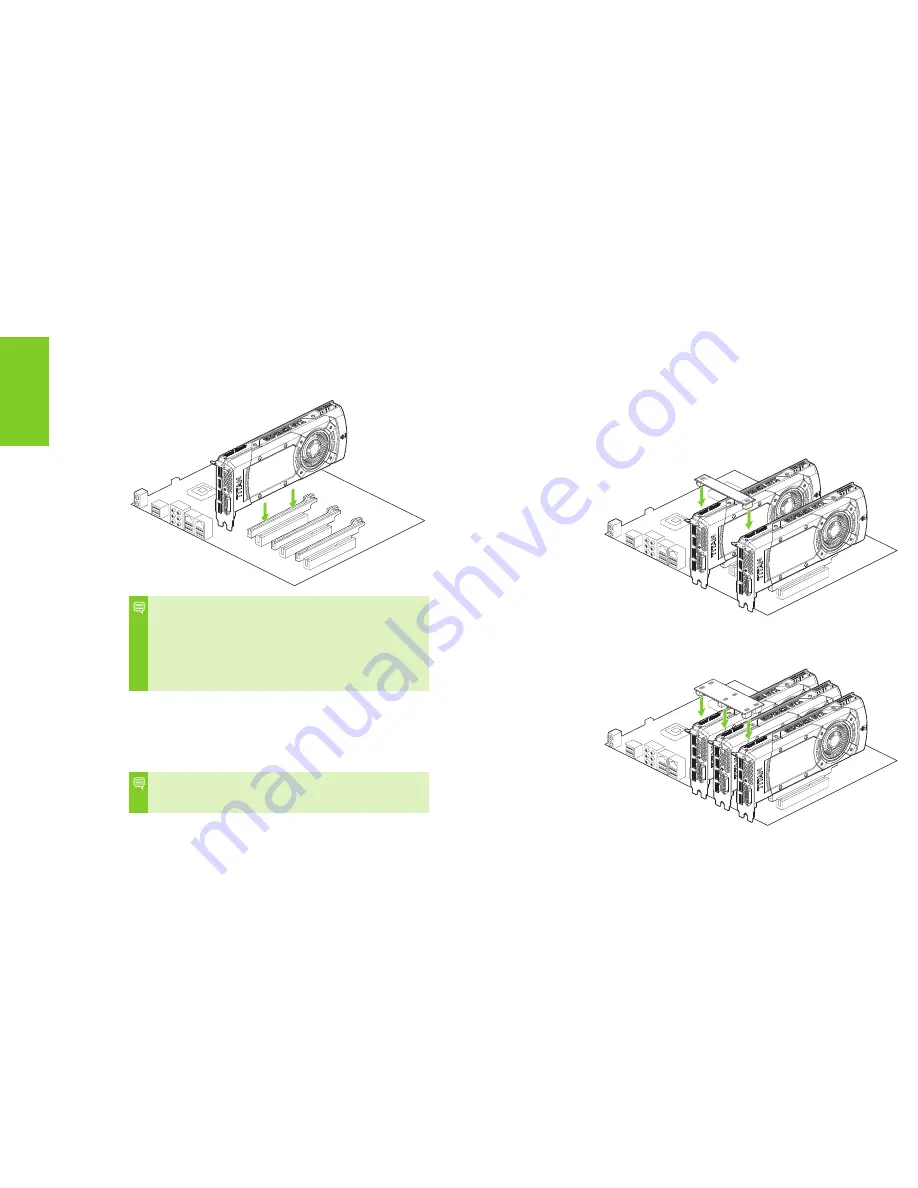
Plug the GeForce GTX TITAN X graphics card into the Primary PCI
Express x16 slot on your motherboard. This is often the slot closest to
the CPU but may be the second or third slot. Look for the slot labeled
×16
. It will likely be the only PCI Express slot with a retention lever on
the end of the slot or the one closest to the CPU
Note: It is recommended that you install the graphics card
into the primary PCI Express x16 slot. If you install the graphics
card into the secondary slot, your system may not recognize the
graphics card and there will be nothing displayed on the monitor.
Also note that on some motherboard SbIOS, the physical
location of the primary slot can be configured when there are
more than one PCI Express x16 slots.
If you are installing additional GeForce GTX TITAN X graphics cards
for an SLI configuration, continue with step 6 (2-way SLI) or step 6
and 7 (3-way SLI). If you are only installing one GeForce card, go on to
step 8.
Note: All of the graphics cards in an SLI configuration must be
identical. Therefore, you must have all GeForce GTX TITAN X
graphics cards.
6
Install a second GeForce GTX TITAN X graphic card (2-way SLI):
a)
Install the second GeForce card into the outer most PCI Express
x16 slot on the motherboard.
b)
Connect the two GeForce GTX TITAN X cards together using
the dual SLI bridge connector that came with your SLI-ready
motherboard.
7
Install a third GeForce GTX TITAN X graphic card (3-way SLI):
a)
Install the third GeForce card into the middle PCI Express x16 slot
on the motherboard.
b)
Connect the three GeForce GTX TITAN X cards together using
the tripple SLI bridge connector that came with your SLI-ready
motherboard.
SLI
SLI
Summary of Contents for GeForce GTX TITAN X
Page 1: ...USER GUIDE...
Page 2: ...NVIDIA GeForce GTX TITAN X GEFORCE GTX TITAN X INSTALLATION GUIDE...
Page 17: ...www nvidia com...


