background image

14

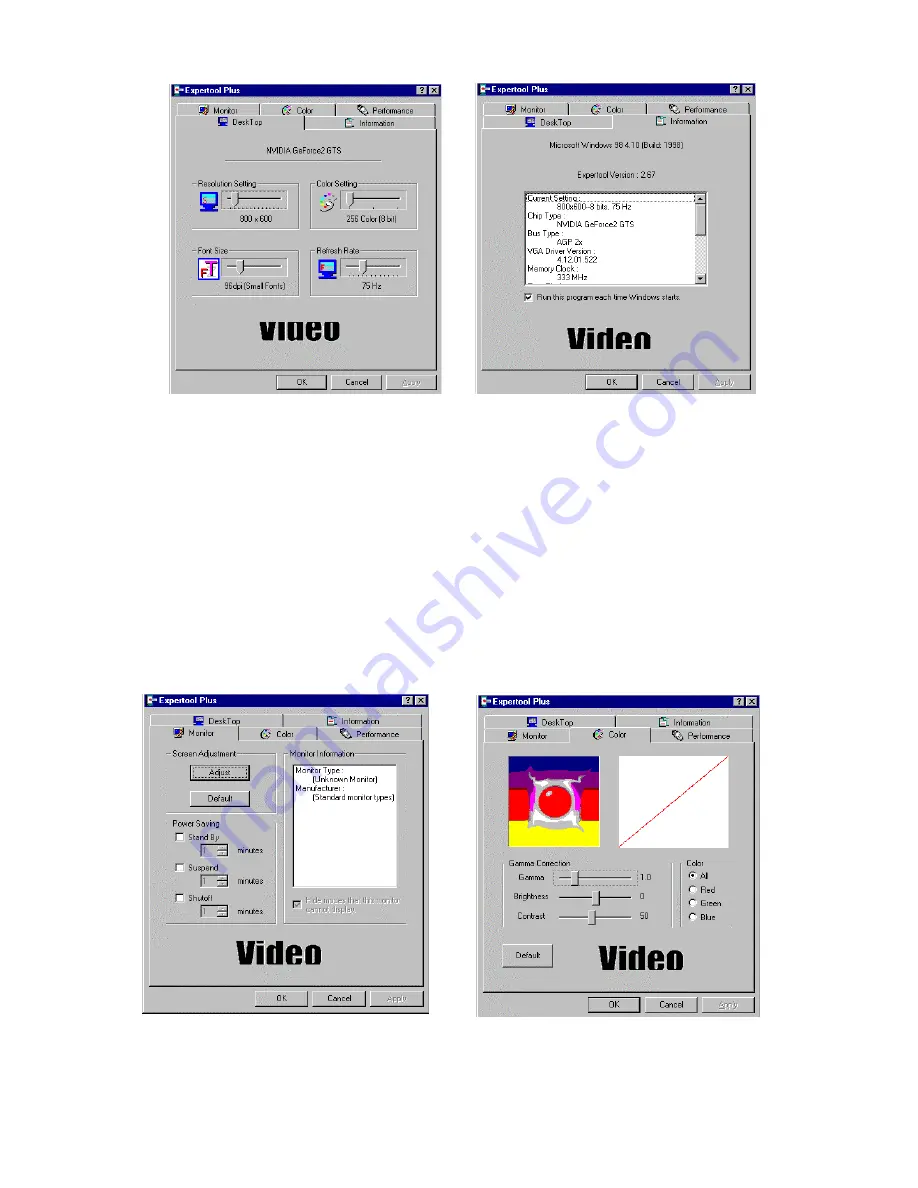
                              Figure 5-4                                                Figure 5-5

(As Figure 5-4)

DeskTop:

 Displays the current Resolution Setting, Color Setting, Font Size and

Refresh Rate for the monitor.    Drag the slider to specify values for each setting and
click 

OK

 to put changes into effect.

(As Figure 5-5)

Information:

 Displays the current display settings and information of your computer.

Run this program each time Windows starts

 - check box: Select this option to run

Expertool immediately each time Windows starts.


  Figure 5-6                                                  Figure 5-7


Summary of Contents for GeForce 2 GTS

Page 1: ...me and without notice Consequently the manufacturer assumes no liability for damages incurred directly or indirectly from errors omissions or discrepancies between the product and the manual All regis...

Page 2: ...installation If this equipment does cause interference to radio or television reception which can be determined by turning the equipment off and on the user is encouraged to try to correct the interf...

Page 3: ...1 Overview 1 Chapter 2 Hardware Installation 3 Chapter 3 Software Installation 5 Chapter 4 Display Properties for Windows 8 Chapter 5 Expertool for Windows 13 Chapter 6 Technical Information 17 Chapt...

Page 4: ...Support 2 4X AGP with Fast Write AND Execute mode Integrated 350MHz RAMDAC resolution up to 2048x1536 True Color 75Hz Full acceleration for Microsoft DirectX7 and Open GL 1 2 ICD 2nd generation T L E...

Page 5: ...igh Quality Texture Filtering including Anisotropic Single pass multi texture High Quality HDTV DVD Playback 8 1 up scaling and down scaling Video acceleration for DirectShow MPEG 1 MPEG 2 and Indeo M...

Page 6: ...meets the peripheral requirements and switch to the standard VGA display driver Prepare Your Computer for Installation Prior to working on your computer make sure the power of the computer and any rel...

Page 7: ...fully seated in the slot Replace the screw to secure the bracket of the Graphic card to the computer chassis Connect the Monitor DVI Optional Plug your monitor DVI cable into the monitor DVI connecto...

Page 8: ...98 2000 NT the New Hardware Found dialog box will appear after restart Select Driver from disk provided by hardware manufacturer click OK then follow all on screen instructions If the New Hardware Fo...

Page 9: ...will appear on the screen please click Continue button and follow the instructions on screen to complete installation 6 Final restart your computer for the changes to take effect Method 2 Manually in...

Page 10: ...elect the driver you want check box and click Next button Figure 3 5 9 Select Show compatible hardware check box and click Have Disk button Type the path to the folder containing the driver files and...

Page 11: ...ties from the pop up menu that appears on screen In Display Properties dialog box for Win95 please select GeForce 2 GTS item For Win98 please select Settings Advanced button then choose GeForce 2 GTS...

Page 12: ...you have saved Selecting an item from the list will activate the setting Save As Lets you save the current color settings as a custom setting Saved settings will then be added to the adjacent list De...

Page 13: ...ons Allowing fast linear mip linear filtering provide in increased application performance at the expense of some image quality Default color depth for textures This option determines whether textures...

Page 14: ...ay not support this feature General Timing Formula GTF It s a standard used by most newer hardware Discrete Monitor Timings DMT It s an older standard still in use on some hardware Enable this option...

Page 15: ...epending on which devices your display adapter supports Device Setting button Opens a window where you can customice the settings for the active display device As Figure 4 8 click Device Settings butt...

Page 16: ...our accelerator s display driver Installation Expertool will automatically install when you use the Setup program under Windows 95 98 2000 NT refer to Chapter 3 Once installed it can be activated by s...

Page 17: ...itor Drag the slider to specify values for each setting and click OK to put changes into effect As Figure 5 5 Information Displays the current display settings and information of your computer Run thi...

Page 18: ...tion instantly places your monitor in standby mode which delivers minimal power savings but provides optimal recovery time Suspend check box This option instantly places your monitor in Suspend mode w...

Page 19: ...e original setting As Figure 5 9 DirectX DirectX properties vary depending on the version of windows you are running the version of DirectX installed and the type of DirectX enabled drivers installed...

Page 20: ...50Hz 1600x900 150Hz 150Hz 120Hz 1600x1200 120Hz 120Hz 100Hz 1920x1080 100Hz 100Hz 85Hz 1920x1200 100Hz 100Hz 85Hz 1920x1440 85Hz 85Hz 75Hz 2048x1536 75Hz 75Hz 60Hz Monitor Connector Pin Assignments Pi...

Page 21: ...utput channel 3 14 5V Power Logic 5V supply 15 Ground Ground reference for 5 volt power pin Used as return by Hsync and Vsync Signals 16 HPD Signal is driven by monitor to enable the system to identif...

Page 22: ...hould work correctly Problem After installing the driver Windows 95 doesn t prompt me to restart and the driver still doesn t work after a manual reboot You may have installed similar drivers before T...

Page 23: ...display flickers after Windows 95 or Windows 98 starts Solution Your monitor may not support the resolution or refresh rate that you have set You must use display settings supported by the monitor To...

Page 24: ...ON Mainboard Chipset CPU Speed MHz Mainboard CPU VGA Memory Type Mainboard Memory MB VGA Memory MB Mainboard Brand VGA Memory Brand Cache Memory KB FDD HDC Card Monitor Type Horizontal Freq KHz to KHz...

Reviews: