background image

Setup and Maintenance 

DIGITS DevBox 

  23 


3.


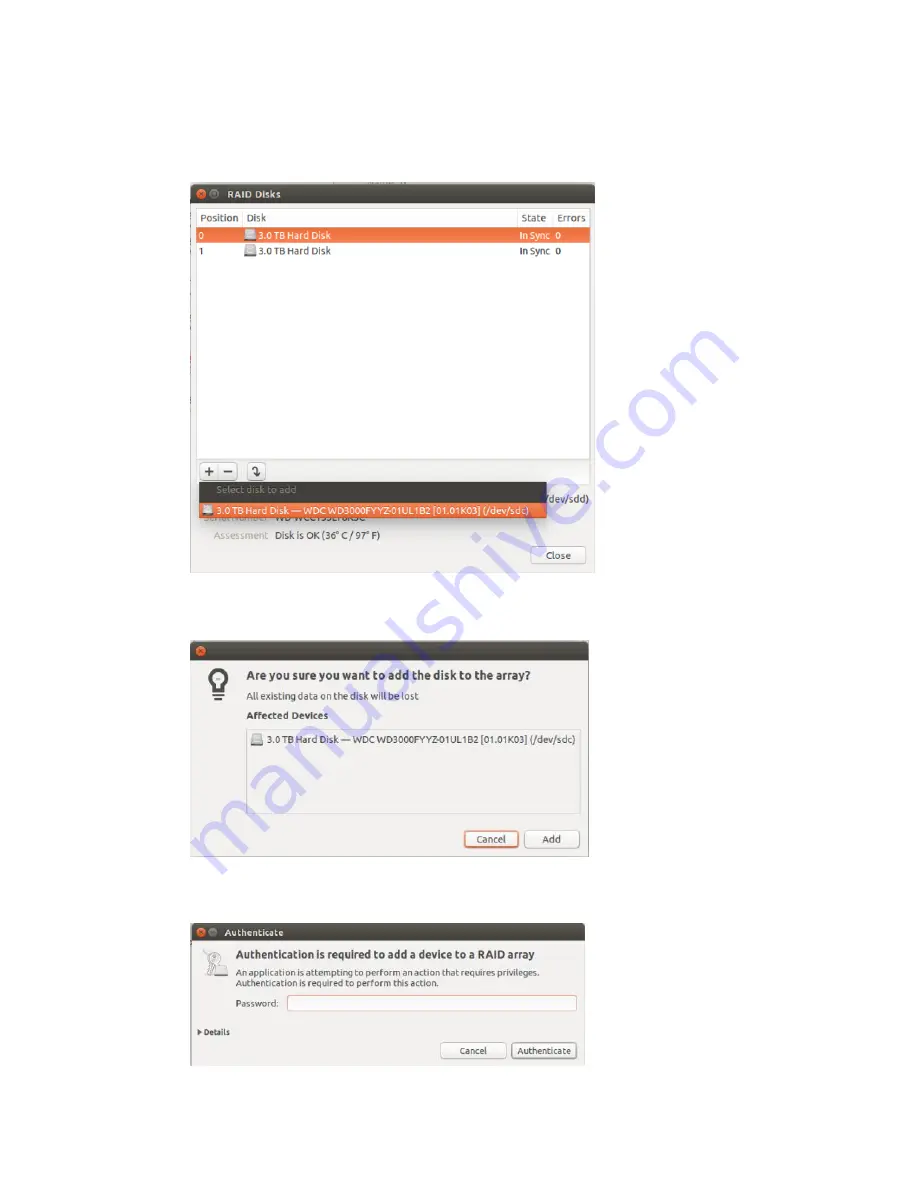
From the RAID Disks window, select the disk to add from the list. 


4.


Click 

Add

 when asked if you are sure you want to add the disk to the array. 


5.


At the 

Authenticate

 dialog, enter the password and then click 

Authenticate


Summary of Contents for DIGITS DEVBOX

Page 1: ...DU 07635 001_v01 May 2015 User Guide DIGITS DEVBOX...

Page 2: ...g Up the DIGITS DevBox 11 What s in the Box 11 QuickStart Setup 11 Software Updates 16 Configuring Multiple Displays 17 Accessing DIGITS Remotely 18 Performing a Factory Reset 18 Rebuilding the RAID 5...

Page 3: ...dditional helpful information 1 Numbered steps are used to indicate the order in which instructions are to be followed Bulleted items are used to indicate a list of items in no particular order Bold t...

Page 4: ...meaningful insight for practical application Such data manipulation has application in various fields such as computer vision speech recognition and language processing and audio recognition It takes...

Page 5: ...owerful solution that can fit under your desk It is a single deskside machine comprised of Four NVIDIA GeForce TITAN X GPUs NVIDIA DIGITS software Interactive Deep Learning GPU Training System Pre ins...

Page 6: ...lled with NVIDIA qualified drivers Operating System and Software The system comes with the following software and OS pre installed on the SATA3 SSD Ubuntu 14 04 2 LTS NVIDIA DIGITS Software Caffe Torc...

Page 7: ...dwidth and 12 GB of memory RAID 5 Storage Data 3 Western Digital RE 3TB 7200 RPM 64MB Cache SATA 6 0Gb s 3 5 Storage cache 1 SSD M 2 SATA MODULE SAMSUNG XP941 M 2 512GB PCI EXPRESS Storage OS 1 Samsun...

Page 8: ...eo jack audio output Audio 1 Optical S PDIF output USB 10 USB 3 0 eSATA 2 6 Gbps eSATA port Audio Port Definitions Port Color 2 channel 4 channel 6 channel 8 channel Light Blue Line In Line In Line In...

Page 9: ...the connection status as described in the following tables Activity Link LED Status Description Off No link Orange Linked Orange blinking Data activity Orange blinking then steady Ready to wake Speed...

Page 10: ...ection explains how to set up and maintain the DIGITS Devbox It contains the following topics Setting Up the DIGITS DevBox Software Updates Configuring Multiple Displays Connecting Remotely Performing...

Page 11: ...IDIA DIGITS DevBox NVIDIA DIGITS DevBox Power Cable Three 3 hard disk drives DisplayPort to DVI adapter Welcome Card QuickStart Setup The three hard disk drives are packaged separately from the system...

Page 12: ...sure that the hard disks are seated properly a Lower the latches just to the point where you need to push them closed b Push the hard disks to make sure they are securely seated c Push the latches dow...

Page 13: ...can reach 1350W under a heavy multi GPU workload Be sure the DevBox is connected to an adequately rated circuit to avoid overloading the circuit 3 Connect the keyboard and mouse not included 4 Connec...

Page 14: ...ime zone and setting up your system user name and password After that the Welcome screen appears while the system processes the initialization This may take a few minutes Wait for this step to complet...

Page 15: ...Box 15 Using the Software Double click the NVIDIA DIGITS icon to launch the software The DIGITS software opens to the Home screen For an explanation of the software double click the DIGITS Tutorial ic...

Page 16: ...hen they are available Click the notification balloon and follow the prompts to update the software Manual Updates You can also check for updates yourself by opening the System Settings window Double...

Page 17: ...Turn on the Devbox and log in The two displays will be activated automatically The desktop controls appear on the primary display 3 To adjust the display configuration such as switching primary displ...

Page 18: ...IGITS DevBox and run the DIGITS software over your network by opening a browser and entering http host name where host name is the host name for your DevBox or the IP address for your DevBox PERFORMIN...

Page 19: ...he lost data on the newly added drive The LEDs for each disk drive in the array indicate the general state of the corresponding disk A blue light indicates the disk is powered up properly while a blan...

Page 20: ...d disk do the following 1 Power down the DevBox 2 On the front of the DevBox flip open the latch for the hard disk that you want to replace Opening the latch is a two step process a First pull down on...

Page 21: ...e latch to secure To ensure that the hard disk is inserted properly a Lower the latch just to the point where you need to push it closed b Push the hard disk to make sure it is securely seated c Push...

Page 22: ...aced the degraded or failing RAID 5 disk with a new one turn on the DevBox and then rebuild the array as follows 1 At the Ubuntu window click the search icon and then enter disks in the search bar The...

Page 23: ...DevBox 23 3 From the RAID Disks window select the disk to add from the list 4 Click Add when asked if you are sure you want to add the disk to the array 5 At the Authenticate dialog enter the password...

Page 24: ...Setup and Maintenance DIGITS DevBox 24 The Disks page show the recovery progress of the array When completed the Disks page shows the state of the working array...

Page 25: ...the Safety of Information Technology Equipment This also covers the national implementation of IEC 60950 1 based safety standards around the world e g UL 60950 1 These standards reduce the risk of inj...

Page 26: ...RE TO FOLLOW THESE SAFETY INSTRUCTIONS COULD RESULT IN FIRE ELECTRIC SHOCK OR OTHER INJURY OR DAMAGE ELECTRICAL EQUIPMENT CAN BE HAZARDOUS IF MISUSED OPERATION OF THIS PRODUCT OR SIMILAR PRODUCTS MUST...

Page 27: ...grades and servicing to qualified personnel This symbol indicates the presence of electric shock hazards The area contains no user or field serviceable parts Do not open for any reason WARNING To redu...

Page 28: ...ect all AC power cords and cables before installation Do not connect or disconnect any cables when perform installation maintenance or reconfiguration of this product during an electrical storm Never...

Page 29: ...The grounding plug is an important safety feature Do not place objects on AC power cords or cables Arrange them so that no one may accidentally step on or trip over them Do not pull on a cord or cabl...

Page 30: ...shock hazard from communication cable Do not connect communication cable during a lightning storm There may be a remote risk of electric shock from lightning Do not connect or use communication cable...

Page 31: ...has been tested and found to comply with the limits for a Class A digital device pursuant to part 15 of the FCC Rules These limits are designed to provide reasonable protection against harmful interfe...

Page 32: ...CE This device complies with the following Directives EMC Directive for Class A I T E equipment Low Voltage Directive for electrical safety RoHS Directive for hazardous substances A copy of the Decla...

Page 33: ...plication planned by customer and to do the necessary testing for the application in order to avoid a default of the application or the product Weaknesses in customer s product designs may affect the...

Reviews: