background image

- 12 -

BROAN-NUTONE LLC ONE YEAR LIMITED WARRANTY

Broan-NuTone LLC warrants to the original consumer purchaser of its products that such products will be free from defects
in materials or workmanship for a period of one year from the date of original purchase.  THERE ARE NO OTHER WAR-
RANTIES, EXPRESS OR IMPLIED, INCLUDING, BUT NOT LIMITED TO, IMPLIED WARRANTIES OR MERCHANT
ABILITY OR FITNESS FOR A PARTICULAR PURPOSE.
During this one-year period, Broan-NuTone LLC will, at its option, repair or replace, without charge, any product or part which
is found to be defective under normal use and service.
THIS WARRANTY DOES NOT EXTEND TO FLUORESCENT LAMP STARTERS, TUBES, HALOGEN AND
INCANDESCENDT BULBS.  This warranty does not cover (a) normal maintenance and service or (b) any products or parts
which have been subject to misuse, negligence, accident, improper maintenance or repair (other than by Broan-NuTone LLC),
faulty installation or installation contrary to recommended installation instructions.
The duration of any implied warranty is limited to the one-year period as specified for the express warranty.  Some states do
not allow limitation on how long an implied warranty lasts, so the above limitation may not apply to you.
BROAN-NUTONE LLC’S OBLIGATION TO REPAIR OR REPLACE, AT BROAN-NUTONE LLC’S OPTION, SHALL BE
THE PURCHASER’S SOLE AND EXCLUSIVE REMEDY UNDER THIS WARRANTY.  BROAN-NUTONE LLC SHALL
NOT BE LIABLE FOR INCIDENTAL, CONSEQUENTIAL OR SPECIAL DAMAGES ARISING OUT OF OR IN CONNEC-
TION WITH PRODUCT USE OR PERFORMANCE.  Some states do not allow the exclusion or limitation of incidental or
consequential damages, so the above limitation or exclusion may not apply to you.
This warranty gives you specific legal rights, and you may also have other rights, which vary from state to state.  This warranty
supersedes all prior warranties.
To qualify for warranty service, you must (a) notify Broan-NuTone LLC at the address stated below or telephone: 1-800-637-
1453, (b) give the model number and part identification and (c) describe the nature of any defect in the product or part.  At the
time of requesting warranty service, you must present evidence of the original purchase date.

Broan-NuTone LLC. 926 West State Street, Hartford, WI 53027 (1-800-637-1453)
NuTone, Inc., 4820 Red Bank Road, Cincinnati, OH 45227 (1-800-543-8687)
Broan-NuTone Canada, Inc. 1140 Tristar Drive, Mississauga, Ontario, L5T 1H9 (1-888-882-7626)

WARRANTY

Summary of Contents for RangeMaster 614804EX

Page 1: ...ies Broan NuTone LLC 926 West State Street Hartford WI 53027 NuTone Inc 4820 Red Bank Road Cincinnati OH 45227 Broan NuTone Canada INC 1140 Tristar Drive Mississauga Ontario L5T 1H9 ENGLISH 2 FRANÇAIS 13 ESPAÑOL 24 ...

Page 2: ...lways be vented to the outdoors 7 Do not use this unit with any separate solid state speed control device 8 To reduce the risk of fire use only metal ductwork 9 This unit must be grounded TO REDUCE THE RISK OF A RANGE TOP GREASE FIRE A Never leave surface units unattended at high settings Boilovers cause smoking and greasy spillovers that may ignite Heat oils slowly on low or medium settings B Alw...

Page 3: ... when it cools down If the motor continues to shut off and restart have the hood serviced 7 For best capture of cooking impurities the bottom of the hood should be a minimum of 24 and a maximum of 30 above the cooking surface 8 Two installers are recommended because of the large size and weight of this hood 9 This product is equipped with a thermostat which may start blower automatically To reduce...

Page 4: ... Brackets 8 Mounting Screws 4 8 x 38mm Pan Head 4 Mounting Screws 3 9 x 9 5mm Pan Head 4 Mounting Screws 3 9 x 9 5mm Pan Head Black 8 Drywall Anchors 1 Installation Instructions MOUNTING BRACKETS FLUE MOUNTING BRACKET 8 MOUNTING SCREWS 4 8 x 38mm Pan Head 8 DRYWALL ANCHORS 4 MOUNTING SCREWS 3 9 x 9 5mm Pan Head DECORATIVE FLUE 4 MOUNTING SCREWS 3 9 x 9 5mm Pan Head Black ...

Page 5: ...ions below for mounting location suggestions and restrictions 2 A straight short duct run will allow the hood to perform most efficiently 3 Long duct runs elbows and transitions will reduce the performance of the hood Use as few of them as possible Larger ducting may be required for best performance with long duct runs 4 After the Exterior or In Line Blower has been installed connect round metal d...

Page 6: ...o the framing within the dimensions shown 2 After wall surface is finished secure mount ing brackets to framing using dimensions shown FRAMING BEHIND DRYWALL 29 7 8 to 35 7 8 above cooktop 29 7 8 bottom of hood 24 above cooktop 35 7 8 bottom of hood 30 above cooktop 36 MODEL FRAMING BEHIND DRYWALL 29 7 8 to 35 7 8 above cooktop 29 7 8 bottom of hood 24 above cooktop 35 7 8 bottom of hood 30 above ...

Page 7: ...hort have a qualified electrician install an outlet near the appliance Set the electrical power supply within the space covered by the decorative flues Position the power socket at a maximum distance of 33 7 16 85 cm from where the lead exits from the hood see illustration alongside Make sure this does not interfere with the decorative flues where the flue touches the wall Fit the plug into the po...

Page 8: ...r connection at hood 1 Run 2 wire plus ground power cable from the exterior or In Line blower to the hood s wiring box marked motor connection 2 Remove the cover from the wiring box and remove one knockout 3 Feed 6 of cable through the knockout opening and secure the cable to the wiring box with an appropriate connector 4 Make electrical connections at the hood Connect white to white red to black ...

Page 9: ... use a non scratching household cleanser or stainless steel polishing powder with a little water and a soft cloth O For stubborn cases use a plastic scouring pad or soft bristle brush together with cleaser and water Rub lightly in direction of polishing lines or grain of the stainless finish Avoid using too much pressure which may mar the surface O DO NOT allow deposits to remain for long periods ...

Page 10: ...is ON at a lower speed setting it turns blower up to HIGH speed When the temperature level drops to normal the blower will return to its original setting WARNING The HEAT SENTRY thermostat can start the blower even if the hood is turned OFF When this occurs it is impossible to turn the blower OFF with its switch If you must stop the blower do it from the main electrical panel LIGHT SWITCH PILOT LA...

Page 11: ...ENT SWITCH OFF THE ELECTRICITY SUPPLY Remove the grease filters Remove the electrical box support and open the electrical box Replace with the same type of fuse 5x20mm 5A 125V ELECTRICAL BOX SUPPORT FUSE ELECTRICAL BOX ...

Page 12: ...nty Some states do not allow limitation on how long an implied warranty lasts so the above limitation may not apply to you BROAN NUTONE LLC S OBLIGATION TO REPAIR OR REPLACE AT BROAN NUTONE LLC S OPTION SHALL BE THE PURCHASER S SOLE AND EXCLUSIVE REMEDY UNDER THIS WARRANTY BROAN NUTONE LLC SHALL NOT BE LIABLE FOR INCIDENTAL CONSEQUENTIAL OR SPECIAL DAMAGES ARISING OUT OF OR IN CONNEC TION WITH PRO...

Page 13: ...ez pas cet appareil avec un appareil contrôlant la vitesse à état solide 8 Afindediminuertoutrisqued incendien utilisezquedesconduitsenmétal 9 Votre appareil doit être relié à la terre ATTENTION POUR REDUIRE LES RISQUES D INCENDIE DES MATIERES GRASSES QUI SONT EN TRAIN DE CUIRE A Ne laissez jamais ni vos éléments chauffants ni vos casseroles ou poêles sur le feu sans les contrôler si vous réglez l...

Page 14: ...ssière de construction entrent en contact avec la partie électrique 6 Le moteur de votre hotte a un thermostat qui éteindra automatiquement le moteur s il est surchauffé Le moteur se remettra en marche lorsqu il se sera refroidi Si le moteur continue à s éteindre et à se remettre en marche faites vérifier votre hotte 7 Pour mieux capturer les impuretés de cuisine le bas de votre hotte devrait être...

Page 15: ...assemblage 8 Vis d assemblage 4 8 x 38mm Tête ronde 4 Vis d assemblage 3 9 x 9 5mm Tête ronde 4 Vis d assemblage 3 9 x 9 5mm Tête ronde Noir 8 Chevilles 1 Instructions pour l installation ETRIERS D ASSEMBLAGE ETRIER DE SUPPORT 8 VIS D ASSEMBLAGE 4 8 x 38mm Tête ronde 8 CHEVILLES 4 VIS D ASSEMBLAGE 3 9 x 9 5mm Tête ronde CONDUIT DECORATIVE 4 VIS D ASSEMBLAGE 3 9 x 9 5mm Tête ronde Noir ...

Page 16: ...ntilateur In Line sera monté Voir les illustrations ci dessous pour le choix de l emplacement et les éventuelles restrictions à suivre 2 Un conduit d évacuation étroit et court rendra la hotte plus performante 3 Des conduits d évacuation longs avec des coudes et des raccords rendront la hotte moins efficace Les utiliser le moins possible En cas de conduits d évacuation longs on utilisera un diamèt...

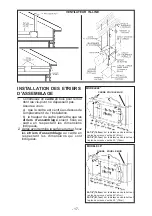
Page 17: ...blage au cadre en respectant les dimensions qui sont indiquées 29 7 8 75 9cm si la distance entre la hotte et le plan de cuisson c est de 24 61cm 35 7 8 91 1cm si la distance entre la hotte et le plan de cuisson c est de 30 76cm CADRE POUR LE MUR de 29 7 8 à 35 7 8 au dessus du plan de cuisson MODELE 36 de 29 7 8 à 35 7 8 au dessus du plan de cuisson 11 13 16 30cm MODELE 48 19 11 16 50cm CADRE POU...

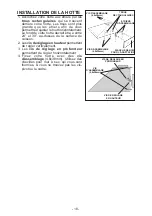
Page 18: ...son 2 Les vis de réglage en hauteur permettent de régler verticalement 3 Les vis de réglage en profondeur permettent de régler horizontalement 4 Fixez votre hotte avec des vis d assemblage 4 8x38mm Utilisez des chevilles pour mur à sec qui vous sont fournies si vous ne trouvez pas les vis pivot ou le cadre VIS D ASSEMBLAGE 4 8x38mm PLANCHE DE BOIS POUR L ADAPTATION VIS DE REGLAGE EN PROFONDEUR TRO...

Page 19: ...Cet appareil doit être relié à la terre En cas de court circuit la mise à la terre réduit le risque de décharge électrique en fournissant un câble permettant au courant d être dévié Cet appareil est équipé d un cordon ayant un câble de mise à la terre avec une fiche de mise à la terre La fiche doit être branchée dans une prise de courant correctement installée et mise à la terre ATTENTION Une mise...

Page 20: ... sur votre hotte au système de conduction qui se trouve au dessus au moyen d un tuyau rond en métal de 8 20cm 3 Utilisez un ruban pour tuyauterie afin de rendre toutes les jonctions sures et étanches 4 Reliez le conduit décoratif supérieur à l étrier au moyen des vis d assemblage 3 9x9 5mm 5 Faites glisser le conduit décoratif inférieur vers le bas jusqu à ce qu il adhère correctement autour de la...

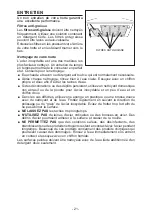
Page 21: ...ez un nettoyant domestique non abrasif ou de la poudre pour l acier inoxydable et un peu d eau et un chiffon doux O Dans les cas difficiles utilisez une éponge en plastique ou une brosse douce avec du nettoyant et de l eau Frottez légèrement en suivant la direction du polissage ou du grain de l acier inoxydable Evitez de frotter trop fort afin de ne pas abîmer la surface O NE LAISSEZ PAS les tache...

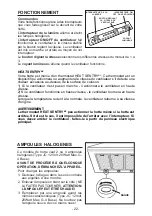
Page 22: ...en marche et arrêté au moyen de cet interrupteur Le bouton réglant la vitesse sélectionne les différentes vitesses du moteur de 1 a 3 Le voyant lumineux s allume quand le ventilateur fonctionne HEAT SENTRYMC Votre hotte est munie d un thermostat HEAT SENTRYMC Ce thermostat est un dispositif qui actionnera ou augmentera la vitesse du ventilateur s il détecte une chaleur excessive au dessus de la su...

Page 23: ...tion ne respectant pas les instructions d installation recommandées La durée de toute garantie implicite est limitée à un an comme cela est spécifié dans la garantie explicite Quelques états ne permettent pas de limites quant à la durée d une garantie implicite par conséquent la limitation indiquée ci dessus peut ne pas vous concerner L OBLIGATIONDEREPAREROUDEREMPLACERDELAPARTDEBROAN NUTONELLCSERA...

Page 24: ...cidad a estado sólido 8 Para evitar el riesgo de incendio use solamente conductos de metal 9 Esta unidad tiene que ser conectada a tierra PARA EVITAR EL RIESGO DE FUEGO POR ALTO NIVEL DE GRASA A Nunca abandone los quemadores con el fuego alto La cocción causa humo y restos de grasa que pueden arder Caliente el aceite a fuego medio o bajo B Encienda siempre la campana cuando cocine a fuego alto o c...

Page 25: ...ienza a encenderse y a apagarse deberá hacer una revisión de éste 7 Para limpiar mejor las impurezas al cocinar la distancia entre la parte inferior de la campana y la zona de cocción debe ser mínimo 24 maximo 30 8 Debido a su gran tamaño y peso se recomienda su montaje por parte de dos técnicos esperializados 9 Este producto está dotado de un termostato que pone en marcha automáticamente el motor...

Page 26: ...ntaje 4 8 x 38mm cabeza redonda 4 Tornillos de montaje 3 9 x 9 5mm cabeza redonda 4 Tornillos de montaje 3 9 x 9 5mm cabeza redonda negra 8 Escarpias 1 Instrucciones para instalación SOPORTES DE MONTAJE SOPORTE PARA EL MONTAJE DEL TUBO 8 TORNILLOS DE MONTAJE 4 8 x 38mm cabeza redonda 8 ESCARPIAS 4 TORNILLOS DE MONTAJE 3 9 x 9 5mm cabeza redonda TUBO DECORATIVO 4 TORNILLOS DE MONTAJE 3 9 x 9 5mm ca...

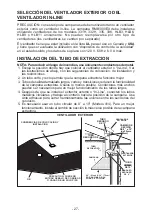
Page 27: ...or o In Line Ver las ilustraciones de abajo con las sugerencias de colocación de instalación y las restricciones 2 Un tubo corto y recto permite que la campana extractora funcione mejor 3 Tubos de salida demasiado largos codos y transiciones reducen la funcionalidad de la campana extractora Úselos lo menos posible Conductores más anchos pueden ser necesarios para un mejor funcionamiento de los tub...

Page 28: ...a sujete los soportes para el montaje siguiendo las dimensiones indicadas ESTRUCTURA DE MADERA EN LA PARED 29 7 8 75 9cm si la distancia entre la campana y la zona de cocción es de 24 61cm 35 7 8 91 1cm si la distancia entre la campana y la zona de cocción es de 30 76cm De 29 7 8 a 35 7 8 por encima de la zona de cocción MODELO 36 De 29 7 8 a 35 7 8 por encima de la zona de cocción 11 13 16 30cm M...

Page 29: ...illos para la regulación de la altura permiten un ajuste en vertical 3 Los tornillos para la regulación de la profundidad permiten un ajuste en horizontal 4 Sujete la campana con tornillos de montaje 4 8x38mm Use escarpias si no dispone de tacos o de la estructura de soporte en madera TORNILLOS PARA LA REGULACION DE LA PROFUNDIDAD TORNILLOS DE MONTAJE 4 8x38mm TORNILLOS PARA LA REGULACION DE LA AL...

Page 30: ...s INSTRUCCIONES DE CONEXIÓN A TIERRA Este aparato se debe conectar a tierra En caso de cortocircuito la conexión a tierra reduce el riego de electrocución ya que posee un hilo de descarga a tierra para la corriente Este aparato está equipado con un cable que posee un hilo de toma de tierra con una clavija de tierra La clavija se debe conectar a un enchufe instalado correctamente y conectado a tier...

Page 31: ...e 8 20cm de diámetro para unir el casquillo que se encuentra encima de la campana al tubo de extracción situado arriba 3 Use cinta para ajustar todas las junturas y que quede hermético 4 Una el tubo decorativo superior al soporte con los tornillos de montaje 3 9x9 5mm 5 Deslice el tubo decorativo inferior hacia abajo hasta que ajuste perfectamente con la campana 6 Sujete el tubo decorativo inferio...

Page 32: ...O Para las manchas o restos de grasa que persistan use un producto químico doméstico que no raye ó un limpiador para acero inoxidable con poca agua y un paño suave O Si las manchas persisten use un estropajo y un cepillo de cerdas suaves con un producto limpiador y agua Frote suavemente en el sentido del pulido o de las vetas del remate del inoxidable No apriete demasiado porque podría dañar la su...

Page 33: ...velocidad minima el se prenderá a una velocidad máxima Cuando la temperatura disminuye a un nivel normal el ventilador vuelve a la función de origen AVERTENCIA El HEAT SENTRYMC termostato puede comenzar a funcionar al igual si la campana esta parada En este caso es imposible parar el ventilador con los interruptores Si usted para la campana halago a partir del panel eléctrico principal PILOTO INTE...

Page 34: ...TO Remover los filtros antigrasa Desmontar la placa de la instalación eléctrica y abrir la caja de la instalación eléctrica Sustituir por un fusible del mismo tipo 5x20mm 5A 125V CAJADELA INSTALACION ELECTRICA PLACA INSTALACION ELECTRICA FUSIBLE ...

Page 35: ...Algunos paises no permiten un limite en la duración de la garantía implicita si es asi en su caso esta limitación arriba indicada podría no aplicarse LA PRESENTE GARANTIA CUBRIRA EXCLUSIVAMENTE AL COMPRADOR LOS SERVICIOS DESCRITOS ANTERIORMENTE BROAN NUTONE LLC NO SE HACE RESPONSABLE DE DANOS PRODUCIDOS DE MANERA ACCIDENTAL O RELACIONADOS CON EL USO INCORRECTO DEL PRODUCTO O SU FUNCIONAMIENTO Algu...

Page 36: ...Flue Mounting Bracket 144 B03292287 Wire Clamp 145 B032920170 Feeder Cable Connection Box 146 B032920180 Feeder Cable Connection Box Cover 147 BR2300132 Junction Clamp 151 B032920200 Electrical Box Wires Stop 165 B03294781 Electrical Box 165 B03295008 Electrical Board Box 166 B08086141 Electrical Board 166 B08086668 Electrical Board 195 BE3403629 Upper Support 208 B02300783 Transformer 36 Model 20...

Page 37: ...ur 119 BE3341311 Tube supérieur 120 BE3300517 Etrier montage tube 144 B03292287 Serre cable 145 B032920170 Boîte cable alimentation 146 B032920180 Couvercle boîte cable alimentation 147 BR2300132 Borne 151 B032920200 Serre cable 165 B03294781 Boîte circuit imprimé electrique 165 B03295008 Boîte circuit imprimé 166 B08086141 Circuit imprimé installation electrique 166 B08086668 Circuit imprimé inst...

Page 38: ... BE3341301 Tubo inferior 119 BE3341311 Tubo superior 120 BE3300517 Soporte de montaje del tubo 144 B03292287 Sujeta cabos 145 B032920170 Caja cabos 146 B032920180 Tapa de la caja cabos 147 BR2300132 Terminal 151 B032920200 Sujeta cabos 165 B03294781 Caja de instalación eléctrica 165 B03295008 Caja base para instalación eléctrica 166 B08086141 Base para instalación eléctrica 166 B08086668 Base para...

Page 39: ... 39 SERVICE PARTS LISTE PIECES DE RECHANGE LISTA DE PIEZAS DE RECAMBIO MODEL 61000 EX ...

Page 40: ... 40 04307154 3S ...

Reviews: