- 8 -
7. GROUNDING INSTRUCTIONS
This appliance must be grounded. If it should malfunction or break down, grounding
provides a path of least resistance for electric current, to reduce the risk of electric
shock. This appliance is equipped with a cord having an equipment-grounding
conductor and grounding plug. The plug must be inserted into an appropriate outlet
that is properly installed and grounded in accordance with all local codes and
ordinances.
This appliance is for use on a nominal 120-volt circuit and has a grounding attachment
plug that looks like the plug illustrated below. Make sure that the appliance is
connected to an outlet having the same configuration as the plug. No adapter
should be used with this appliance.
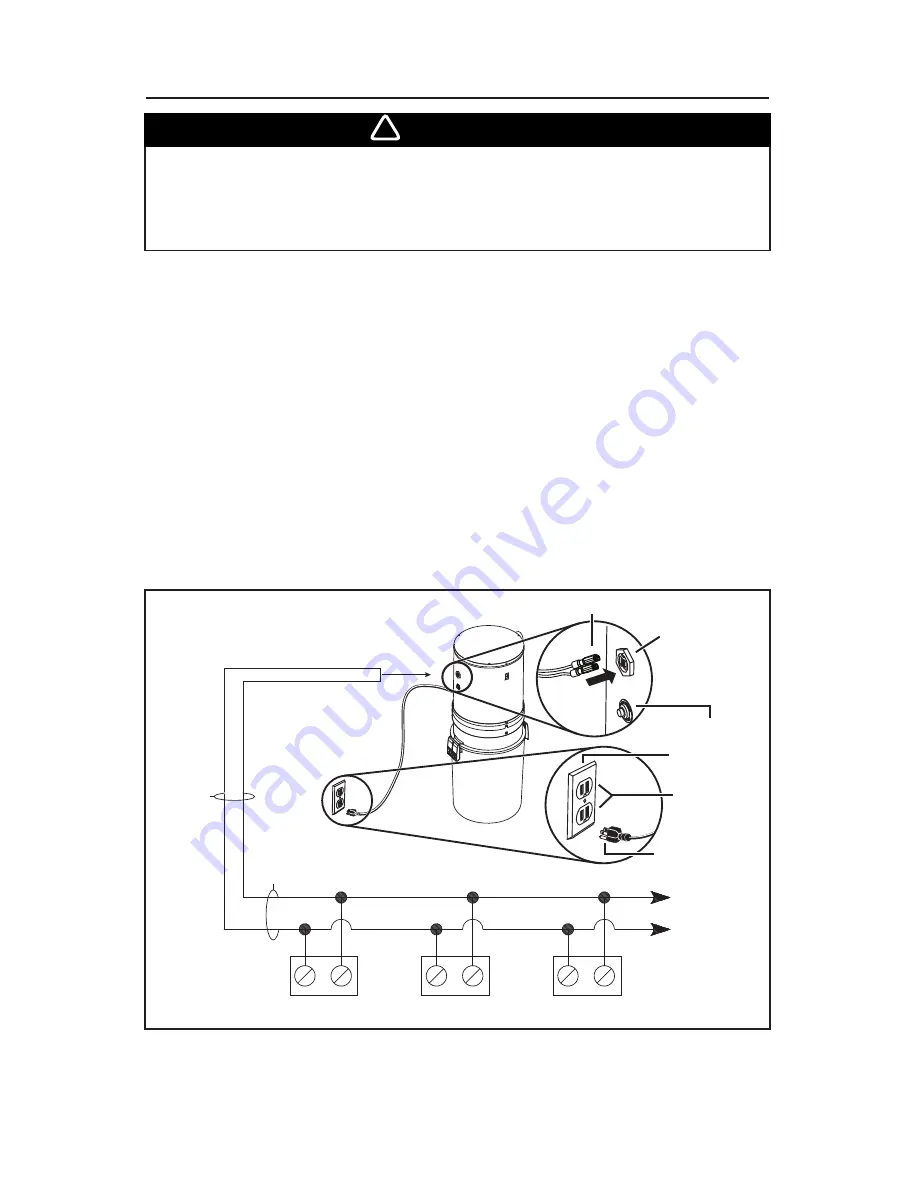
1. Using pliers, install both crimp connectors (included) to low voltage wire
(18 gauge minimum, 2-conductor, model 376, not included).
2. Connect low voltage wire to tabs located on outside of the power unit.
3. The power unit is equipped with a 6-foot grounded cord. Plug cord into
120-volt grounded receptacle.
Improper connection of the equipment-grounding conductor can result in a
risk of electric shock. Check with a qualified electrician or service person if
you are in doubt as to whether the outlet is properly grounded. Do not
modify the plug provided with the appliance — if it will not fit the outlet,
have a proper outlet installed by a qualified electrician.
AE00
3
2
NOTE: I
NLET LEADS TO BE CONNECTED TO POWER UNIT LOW VOLTAGE TABS USING CRIMP CONNECTORS
(
INCLUDED
)
AND LOW VOLTAGE HARNESS
.
G
ROUNDING PIN
P
OWER
CORD
P
OWER UNIT
I
NLET
LEADS
I
NLET
I
NLET
I
NLET
M
ODEL
376 (18/2)
LOW VOLTAGE WIRE
T
O
OTHER
INLETS
L
OW VOLTAGE TABS
O
VERCURRENT
PROTECTOR BUTTON
C
RIMP CONNECTORS
WARNING
!
G
ROUNDED
OUTLETS
G
ROUNDED
OUTLET BOX


