


5
6
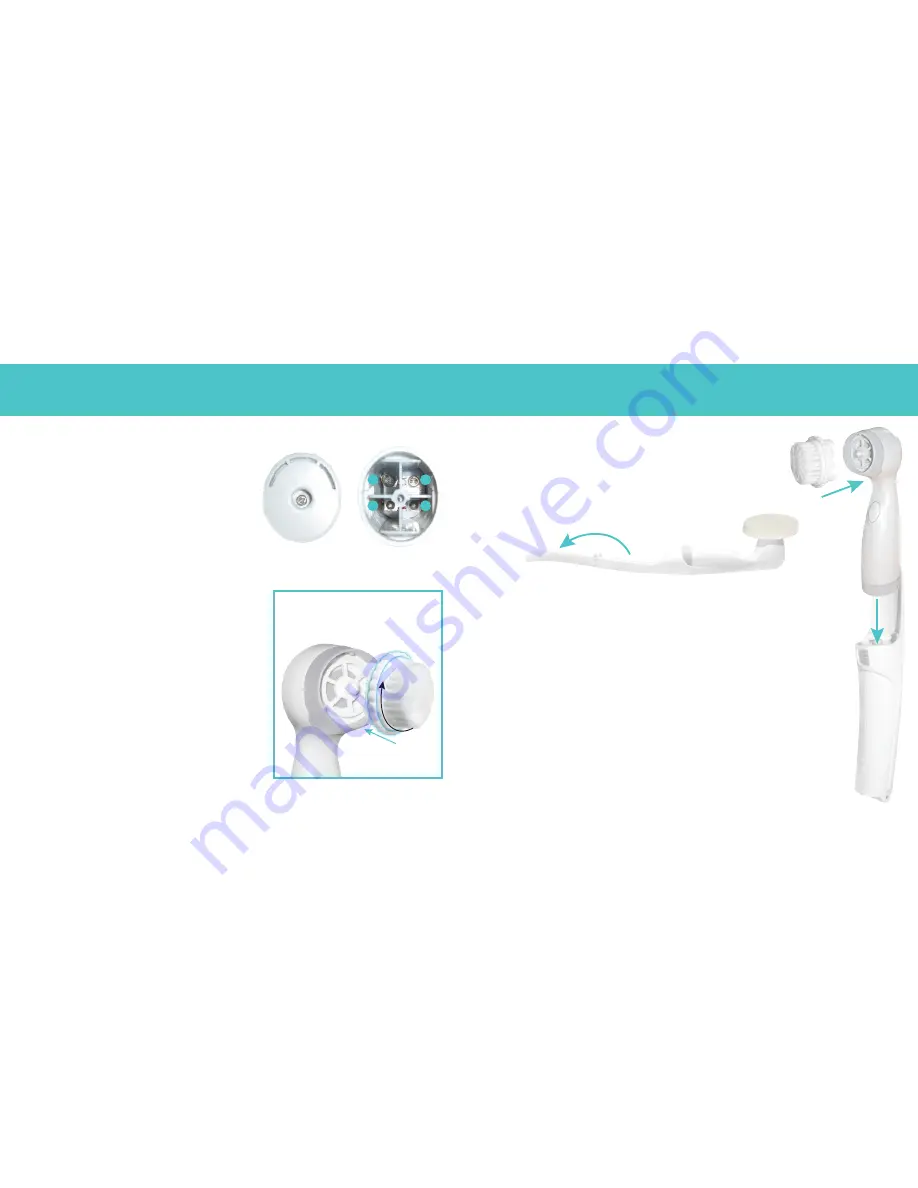
KIT ASSEMBLY:
1. Select the desired brush head (choose from below).
Facial Brush Head - helps loosen oil, dirt and make-up
Small Sponge Brush Head - for facial skin exfoliation
Large Sponge Brush Head - for body skin exfoliation
Pumice Brush Head - for feet and callous
Foldable Arm Attachment - extends to 17 inches
for long back reach
2. Place the selected brush attachment (Facial Brush Head,
Small Sponge Brush Head, Large Sponge Brush Head or
Pumice Brush head) onto the unit (
A
). You may need to
turn the attachment until it fits in. Then, by holding the
attachment by the rotating disk (disk is shown highlighted
in blue), turn clockwise to lock in place as shown on right (B).
The attachment should be flush with the unit.
To remove the attachment, turn the disk counterclockwise.
USAGE - FACIAL BRUSH HEAD ATTACHMENT:
NOTE: Use the Nu Brilliance Cleansing Brush as part of your daily skin care regimen.
For all skin types. Use once or twice a day. If using once a day, use it in the evening to
remove all of the make-up and/or impurities from your skin. Do not share brush heads.
IMPORTANT: If the condition of your skin worsens after one or several uses of
Nu Brilliance, give your skin a rest for a few days. Always start at the low speed
and progress to high speed if needed, depending on your comfort level and skin
sensitivity. If you are concerned about any change in your skin condition, consult
your dermatologist.
1. Select the appropriate attachment. Refer to pp. 4 and 5 for attachment selection and
kit assembly.
2. Wet your skin with warm water. Apply your usual cleanser to your skin in a circular
motion. Do not use harsh cleansers.
3. Wet the attachment of the Nu Brilliance brush in warm water. Turn the brush on by
pressing on the Power button. Press it once for low speed, press it again for high speed.
We recommend to start at the low speed. Once your skin becomes comfortable,
you may increase the speed. To turn the unit off, press the Power button again.
BATTERY PLACEMENT - ASSEMBLY
USAGE - FACIAL BRUSH HEAD
BATTERY PLACEMENT:
1. Using the Phillips head screwdriver, loosen the screw
(turn counterclockwise) on the bottom of the main unit.
Remove the battery compartment.
2. Insert 4 AA Alkaline batteries. Observe the polarity.
Do not mix old and new batteries.
3. Replace the cover and tighten the screw.
4. When the operation of the unit becomes slow, it is
time to replace the batteries. Follow the above steps
to replace the batteries.
LOOSEN THE SCREW
-
-
+
+
FOR ALL BRUSH HEAD
ATTACHMENTS
BOTTOM OF UNIT
A
B
3. For use on back or hard to reach places, use the Foldable Arm
Attachment. To assemble, simply place the main unit into the cradle of
the foldable attachment until you hear a click. See Diagram on right.
Make sure it is connected securely before using.
To remove, press the release button located on the front of the foldable
attachment. To extend the attachment more, simply flip open the
bottom of the attachment as shown below and press downward
to fully extend.