background image


   Matrix Installation and Operation Instructions 

3.0 VENTING 

The NY Thermal Matrix is a high efficiency condensing gas furnace/boiler utilizing induced power venting.  Exhaust gases are to 
be vented directly outdoors, using the venting method detailed in this section. Under no conditions, may this unit vent gases into a 
masonry chimney, unless it is vacant, and utilizes Matrix approved venting material as illustrated in the figures in this section. 

Attaching Vent Piping to Boiler   

It is extremely important for the intake and exhaust piping to be adapted to the appropriate size immediately upon exiting the boiler 
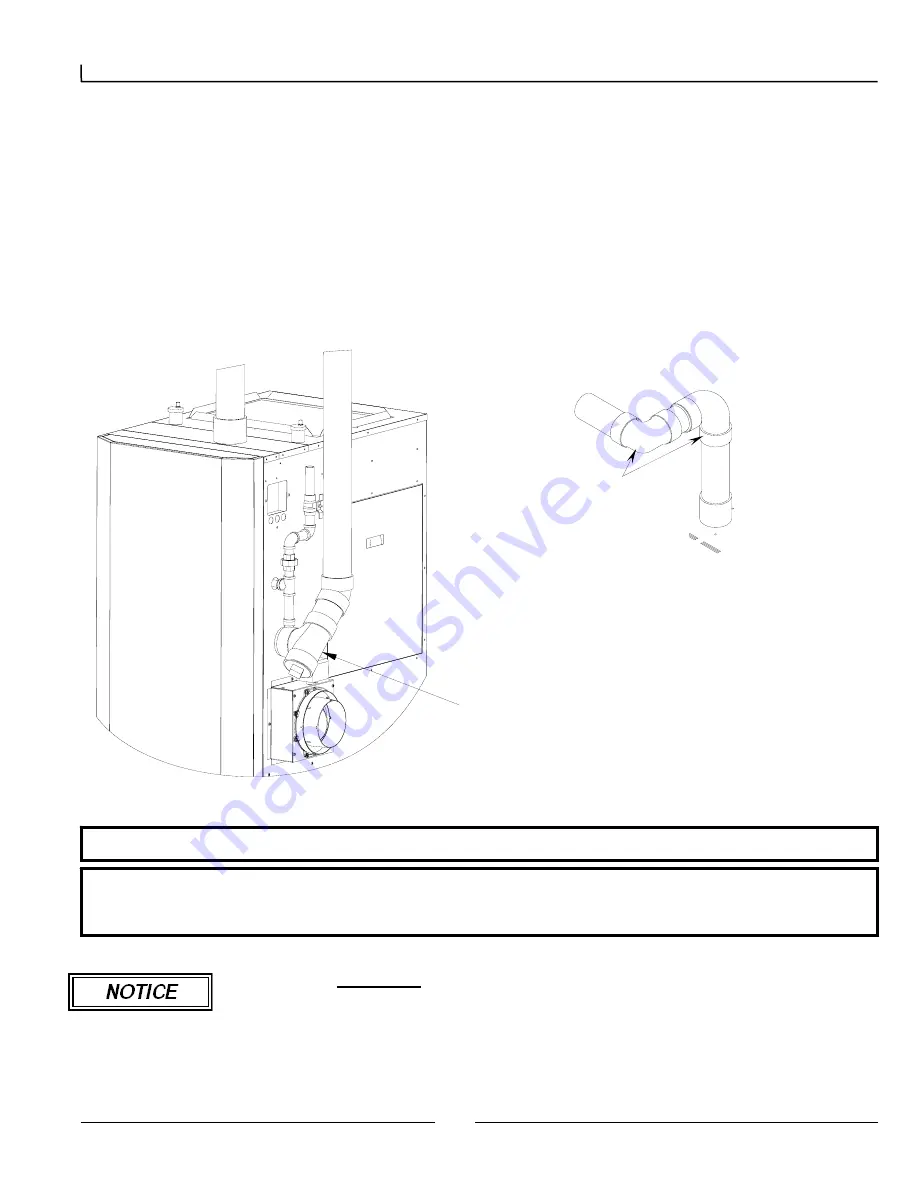
cabinet.  The Matrix comes with a 3” male PVC fitting to connect the air intake port of the boiler.  The Matrix exhaust connection 
is 3” male PVC, use approved cement to connect to venting system.  Check the flue outlet gasket for proper insertion and sealing 
prior to and after attaching the venting.  Ensure the venting system does not apply a load or stain on the flue outlet of the boiler 
(recommend using two elbows to create a “swing joint” as shown above). 


In Canada, the first 

3 ft (915 mm)

 of vent piping must be readily accessible for inspection. 


IMPORTANT 

The vent connection and piping must be perfectly aligned to the furnace connection.  AND MUST NOT 
APPLY ANY WEIGHT OR LATERAL FORCE TO THE FLUE BOX.  NTI does not warranty damages to the flue 
box. 

It is recommended that two elbows be 
used, so that the slope of the horizontal 
exhaust vent does not affect the vertical 
plumb of the pipe connected to the boiler. 
Slope all horizontal indoor exhaust 
venting ¼” to ½” per linear foot. 

Figure 3.1  Venting Construction 

It is recommended to have a collection point 
for condensation in the intake venting. 


Condensation can then be drained to an 
open house drain or condensate pump. 
 
Drain line from intake must have an 
appropriate trap or shut off valve to avoid 
siphoning. 

Summary of Contents for Matrix M100

Page 1: ...LIST 51 16 0 ANNUAL MAINTENANCE AND INSPECTION 52 17 0 PARTS LIST 55 HAZARD SYMBOL DEFINITIONS Danger Sign Indicates a hazardous situation which if not avoided will result in serious injury or death W...

Page 2: ...ow and other debris may result in property damage serious injury or death Installer Responsibilities As the installing technician it is your responsibility to ensure the installation is performed in a...

Page 3: ...andard test procedures prescribed by the U S Department of Energy Ratings have been confirmed by AHRI GAMA 4 Matrix units require a special venting system use only vent materials and methods detailed...

Page 4: ...nals for the installation of hard wired carbon monoxide detectors a In the event that the side wall horizontally vented gas fueled equipment is installed in a crawl space or an attic the hard wired ca...

Page 5: ...m components with the equipment the instructions provided by the manufacturer for installation of the equipment and the venting system shall include 1 Detailed instructions for the installation of the...

Page 6: ...for proper insertion and sealing prior to and after attaching the venting Ensure the venting system does not apply a load or stain on the flue outlet of the boiler recommend using two elbows to creat...

Page 7: ...lue gas temperatures up to 149o F 65o C and must only be used for low temperature applications High temperature applications requiring appliance supply water temperatures greater than 140o F 60o C mus...

Page 8: ...rt Field installed Inlet air Exhaust Inlet air Exhaust Note inlet pipe must always be connected to the boiler Figure 3 3 Concentric Vent Termination 36 min Minimum 12 plus snow allowance 4 or greater...

Page 9: ...ways be connected to the boiler 12 Plus Snow 18 Figure 3 4 Roof Venting IMPORTANT USE OF EXISTING CHIMNEY It is permissible to run vent pipe through an existing chimney as long as 1 The chimney is not...

Page 10: ...ust be on a slope back to the boiler a minimum of per linear foot of vent For applications where excessive condensation is possible per linear foot is recommended See illustration in Figure 3 1 6 Exha...

Page 11: ...orch or deck unless both ends are open and the exhaust pipe is installed at least 24 under the deck floor 10 So situated that the flue gases are directed towards brickwork siding or other construction...

Page 12: ...s are maintained o All exterior exhaust vent pipes are insulated with 3 5 ID thick Closed Cell Foamed Polyolefin Tubing i e Tundra Seal Plus or equivalent o The pipe is supported every 24 o The exhaus...

Page 13: ...must be taken into consideration when constructing the condensate system o DO NOT run condensate line outside A frozen or blocked drain will cause the condensate to fill the combustion chamber This w...

Page 14: ...n any unit or combination of units lights or runs o Always use a pipe threading compound that is resistant to propane LP gas solvent action Use sparingly to all male threads starting at two threads fr...

Page 15: ...any condition If the CO is over 140 PPM the input should be reduced until the CO is less than 140 PPM or the CO2 is reduced to 8 9 for LP Gas If the CO is over 140 PPM and the CO2 is less than 8 9 fo...

Page 16: ...N MAY RESULT IN HEAT EXCHANGER FAILURE AND WILL VOID YOUR NTI WARRANTY TREAT ALL SYSTEMS WITH FERNOX PROTECTOR F1 NTI PART NUMBER 83448 WHICH IS INCLUDED WITH THE MATRIX PACKAGE CAUTION This appliance...

Page 17: ...ystem The Matrix design allows for the evacuation of air from the internal plumbing For installations in conjunction with a hydronic heating system an Air Scoop installed as shown in the following dia...

Page 18: ...will only receive the heat leftover from the Matrix air handler keep this in mind during system sizing and design 3 In applications that do not use zone valves it is important to incorporate into the...

Page 19: ...air temperature of 95 F the Fan Controller will shut off the hydronic loop using the N O N C contacts on the terminal board until the forced air temperature recovers The Matrix has a Grundfos 15 42 bu...

Page 20: ...Matrix Installation and Operation Instructions 6 3 1 B Multiple High Temperature Zones Zone Valves Wiring w Zone Controller 6 3 1 C Multiple High Temperature Zones Zone Valves Wiring w o Zone Controll...

Page 21: ...e High Temperature Zones Zone Circulators 6 3 2 B Multiple High Temperature Zones Zone Circulators Wiring w Zone Controller Zone 3 Zone 2 Zone 1 Air Separator NTI Make Up Water Backflow Preventer Pres...

Page 22: ...tem M H C H M C C M H Temp 3 Temp 2 Temp 1 Air Separator NTI Make Up Water Backflow Preventer Pressure Reducing Valve Expansion Tank Zone Circulators Tempering Valves Air Separator NTI Make Up Water B...

Page 23: ...Wiring Tekmar 356 6 3 5 Multiple Controlled Temperature Zones Injection System Multiple Controlled Temperatures Air Separator Make Up Water Backflow Preventer Pressure Reducing Valve Expansion Tank Sy...

Page 24: ...Heat Exchanger See Figures 7 1 and 7 2 for installation details Thermostatic Mixing Valve A Sparcomix AM101 US 1 is provided with your package This valve regulates the water temperature leaving the pl...

Page 25: ...neously there are inherent limitations of the system o NO STORAGE As there is no water storage the boiler can only provide water at the temperature specified at the corresponding flow rates Flow throu...

Page 26: ...cets o Allow the boiler to reach steady state and then throttle the shut off valve until the hot water exiting the plate heat exchanger is slightly warmer than the mixed water exiting the mixing valve...

Page 27: ...27 Matrix Installation and Operation Instructions Figure 7 2 DHW Piping w Storage Tank Figure 7 1 DHW Piping Tankless On demand...

Page 28: ...ine Voltage Field Wiring ATTENTION 1 Before providing 120 Volts to the appliance do a continuity check between all wires and ground to make sure that there are no electrical leaks that could damage th...

Page 29: ...29 Matrix Installation and Operation Instructions Figure 8 2 Low Voltage Filed Wiring...

Page 30: ...porated in the home thermostat Air circulation rate is set via the FAN setting in the blue Fan Controller see Table 9 5 R 24VAC Hot Power supply for inputs H FS DH W1 W2 Y1 and Y2 W1 Forced Air Centra...

Page 31: ...31 Matrix Installation and Operation Instructions 8 2 Matrix Factory Wiring Schematic 8 2 1 Boiler Control Wiring Consult diagram on unit for exact wire routing...

Page 32: ...32 Matrix Installation and Operation Instructions 8 2 2 Fan Control Wiring Consult diagram on unit for exact wire routing...

Page 33: ...off Hydronic Demand Indicates a call for hydronic heat DHW Demand Indicates a call for domestic hot water Boiler Temp When illuminated display is showing boiler water temperature Boiler Setpoint When...

Page 34: ...o the menu When all desired values are selected scroll to the RUN menu and press Function which exits the Programming Mode and initiates normal operation A safety feature has been added to ensure that...

Page 35: ...n you must return to RUN on the menu and press Function Normal operation will begin Controller will return to RUN mode if no button is pressed for 2 minutes Menu Level Description Main Sub Value Defau...

Page 36: ...trol factors in the current outdoor temperature control setpoint HYD or HI and the RES reset setpoint in determining the appropriate operating water temperature Figure 9 2 Outdoor Reset Calculation Fo...

Page 37: ...on the reaction of the thermostat to the rise and fall of the space temperature and the heat cycle rate of the thermostat If at any time the plenum temperature exceeds 160 F the boiler will stop suppl...

Page 38: ...a call for cooling unless there is a concurrent call for DH Dehumidification or G Continuous and HRV is set to ON Call for Cooling Fan 24VAC Y2 Matrix operates at the prescribed air circulation rate Y...

Page 39: ...following methods 11 1 1 Room Count Calculation 11 1 2 Air Change per Hour Method Example A 25 x 40 house with basement 1000 sqft x 8 high x 2 main floor and basement 16 000 cu ft 16 000 x 3 air chan...

Page 40: ...Exhaust from the return Simplified System Stale air is drawn from the return plenum 6 0 min Cold Air Return Stale Air From Kitchen and Bathroom External Ducting to be 6 insulated with Vapor Barrier 1...

Page 41: ...condensate tubing provided must be routed through the hole in the side of the appliance and attached to the 90 elbow directly underneath the ventilation module From there the condensate tube must be e...

Page 42: ...y selecting the heating profile required in the Matrix Fan Controller HEA menu Refer to the heating section of the manual for more explanation The heating profile selected dictates the air handler blo...

Page 43: ...e balanced during Low air circulation rate 300 400 500CFM 120cfm 55 L s ECH HRV Exhaust at Continuous low ventilation rate balanced during High air circulation rate 800 1000 1200CFM 70cfm 30 L s SCH H...

Page 44: ...Do not use any phone in your building Immediately call your gas supplier from a neighbor s phone Follow the gas supplier s instructions If you cannot reach your gas supplier call the fire department C...

Page 45: ...lights unplug the flame probe and allow the unit to cycle again Ensure that it tries to light and locks out on safety reset Once you have successfully activated the flame safety system replace the wir...

Page 46: ...valve during operation or a Fenwal ignition lockout There is a problem in the ignition sequence it could be caused by a faulty igniter flame sensor gas valve or improper line pressure or combustion Ch...

Page 47: ...speed 1 Check for 120V to blower ensure door switches are making the circuit 2 Check wiring from Pin 6 at Fan Control white wire to Pin 15 at blower motor 3 Check for 24VDC at blower Pin 15 if presen...

Page 48: ...eration does not drop more than 20 from the static line pressure 3 Momentarily remove the intake vent from the boiler during ignition if unit lights smoothly with intake vent disconnected reconnect an...

Page 49: ...80 190 200 210 220 230 Water Temperature o F Resistance Kilo Ohms Figure 13 1 M atrix Thermistor Resistance Chart 1 Mohm Water Probe Low Temp 0 0 25 0 5 0 75 1 1 25 1 5 1 75 2 2 25 50 60 70 80 90 100...

Page 50: ...s SFS 80 VDC Signal to Combustion Blower Sentry 2100 Error A S O Three Retries for Flame Power to Ignitor 120V to S1 Checks Flame Probe Signal Less than 0 6 uAmp Power to Gas Valve Greater than 1 0 uA...

Page 51: ...r death 1 Turn gas shut off valve to the ON position 2 Turn Power on to appliance 3 Set Controller to the desired settings 4 Turn thermostat up Ignition will occur Operational Checklist 1 System is fr...

Page 52: ...efore commencing any service work in the combustion chamber Take all necessary precautions and use recommended personal protective equipment as required 1 Initiate a post purge cycle to clear any gas...

Page 53: ...ving this appliance This appliance contains materials that have been identified as carcinogenic or possibly carcinogenic to humans Table 16 1 Handling Instructions for Refractory Ceramic Fibers RCF Re...

Page 54: ...covery Core Annually or as needed Vacuum surfaces let soak in warm water for three hours spray rinse and let dry Energy Recovery Core Annually or as needed Vacuum surfaces Every 3 months or as needed...

Page 55: ...urner door gasket 20 82768 Igniter gasket 21 82228 Temperingvalve AM101 US 1 22 82771 Extended air tube 23 82011 Plate heat exchanger LA1430 24 83507 Flow Meter 25 82160 3 way Valve VU54S2016B 3 4 26...

Reviews: