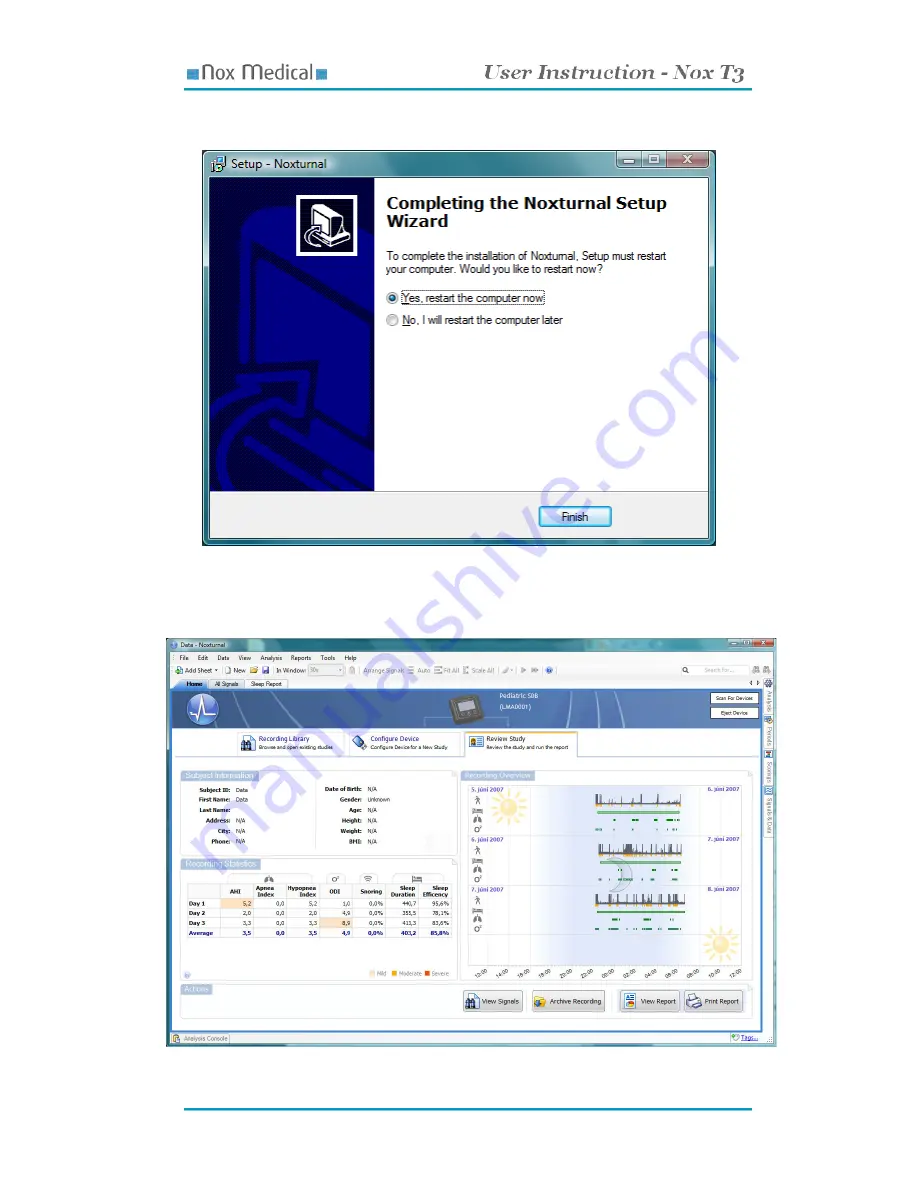
Nox Medical NOX T3 User Instruction Download Page 18


Hook-Up

 ● 18 

8.


After installation completes, you might be prompted to restart your computer, do so before 
running the application.  Select your option and then press 

Finish.


Running the software 

When running the software, the first page that appears is the 

Start Page

 shown in the picture below.  


Summary of Contents for NOX T3

Page 1: ...U Us se er r I In ns st tr ru uc ct ti io on n N NO OX X T T3 3...

Page 2: ...d by or concluded from data obtained by the products including software from Nox Medical All clinical conclusions and decisions that are based on the use of this product are the responsibility of the...

Page 3: ...Data 21 Hook Up 23 Attaching the Device and the Respiratory Effort Sensors 23 Recording of Respiratory Sounds and Snoring 25 Applying the Nasal Cannula 25 Attaching Electrodes 25 Pulse Oximeter Modul...

Page 4: ...ory effort sensors carry bag clip straps USB cable and the Nox T3 application Noxturnal used for analyzing and reviewing of data The device is able of recording signals from two respiratory effort sen...

Page 5: ...with international standards IEC60601 1 2 for electromagnetic compatibility for medical electrical equipment and or systems This standard is designed to provide reasonable protection against harmful...

Page 6: ...al device FCC ID V5ANOX T3 0100 FCC ID label Contains TX IC 1520A LMX9838 Industry Canada IC label Bluetooth wireless technology Bluetooth Wireless Technology The Nox T3 uses Bluetooth wireless techno...

Page 7: ...traps The device is powered with one AA battery The device has a display for status indication signal integrity and preliminary results and buttons for control and event marking Interfaces The Nox T3...

Page 8: ...ction Configuring the Device The device must be disconnected from the PC have a battery located in its battery compartment to be able to start a recording To stop the recording Hold down the Select bu...

Page 9: ...and slide the lid towards the bottom of the device 2 Place one AA battery in the compartment aligning the battery poles as illustrated on the back of the device the positive pole is towards the batter...

Page 10: ...out of knitted elastic with insulated wire conductor and have a plastic glider for adjustment of belt length They are terminated with a metal snap at the ends that allows for the connection to the No...

Page 11: ...for measuring of airflow pressure The nasal cannula is equipped with hydrophobic anti microbial filter The nasal cannula is available in two versions adult and pediatric The nasal cannula is single pa...

Page 12: ...ke sure the cover is securely closed Oximeter Sensors The Nonin oximeter pulse oximetry module supports all Nonin PureLightTM pulse oximeter sensors Nonin s Models Soft Sensor Reusable Preferred Appli...

Page 13: ...r continuous monitoring of patients where little sensor motion is expected ExG Sensors The Nox T3 device is capable of recording any combination of two bipolar ExG channels i e EMG EEG EOG or ECG The...

Page 14: ...perating System Windows Vista any version Windows XP Home or Professional with Service Pack 2 Processor X86 based Intel or AMD Processor Clock Speed 1 2 GHz or faster Memory 512 MB or more Free Hard D...

Page 15: ...leges are needed to install Noxturnal To install the application perform the following steps 1 Run the setup exe file on the installation DVD 2 An installation wizard will appear Press Next 3 Select a...

Page 16: ...in the location for the shortcut for the application and then press Next 5 This page gives the option of creating a desktop and a quick launch icon for the application Check the boxes as preferred an...

Page 17: ...talled and additional items that the application depends upon dependencies Press Install to accept otherwise press Back and change your settings 7 The application is now being installed on your comput...

Page 18: ...ou might be prompted to restart your computer do so before running the application Select your option and then press Finish Running the software When running the software the first page that appears i...

Page 19: ...Configure Device sheet let s you configure the device for a new recording Review Study The Review Study sheet shows summary statistics for the recorded data and gives an overview of that recording Con...

Page 20: ...option is to Manually Start Recording If you select this option once disconnected the device will start its recording when you hold down its start stop select button for at least 3 seconds See the pic...

Page 21: ...ew a recorded data in your PC you will need to upload the recording data to your PC Perform the following steps 1 Run the Noxturnal application 2 Connect your device to a USB port on your PC using the...

Page 22: ...tom of the Review Study page shows options for working with the recorded data including View Signals For browsing through the recorded signals and viewing the marked events Archive Recording For archi...

Page 23: ...ions on the display including warnings 4 Replacement of battery It is important to remind the patient to follow the instructions given prior to the study Before sending the patient home 1 Make sure th...

Page 24: ...el of the device Step 3 The belt length is adjusted using the sliders The slider is fixed by the Velcro and secured by the attached tape Step 4 The abdomen thorax cable is snapped to the back of the d...

Page 25: ...nostrils Step 2 Drape the cannula tubing over the ears and then position it under the chin Step 3 Slide the fastener snugly under the chin to hold the cannula tubing securely in place Step 4 Connect t...

Page 26: ...e sensor is securely connected The pulse oximeter is automatically activated when an oximeter sensor is connected 2 Secure the wristband to the patient s wrist 3 Insert the selected digit refer to the...

Page 27: ...tester cannot be used to access the accuracy of a pulse oximeter monitor or probe Factors that may degrade pulse oximeter performance include the following excessive ambient light excessive motion el...

Page 28: ...ng or disinfecting Clean the sensor by wiping all patient contact surfaces with a soft cloth dampened in water or a mild soap solution To disinfect the sensor wipe all patient contact surfaces with is...

Page 29: ...e 20 C to 50 C 0 F to 120 F Rel Humidity Operation 15 95 non condensing Storage 10 95 non condensing Pressure Withstands atmospheric pressures from 0 5 to 2 bar Transmitter Bluetooth compliance Versio...

Page 30: ...s operation with new batteries Storage Life 10 months Weight 4 4 ounces with batteries 125g Environmental Condition Temperature Operation 0 C to 50 C 32 F to 122 F Storage Transportation 30 C to 50 C...

Page 31: ...Standard Programmable electrical medical systems IEC 60601 2 25 Particular requirements for the safety of electrocardiographs IEC 60601 2 26 Particular requirements for the safety of electroencephalo...

Page 32: ...o provide reasonable protection against harmful interference in a residential installation This equipment generates uses and can radiate radio frequency energy If not installed and used in accordance...

Page 33: ...ation Portable and mobile RF communications can affect the performance of the device The device should not be used adjacent to or stacked with other equipment If adjacent or stacked use is necessary t...

Page 34: ...munity test IEC 60601 test level Compliance level Electromagnetic environment guidance Electrostatic discharge ESD IEC 61000 4 2 6kV contact 8kV air 6kV contact 8kV air Floors should be wood concrete...

Page 35: ...obile RF communications equipment and the Nox T3 device The Nox T3 device is intended for use in an electromagnetic environment in which radiated RF disturbances are controlled The customer or the use...

Reviews: