background image

NVR

-

6232

-

H2/F

 User

s manual (Short) ver.1.0


All rights reserved © AAT Systemy Bezpieczeństwa sp. z o.o.


6


STARTING THE DEVICE


2.2 HDD mounting


Novus  NVR

-

6232

-

H2/F supports up to 2 internal SATA HDDs.


WARNING!


In  order  to  find  information  regarding  the  compatible  models  of  HDDs  and  their  maximum 

capacities,  please  contact  Novus  distributor  or  check  the  information  presented  at  

www.novuscctv.com.  AAT  SYSTEMY  BEZPIECZEŃSTWA  SP.  Z  O.O.  is  not  responsible  for 

any problems from using not recommended hard drives.


The list of compatible HDDs contains all the HDDs that can be used with a given DVR including 

HDDs designed for office use 

-

 so called desktop disks. However, due to the fact that reliability of 

the recording process and data safety are paramount factors of any CCTV system, we strongly 

advise to use HDDs designed for continuous (24/7) operation.


You need to format disks if they were used in a different device. All data saved on HDD prior to 

format will be lost.


HDDs Installation 


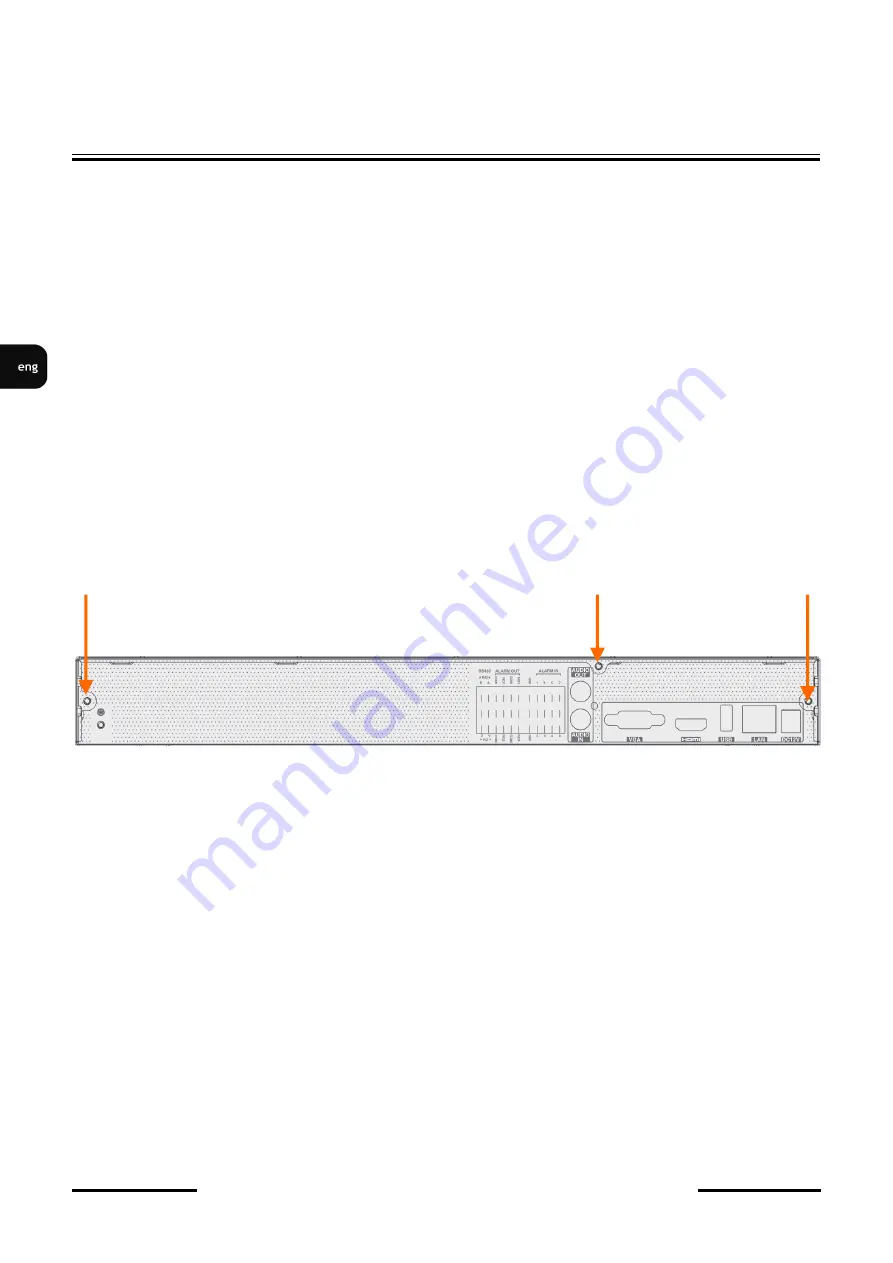
To install the hard disks, unscrew 3 screws on the back of the casing (pointed by arrows), sliding top 

cover backwards and then lifting it up.


WARNING:  !


Before removing cover unplug the power cord from the NVR. When NVR is turned on before 

disconnecting the power cord, shut down the recorder using the NVR menu. 


If you use the disk previously used in another device, it is necessary to format it before using. 

Formatting the drive erase all the data from disk. All drives in the recorder should be exactly the 

same type.


By  default,  SATA  cables  are  packed  together  with  DVR  accessories,  while  HDD  power  cable  is 

connected to the NVR PSU and ready for connecting the HDDs. 


After  removing  the  housing,  unscrew  and  remove  the  upper  and  lower  mounting  strip  for  disks  by 

unscrewing the screws on the side of the recorder housing. Then, mount the drives using the mounting 

screws included with the recorder.


CAUTION!


If  the  device  was  brought  from  a  location  with  lower  temperature,  please  wait  until  it  reaches  the 

temperature of location it is currently in. Turning the device on immediately after bringing it from a 

location with lower ambient temperature is forbidden, as the condensing water vapour may cause short

-

circuits and damage the device as a result.


Summary of Contents for NVR-6232-H2/F

Page 1: ...User s manual short NVR 6232 H2 F ...

Page 2: ...lf as a consequence 9 Mounting the device on unstable surface or using not recommended mounts is forbidden Improperly mounted device may cause a fatal accident or may be seriously damaged itself The device must be mounted by qualified personnel with proper authorization in accordance with this user s manual 10 Device should be supplied only from a power sources whose parameters are in accordance w...

Page 3: ... Detection supports camera s motion detection System Reaction to Alarm Events buzzer e mail recording activation PTZ Intelligent image analysis Supported Functions Exception Scene Change Video Blurred Video Color Cast Tripwire Zone entrance Abandoned Ob ject Object Disappearance Perimeter Intrusion Detection by pedestrian or vehicle Line Cross Detec tion by pedestrian or vehicle Analysis of Recogn...

Page 4: ...ILE S Implementation of the ONVIF protocol by different manufacturers may vary by some functions which can make them work improperly or not in accordance with expectation AAT SYSTEMY BEZPIECZEŃSTWA SP Z O O is not responsible for incompatibility problems resulting from cameras of other brands than NOVUS which are using ONVIF protocol If you are using ONVIF protocol cameras other than NOVUS brand i...

Page 5: ...NNECTORS Block of alarm input output connectors 2 AUDIO IN Audio mono inputs to connect microphones 3 VGA VGA connector to connect VGA monitor 4 HDMI HDMI connector use the HDMI cable to connect monitor 5 USB USB port for external Flash memory and other USB devices 6 LAN RJ 45 connector port to connect to the local network and internet 7 POWER SOCKET To plug in the 12V power 8 AUDIO OUT Audio outp...

Page 6: ...crew 3 screws on the back of the casing pointed by arrows sliding top cover backwards and then lifting it up WARNING Before removing cover unplug the power cord from the NVR When NVR is turned on before disconnecting the power cord shut down the recorder using the NVR menu If you use the disk previously used in another device it is necessary to format it before using Formatting the drive erase all...

Page 7: ... the menu CAUTION Make connection when the power is not applied and the power switch is turned off Do not place the power cord under the carpet or rug The power cord is usually earth grounded However even if it s not earth grounded never modify it on your own for earth grounding Make sure that power adapter is placed near of NVR and secured from accidental disconnection If the device was brought f...

Page 8: ...t you configure the camera before connecting to a recorder as described the manual camera Please note that cameras have addressed the unique IP address supported by the recorder Connecting cameras and network recorders NVR 6232 H2 F 2 6 Connecting external devices Connecting audio ports Audio output signal normally are above 200mV 1kΩ load You can connect to it the audio amplifier with the externa...

Page 9: ...rk recorder has alarm inputs and outputs The alarm inputs are marked in the ALARM IN section The individual inputs should be connected as shown in the figure below An example of connecting the alarm output no 1 should be done as shown below STARTING THE DEVICE NO COM ALARM Power source GND Alarm in Alarm out RS485 ALARM IN1 IN2 IN3 IN4 GND CZUJNIK ...

Page 10: ... screen mode Subsequent double click returns to previous display mode Move cursor to the top or click the right key of mouse to bring up MAIN MENU and select START icon Certain positions allow to select them via mouse scroll Depending on NVR operating mode pressing RMB displays a corresponding function menu 3 3 First start After the NVR is started for the first time a window is displayed that allo...

Page 11: ...em on the screen keyboard available after clicking in the NEW PASSWORD and CONFIRM PASSWORD fields To display the entered password check the DISPLAY PASSWORD box Selecting LOG IN AUTOMATIC field will automatically log the user into the system after starting the recorder By selecting the ENABLE field in the PATTERN LOCK row it is possible to activate the setting of enabling access for the user by m...

Page 12: ...d answers that can unlock access to the recorder To add a question click on the QUESTION field to enter the question using the keyboard Then click on the ANSWER field to enter the answer to the question Clicking on the ADD button adds a set of questions and answers Clicking the NEXT button takes you to the window in which information about the disk connected to the recorder is displayed NVR OPERAT...

Page 13: ...lity of the disk format the disk by clicking on the FORMAT button A window appears asking you to confirm that you want to format the disk NOTE Formatting causes the loss of information stored on the hard drive Pressing the OK button confirms the intention to format the disk The status of the disk should be READ AND WRITE after successful formatting NVR OPERATING ...

Page 14: ...ote For suggested values for IP camera setting please refer to the Cameras Capability Table available on the www novuscctv com website If you set wrong values some problems may appear the NVR cannot search the IP camera the stream cannot be connected the image is not fluent the image quality is bad and so on In case of first NVR start WIZARD SETUP menu window occurs if function wasn t disabled ear...

Page 15: ...hange the settings after unchecking the OBTAIN AN IP ADDRESS AUTONOMATICALY and OBTAIN DNS AUTOMATICALLY boxes The following network settings of the recorder are available IP Subnet Mask When it is necessary to connect the NVR to the Internet for remote access sending e mails etc configure the following parameters GATEWAY PRIMARY SECONDARY DNS It is possible to change the default HTTP port for dis...

Page 16: ...VR To change the addressable cameras click on the icon in the column EDIT This works with cameras NOVUS IP 6000 series Enter the address in the IP ADDRESS field and set the masks in the SUBNET MASK then press the OK button to save the settings Press the button to add a camera to the system Added camera is displayed on the bottom of the menu list To edit the connection settings of the camera press ...

Page 17: ...necting to the camera you must enter the correct user name in the USER NAME and password in the PASSWORD field and then press the OK button to save the settings If the NVR connected to the camera in STATUS filed will be displayed Connected To remove a camera from the list press the in DELETE column III RECORD SETTINGS NVR OPERATING ...

Page 18: ...recording and recording after receiving motion detection information from the camera ALWAYS 24x7 RECORD SENSOR RECORD continuous recording and recording alarm generated on alarm input ALWAYS 24x7 RECORD MOTION RECORD SENSOR RECORD continuous recording and recording alarm generated on alarm input and after receiving motion detection information from the camera ALWAYS 24x7 RECORD MOTION RECORD SENSO...

Page 19: ...the NAT 2 0 setting This service offers greater security by encrypting connections between the NVR and the P2P server Note The AAT SYSTEMY BEZPIECZEŃSTWA Sp z o o company constantly cares for the proper functioning of the P2P service however due to the use of third party infrastructure it cannot be held responsible for interruptions and inconveniences in the operation of the service V CLOUD UPGRAD...

Page 20: ... enter the real time monitoring image Displaying all cameras simultaneously is the default mode On the bottom of screen STATUS BAR is displayed To start access to the NVR click on the button to launch the start menu After clicking log on to the system the default password for the root user is a pass STATUS BAR description NVR MENU MENU BAR VIDEO WINDOW VIEW MENU START MENU Item Icon Description In...

Page 21: ...t Click to open start menu Full screen Switches video view to full screen Single view Start displaying camera in single view Quad view Start displaying 4 cameras in video view 9 cam View Start displaying 9 cameras in video view 16 cam View Switch between 16 screen splits Other divisions Opening video subdivisions Other divisions Open 1 main 5 7 or 12 additional views and 25 32 36 division view Dwe...

Page 22: ...ecord Turn on off manually recording channels Manual Alarm Allow to trigger the alarm manually Recording Status Displays information about the recording Alarm Status Displays the status of alarm devices Disk Status Information about disk status Network status View information about network usage Device Information Displays information about the state of operation of the basic components of recorde...

Page 23: ...the calendar and press the OK button The recordings available for the se lected day displayed in the graph The colors of the recording bars indicate the type of recordings To select the type of recordings click on the selection button on the right side of the icons selected rec ord types When you click a window appears that allows you to select the types of recordings arranged in two groups NVR ME...

Page 24: ...ecordings triggered by motion detection POS Displays recordings triggered by POS events Schedule Displays schedule triggered recordings All Ordinary Displays recordings triggered by all events not related to intelligent image analysis Face Displays recordings triggered by face recognition Plate Displays recordings triggered by board recognition Line Crossing Displays events triggered by line cross...

Page 25: ...tem Icon Descryption Stop Stop video playback Rewind Rewind Pause video rewind Play Play Pause video record Decrease Increase the pace Allows to change the playback speed Normal speed Switches playback to normal speed Previus Next frame Display the next previous frame Previous Next 30 seconds Display of recordings 30 seconds Playback information Information about the current speed mode Smart Plyba...

Page 26: ...ded from the NVR must not exceed 16 In the main menu please choose AI EVENT then in submenu click on FACE RECOGNITION section Choose RECOGNITION field in the menu In the menu that appears check the SUCCESSFUL RECOGNITION field and or the STRANGER field In the field SCHEDULE choose one of the available schedules To start the function click on the APPLY button The recorder displays a window asking y...

Page 27: ...e is different than expected to change it please follow the steps below Click on bottom left on start menu button Then select menu options to open third from the bottom In the NVR menu select the tab SYSTEM In the displayed menu select the English language in the third box from the top and click the button on the bottom menu After saving settings the language is switched to English NVR MENU ...

Page 28: ...2021 09 29 MB MK SYSTEMY BEZPIECZEŃSTWA SP Z O O 431 Pulawska St 02 801 Warsaw Poland tel 4822 546 07 00 fax 4822 546 07 59 www novuscctv com ...

Page 29: ...instrukcja obsługi skrócona NVR 6232 H2 F ...

Page 30: ...rzez producenta w danych technicznych kamery Dlatego też zabrania się zasilania rejestratora ze źródeł o nieznanych niestabilnych lub niezgodnych z wymaganiami określonymi przez producenta parametrach 11 Nie wolno dopuścić aby jakiekolwiek metalowe elementy dostały się do wnętrza urządzenia może to spowodować uszkodzenie urządzenia W przypadku dostania się takich elementów do środka należy niezwło...

Page 31: ...h wsparcie wejść wyjść dostępnych w kamerach Detekcja ruchu wsparcie detekcji ruchu dostępnej w kamerach Reakcja na zdarzenia alarmowe sygnał dźwiękowy e mail aktywacja nagrywania PTZ Inteligentna analiza obrazu Obsługiwane funkcje sabotaż zmiana sceny utrata ostrości zmiana kolorystyki przekroczenie linii wkroczenie do strefy pojawienie się obiektu zniknięcie obiektu wkroczenie do strefy przez os...

Page 32: ...a protokołu ONVIF przez różnych producentów kamer może się różnić a co za tym idzie poszczególne funkcje mogą działać niepoprawnie lub niezgodnie z oczekiwaniem Firma AAT Systemy Bezpieczeństwa sp z o o nie ponosi odpowiedzialności za problemy wynikłe z niekompatybilności kamer innych marek niż NOVUS podłączanych przy wykorzystaniu protokołu ONVIF W wypadku korzystania z protokołu ONVIF w kamerze ...

Page 33: ... alarmowych 2 AUDIO IN Wejście audio do podłączenia mikrofonu 3 VGA Złącze monitora należy użyć przewodu VGA D SUB 4 HDMI Złącze monitora w standardzie HDMI 5 USB 3 0 Port do podłączenia pamięci typu Flash i innych kompatybilnych urządzeń 6 LAN Złącze RJ 45 do podłączenia kamer sieci lokalnej i Internetu 7 GNIAZDO 12V Gniazdo do połączenia przewód zasilania 12 V 8 AUDIO OUT Wyjście audio do podłąc...

Page 34: ...utratę danych Opis instalacji dysków W celu zamontowania dysków twardych należy po odkręceniu trzech śrub z tyłu obudowy rejestratora odsuwając ją do tyłu a następnie podnosząc do góry UWAGA Przed zdjęciem obudowy rejestratora należy bezwzględnie odłączyć kabel zasilający Gdy rejestrator jest włączony przed odłączeniem przewodu zasilającego należy zamknąć system rejestratora używając menu ZAMKNIJ ...

Page 35: ...rządzenia i naciskanie jakichkolwiek przycisków jest zabronione Aby wyłączyć urządzenie skorzystaj z menu UWAGA Nie należy modyfikować podłączenia zasilaczy i ich uziemienia W celu zapewnienia nieprzerwanej pracy urządzenia należy upewnić się ze wszystkie połączenia wykonano w sposób właściwy i trwały uniemożliwiający ich przypadkowe rozłączenie Jeżeli urządzenie przyniesione zostało z otoczenia o...

Page 36: ... zgodnie z opisem znajdującym się instrukcji obsługi kamery Należy pamiętać aby kamery zostały zaadresowane unikalnym adresem IP obsługiwanym przez rejestrator Rejestratory z wbudowanym przełącznikiem PoE używają innej adresacji dla kamer podłączonych przez wbudowany przełącznik a innej do łączenia się z urządzenia podłączonymi przez port LAN Zalecamy skonfigurowanie kamer przed podłączaniem do re...

Page 37: ...a panelu tylnym Porty umożliwiają podłączenie pamięci USB myszy i innych kompatybilnych urządzeń USB Zalecane jest podłączanie pamięci i dysków do portu USB 3 0 Podłączanie wejść i wyjść alarmowych Rejestrator sieciowy NVR 6232 H2 F posiada wejścia i wyjście alarmowe Wejścia alarmowe oznaczone są w sekcji ALARM IN Poszczególne wejścia powinny być połączone tak jak na rysunku przedstawionym poniżej...

Page 38: ...j pełnoekranowo Ponowne podwójne kliknięcie wskaźnikiem myszy powoduje powrót do poprzedniego formatu wyświetlania W czasie konfiguracji wyboru poszczególnych pozycji dokonuje się przy użyciu lewego przycisku myszy W wybranych pozycjach zmiany wartości danego pola można dokonać przy użyciu rolki myszy Zależnie od aktualnie wybranego menu wciśnięcie prawego przycisku myszy wywołuje odpowiednie menu...

Page 39: ... ekranowej dostępnej po kliknięciu w polach NOWE HASŁO i POTWIERDŹ HASŁO Aby wyświetlić wpisywane hasło należy zaznaczyć pole WYŚWIETL HASŁO Zaznaczenie w polu ZALOGUJ AUTOMATYCZNIE będzie automatycznie logowało użytkownika do systemu po uruchomieniu rejestratora Zaznaczenie pola WŁĄCZ w wierszu BLOKADA GRAFICZNA umożliwia uruchomienie ustawienia odblokowywania dostępu dla użytkownika przy pomocy ...

Page 40: ...iedzi które mogą odblokować dostęp do rejestratora Aby dodać pytanie należy kliknąć na polu PYTANIE aby za pomocą klawiatury wpisać pytanie Następnie należy kliknąć na polu ODPOWIEDŹ aby wpisać odpowiedź na pytanie Kliknięcie na przycisku DODAJ dodaje zestaw pytań i odpowiedzi Kliknięcie przycisku DALEJ przechodzi do okna w którym wyświetlane są informacje o dysku podłączonym do rejestratora OBSŁU...

Page 41: ...stępności dysku należy sformatować dysk klikając na przycisku FORMATUJ Wyświetlone zostanie okno z pytaniem o potwierdzenie zamiaru formatowania dysku UWAGA Formatowanie powoduje utratę informacji zapisanych na dysku twardym Naciśnięcie przycisku OK potwierdza zamiar formatowania dysku Po udanym formatowaniu dysk powinien mieć status ODCZYT I ZAPIS OBSŁUGA REJESTRATORA ...

Page 42: ...pować zgodnie z podaną procedurą Informacja Zalecane wartości ustawień w kamerach znajdują się w Tabeli kompatybilności kamer dostępnej na stronie www novuscctv com W przypadku ustawienia niewłaściwych wartości mogą wystąpić problemy z wyszukaniem podłączeniem kamer lub uzyskaniem płynnego obrazu bez zniekształceń Przed przystąpieniem do pracy z rejestratorem sieciowym należy przeprowadzić wstępną...

Page 43: ...a zmienić ustawienia po odznaczeniu pól UZYSKAJ ADRES IP Z DHCP i pola UZYSKAJ DNS AUTOMATYCZNIE Dostępne są następujące ustawienia sieciowe rejestratora IP Maska podsieci W przypadku gdy konieczne jest połączenie NVRa z Internetem do zdalnego dostępu wysyłania emaili itp należy skonfigurować następujące parametry BRAMA PODSTAWOWY POMOCNICZY DNS Istnieje możliwość zmiany domyślnego portu HTTP prze...

Page 44: ...iej możliwość zmiany nazwy kanału po kliknięciu w polu EDYTUJ Aby zmienić adresację kamer IP należy kliknąć na ikonie w kolumnie EDYTUJ Funkcja działa z kamerami NOVUS IP serii 6000 Wprowadź adres w polu ADRES IP i ustawiania maski w polu MASKI POD następnie naciśnij przycisk OK w celu zapisania ustawień Naciśnij przycisk aby dodać kamerę do systemu Dodane kamery zostaną wyświetlone na dolnej liśc...

Page 45: ...merą należy wprowadzić poprawna nazwę użytkownika w polu NAZWA UŻYT i hasło w polu HASŁO a następnie nacisnąć przycisk OK w celu zapisania ustawień Jeśli rejestrator nawiązał połączenie z kamerą w kolumnie STATUS zostanie wyświetlony napis POŁĄCZONY Aby usunąć kamerę z listy należy nacisnąć przycisk z kolumny USUŃ III USTAWIENIA NAGRYWANIA OBSŁUGA REJESTRATORA ...

Page 46: ...Z AKT WEJ nagrywanie po zdarzeniu detekcji ruchu i po zdarzeniu wygenerowanym z wejścia alarmowego ZAWSZE 24 7 NAGRAJ PO DETEKCJ nagrywanie ciągłe i dodatkowe nagrywanie po zdarzeniach detekcji ruchu ZAWSZE 24 7 NAGRAJ Z AKT WEJ nagrywanie ciągłe 24 i dodatkowe nagrywanie po zdarzeniach wygenerowanych z czujników alarmowych ZAWSZE 24 7 NAGRAJ PO DETKECJI NAGRAJ Z AKT WEJ nagrywanie ciągłe nagrywan...

Page 47: ...ie Zalecane jest pozostawienie ustawienia NAT 2 0 serwis ten oferuje większe bezpieczeństwo przez szyfrowanie połączeń pomiędzy NVRem a serwerem P2P Uwaga Firma AAT SYSTEMY BEZPIECZEŃSTWA Sp z o o nieustannie dba o prawidłowe działanie usługi P2P jednak ze względu na wykorzystanie infrastruktury firm trzecich nie może ponosić odpowiedzialności za przerwy i niedogodności w działaniu serwisu V AKTUA...

Page 48: ...ki i inne Po zakończeniu procesu inicjalizacji na ekranie monitora wyświetlane są obrazy z kamer na żywo U dołu ekranu wyświetlany jest pasek stanu urządzenia W celu wyświetlenia menu w rejestratorze należy kliknąć na przycisk aby uruchomić menu start Następnie należy zalogować się do systemu domyślne hasło dla użytkownika root to pass MENU REJESTRATORA PASEK STANU OKNO WIDEO MENU WIDOK MENU START...

Page 49: ...łny ekran Przełącza obraz wideo na cały ekran Pojedynczy obraz Przełącza do pojedynczego widoku wideo Poczwórny obraz Przełącza obraz do poczwórnego obrazu wideo Podział na 9 Przełącza obraz do podziału na 9 ekranów Podział na 16 Przełączanie między podziałami na 16 ekranów Otwiera inne podziały Otwarcie okna dodatkowych podziałów Dodatkowe podziały Podział 1 główny 5 7 lub 12 dodatkowych oraz 25 ...

Page 50: ...etlane informacji OSD Odtwarzanie Uruchamia odtwarzanie wyświetlanych kamer Nagrywanie ręczne Włącza wyłącz ręczne nagrywanie kanałów Alarm ręczny Uruchamianie alarmu ręcznego Status nagrywania Wyświetla informację o nagrywaniu Stan alarmów Wyświetla stan alarmów z urządzeń Stan dysku Informacje o stanie dysków do rejestracji nagrań Informacje o sieci Wyświetlanie informacji o wykorzystaniu sieci ...

Page 51: ...o jak poniżej Na kalendarzu należy wybrać pożądaną datę i wcisnąć przycisk OK Na grafie wyświetlone zostaną nagrania dostępne dla wybranego dnia Kolory pasków z nagraniami określają typ nagrań Aby wybrać rodzaj nagrań należy kliknąć na przycisku wyboru z prawej strony ikon wybrane typy nagrań Po kliknięciu pokażą się okno umożliwiające wybór rodzajów nagrań rozmieszczonych w dwóch grupach MENU REJ...

Page 52: ...yświetla nagrania wyzwolone detekcją ruchu POS Wyświetla nagrania wyzwolone zdarzeniami POS Harmonogram Wyświetla nagrania wyzwolone harmonogramem Wszystkie zdarzenia normalne Wyświetla nagrania wyzwolone wszystkimi zdarzeniami nie pochodzącymi z inteligentnej analizy obrazu Twarz Wyświetla nagrania wyzwolone rozpoznawaniem twarzy Tablica Wyświetla nagrania wyzwolone rozpoznaniem tablic Przekrocze...

Page 53: ... Przewiń Przewijanie Pauza materiału wideo do tyłu Odtwarzaj Odtwarzanie Pauza materiału wideo Zmniejszanie Zwiększanie tempa Umożliwia zmianę prędkości odtwarzania Normlana prędkość Przełącza odtwarzanie do normalnej prędkości Poprzednia Następna klatka Wyświetlanie następnej poprzedniej klatki Poprzednie Następne 30 sekund Wyświetlanie nagrań 30 sekund Informacja odtwarzania Informacja o bieżący...

Page 54: ...a nie może być większa niż 16 W menu głównym rejestratora należy wybrać ZDARZENIA INTELIGENCJI W podmenu ROZPOZNAWANIE TWARZY należy wybrać pole ROZPOZANIE W wyświetlonym menu należy zaznaczyć pola POMYŚLNE ROZPOZNANIE i lub pole OBCY W polu KONFIG HARMONOG wybiera się jeden z dostępnych harmonogramów działania funkcji W celu uruchomienia funkcji należy kliknąć na przycisku USTAW Rejestrator wyświ...

Page 55: ... niż oczekiwany w celu jego zmiany należy postępować zgodnie z poniższą procedurą Należy wybrać przycisk otwierania MENU a następnie wybrać opcję otwierania menu ustawień systemowych trzecia opcja od dołu W menu rejestratora należy wybrać zakładkę SYSTEM W wyświetlanym menu należy wybrać język Polski w trzecim od góry polu i kliknąć przycisk na dole menu Po zapisaniu ustawień język zostanie przełą...

Page 56: ...AAT Systemy Bezpieczeństwa sp z o o ul Puławska 431 02 801 Warszawa tel 4822 546 07 00 fax 4822 546 07 59 www novuscctv com 2021 09 29 MB MK ...

Reviews: