background image

NVIP

-

2H

-

6231

-

II 


Quick start guide


version 1.0


All rights reserved © AAT SYSTEMY BEZPIECZEŃSTWA Sp. z o.o. 


9


START

-

UP AND INITIAL IP CAMERA CONFIGURATION


2.2. Ethernet cable connecting 


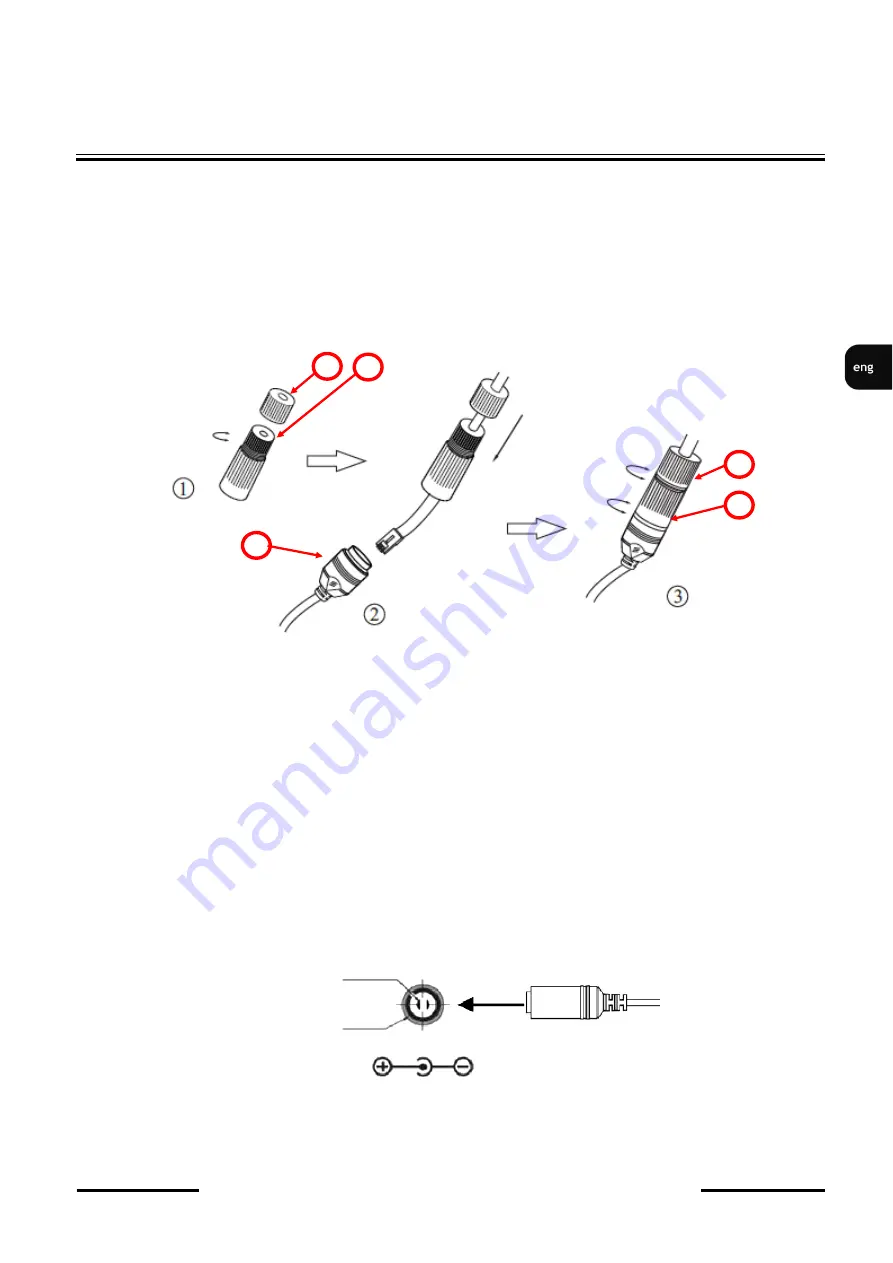
To maintain tightness of ethernet cable connection, please follow instruction below:


1. Unscrew the nut (

1

) from the connector cover (

2

).


2. Route the network cable (without the RJ

-

45 plug) through the components (

1

) and (

2

), than crimp the 

RJ

-

45 connector.


3. Plug the RJ

-

45 connector into the hermetic socket (

3

), screw the connector cover (

2

), and than the 

nut (

1

).


CAUTION!


The  declared  degree  of  protection  of  the  camera  relates  to  its  housing  and  does  not  take  into 

account the possibility of moisture infiltration into the camera by connection cables. Connection 
cables  protection  through  i.e.  sealing  up  is  the  camera  installer  duty.  The  manufacturer  is  not 
liable  for  any  camera  damages  caused  as  a  result  of  failing  in  performing  that  activity  by 
installer, which also means that camera damaged in that way is not subject to warranty repairs.


CAUTION!


Camera power supply connector is not hermetic. Installer should seal this connector by himself.


Camera can be supplied using external power supply unit corresponding with the camera parameters or 

by  using  RJ45  network  socket  and  PoE  (802.3af)  power  supply  unit.  If  you

re  using  external  power 

supply please connect wires according to polarisation shown on picture:


CAUTION!  


In order to provide protection against voltage surges/lightning strikes, usage of appropriate surge 

protectors is advised. Any damages resulting from surges are not eligible for service repairs.


12 VDC +


GND


Scheme of 12VDC power supply connector


1


2


3


1


2


Summary of Contents for NVIP-2H-6231-II

Page 1: ...Quick start guide NVIP 2H 6231 II NVIP 2H 6231 II 7043...

Page 2: ...pe model settings observation area or environmental conditions DYREKTYWA PARLAMENTU EUROPEJSKIEGO I RADY 2014 30 UE z dnia 26 lutego 2014 r w sprawie harmonizacji ustawodawstw pa stw cz onkowskich odn...

Page 3: ...er s manual 5 The device should be disconnected from power sources during maintenance procedures 6 Usage of additional devices and components neither provided nor recommended by the producer is forbid...

Page 4: ...4 Starting the IP camera 11 2 5 Initial configuration via the web browser 12 2 6 Security recommendations for network architecture and configuration 13 3 NETWORK CONNECTION USING WEB BROSWER 14 3 1 Re...

Page 5: ...lt in webserver camera configuration through the website Video compression H 264 H 265 H 264 H 265 MJPEG G711 Max video resolution up to 1920 x 1080 Multi streaming compression resolution speed and qu...

Page 6: ...1080 Full HD and lower resolutions Multistreaming Mode 2 streams Video Audio Compression H 264 H 264 H 265 H 265 MJPEG G 711 Number of Simultaneous Connections max 3 Bandwidth 9 Mb s in total Network...

Page 7: ...h IEEE 802 3af standard items called passive PoE power supply Damages caused by the usage of improper power supply source are not covered by the warranty IR LED LED Number 1 Range 30 m Smart IR yes so...

Page 8: ...y after bringing it from a location with lower ambient temperature is forbidden as the condensing water vapour may cause short circuits and damage the device as a result Before starting the device fam...

Page 9: ...ection cables protection through i e sealing up is the camera installer duty The manufacturer is not liable for any camera damages caused as a result of failing in performing that activity by installe...

Page 10: ...e camera service panel 3 mount microSD card in the socket 5 screw the camera service panel 3 and put on plastic cover 4 Connect the camera wires Adjust camera position Tighten to the stop counter nut...

Page 11: ...camera and perform its configuration is a direct connection to the network switch which is not connected to other devices To obtain further information about network configuration parameters IP addres...

Page 12: ...1 appropriate address for the camera ranges from 192 168 1 2 to 192 168 1 254 for example 192 168 1 60 It is not allowed to set the same addresses for camera and PC computer You can either set a netwo...

Page 13: ...on all ports which gives possibility for an unauthorized interference with the system Instead of DMZ use port forwarding redirect only the ports which are necessary for the performance of the connect...

Page 14: ...2 Connection with IP camera via web browser Connecting to the camera for the first time Enter the IP address of the camera default 192 168 1 200 in the address bar of the web browser If the address is...

Page 15: ...administrator account created during the activation of the device It means that the user logging in by using the root login and a predefined password and have access to the full functionality and all...

Page 16: ...ount select the user by clicking on the appropriate row in the table then click Delete button Please note that deleting Onvif account means that the camera cannot be added to NMS software Add button i...

Page 17: ...ight answers is essential to recovering the administrator password Plug in installation If the browser has no connected to any of the 6000 series cameras so far or if an older version of the plug in i...

Page 18: ...nd then click Install button to install plug in After installation click the Finish button to close the installer and refresh the browser window you can also close and restart the browser If after ins...

Page 19: ...nfiguration menu Search opens the camera playback 2 The buttons for changing the displayed stream and fluency Allow to change the displayed stream to Main stream Sub stream Allow you to choose between...

Page 20: ...AND ACCESORIES 5 1 MicroSD card installation Camera supports microSD cards up to a maximum size of 256 GB In order to install the card properly please follow the instructions below Turn off the camera...

Page 21: ...RST 6 1 Software factory settings restoring via web browser Restoring factory settings via web browser allows you to optionally keep some settings such as network settings To restore default settings...

Page 22: ...e factory settings using reset button RST please follow the instructions below Remove the plastic cover 2 unscrew the camera service panel 1 Press the reset button 3 and hold on for 10 seconds Release...

Page 23: ...NVIP 2H 6231 II Quick start guide version 1 0 All rights reserved AAT SYSTEMY BEZPIECZE STWA Sp z o o 23 NOTES...

Page 24: ...2022 06 27 PF AAT SYSTEMY BEZPIECZE STWA Sp z o o 431 Pulawska St 02 801 Warsaw Poland tel 4822 546 0 546 kontakt aat pl www novuscctv com...

Page 25: ...Skr cona instrukcja obs ugi NVIP 2H 6231 II NVIP 2H 6231 II 7043...

Page 26: ...e obrazy z kamer mog by symulacjami Rzeczywiste obrazy z kamer mog si r ni w zale no ci od typu modelu ustawie obszaru obserwacji lub warunk w zewn trznych DYREKTYWA PARLAMENTU EUROPEJSKIEGO I RADY 20...

Page 27: ...erwatorskich urz dzenie musi by od czone od zasilania 6 Nie wolno stosowa adnych dodatkowych urz dze lub podzespo w nie przewidzianych i nie zalecanych przez producenta 7 Nie wolno u ywa kamery w rodo...

Page 28: ...11 2 5 Konfiguracja parametr w przy u yciu przegl darki internetowej 12 2 6 Zalecenia dotycz ce bezpiecze stwa sieci 13 3 PO CZENIA SIECIOWE ZA POMOC PRZEGL DARKI WWW 14 3 1 Zalecana konfiguracja komp...

Page 29: ...wany webserwer mo liwo konfiguracji kamery przez przegl dark Kompresja H 264 H 265 H 264 H 265 MJPEG G 711 Rozdzielczo przetwarzania wideo do 1920 x 1080 Mo liwo definiowania kompresji rozdzielczo ci...

Page 30: ...twarzania 30 kl s dla 1920 x 1080 Full HD i ni szych rozdzielczo ci Tryb wielostrumieniowy 2 strumienie Kompresja wideo audio H 264 H 264 H 265 H 265 MJPEG G 711 Liczba jednoczesnych po cze maks 3 Prz...

Page 31: ...ndardem IEEE 802 3af potocznie nazywanych pasywne zasilacze PoE Uszkodzenia wynik e ze stosowania nieodpowiednich r de zasilana nie podlegaj gwarancji 75 75 165 O WIETLACZ IR Liczba LED 1 Zasi g 30 m...

Page 32: ...bezpo rednio po przyniesieniu z ch odniejszego miejsca Kondensacja zawartej w powietrzu pary wodnej mo e spowodowa zwarcia i w konsekwencji uszkodzenie urz dzenia Przed uruchomieniem urz dzenia nale y...

Page 33: ...rzez np uszczelnienie ich odpowiedni mas jest obowi zkiem osoby instaluj cej kamer Producent nie ponosi odpowiedzialno ci za wszelkie szkody uszkodzenia kamery powsta e w skutek niedope nienia w w obo...

Page 34: ...scu pod czenia Zamocowa podstaw kamery 1 przy u yciu za czonych ko k w i wkr t w W razie potrzeby zdj plastikow os on 4 odkr ci klapk 3 umieszczon na kamerze w o y kart pami ci 5 za o y plastikow os o...

Page 35: ...lub laptopa w wydzielonym prze czniku PoE do kt rego nie ma pod czonych innych urz dze W przypadku zasilania z zewn trznego zasilacza wystarczy zastosowa dowolny prze cznik sieciowy lub kabel pod czon...

Page 36: ...68 1 60 Niedopuszczalne jest ustawianie adresu komputera takiego samego jak adres kamery Wykorzystuj c po czenie przez przegl dark internetow Internet Explorer lub oprogramowanie NMS nale y ustawi doc...

Page 37: ...u u atwia ewentualn nieautoryzowan ingerencj w system Zamiast wykorzystywania funkcji DMZ nale y zastosowa przekierowanie port w Przekierowane powinny zosta jedynie porty niezb dne do realizacji po cz...

Page 38: ...0 Mb s 3 2 Po czenie sieciowe z kamer za pomoc przegl darki internetowej Pierwsze po czenie si z kamer W pasku adresu przegl darki WWW nale y wpisa adres IP kamery domy lnie 192 168 1 200 Je li podany...

Page 39: ...aktywacji urz dzenia jest kontem administratora kamery Oznacza to e u ytkownik loguj c si do urz dzenia przez przegl dark loginem root i wcze niej ustalonym has em b dzie mia dost p do pe nej funkcjo...

Page 40: ...onto Onvif nale y klikaj c na odpowiedni wiersz w tabeli wybra u ytkownika a nast pnie klikn przycisk Usu Nale y mie na uwadze e usuni cie konta Onvif wi e si z brakiem mo liwo ci dodania kamery do op...

Page 41: ...mo w a ciwych pyta i odpowiedzi jest niezb dna do odzyskania has a administratora Instalacja dodatku plug in Je li do tej pory przegl darka nie czy a si z adn z kamer serii 6000 lub je li jest zainsta...

Page 42: ...t pnie klikn przycisk Install by zainstalowa dodatek Po zako czeniu instalacji nale y klikn przycisk Finish oraz od wie y okno przegl darki mo na tak e zamkn i uruchomi ponownie przegl dark Je eli po...

Page 43: ...zukiwanie otwiera okno odtwarzania nagra kamery 2 Przyciski zmiany wy wietlanego strumienia oraz buforowania Umo liwiaj wyb r strumienia Strumie g wny Pomocniczy 1 lub Pomocniczy 2 Pozwalaj wybra opcj...

Page 44: ...azu 5 PO CZENIA ELEKTRYCZNE I Z CZA AKCESORI W 5 1 Instalacja karty Micro SD Kamera obs uguje karty Micro SD o pojemno ci do 256 GB W celu prawid owej instalacji karty nale y post powa zgodnie z instr...

Page 45: ...ustawie kamery opcjonalnie z pomini ciem niekt rych ustawie np sieciowych Kamera zostanie ponownie uruchomiona po ok 1 minucie Opcja do programowego przywr cenia ustawie fabrycznych znajduje si w zak...

Page 46: ...a ustawie fabrycznych kamery IP nale y post powa zgodnie z instrukcj Zdj plastikow os on 2 i odkr ci klapk 1 umieszczon na kamerze Przytrzyma przycisk reset 3 przez 10 sekund Zwolni przycisk Przykr ci...

Page 47: ...NVIP 2H 6231 II Skr cona instrukcja obs ugi wersja 1 0 Wszelkie prawa zastrze one AAT SYSTEMY BEZPIECZ STWA SP z o o 23 NOTATKI...

Page 48: ...2022 06 27 PF AAT SYSTEMY BEZPIECZE STWA Sp z o o ul Pu awska 431 02 801 Warszawa Polska tel 22 546 0 546 kontakt aat pl www novuscctv com pl...

Reviews: