background image

 NHDR

-

6004

-

H1

-

II, NHDR

-

6008

-

H1

-

II


User

s manual (Short) ver.1.1


All rights reserved © AAT SYSTEMY BEZPIECZEŃSTWA SP. Z O.O. 


8


STARTING THE DEVICE


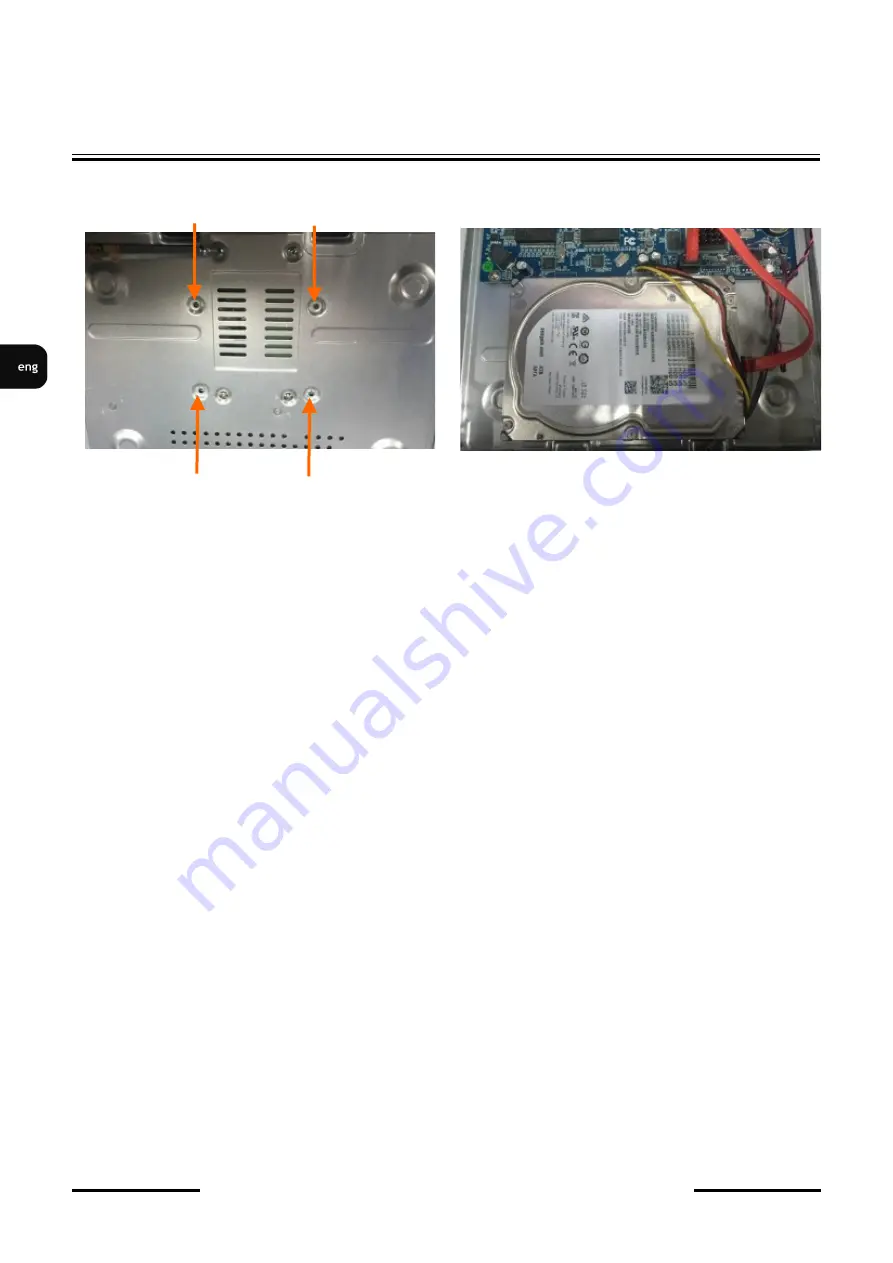
After removing the case, mount the disk using mounting screws supplied in the set (4 pcs.). And then 

connect the power cord and signal.The recorder casing has 6 holes enabling adaptation to hard disk 

mounting holes. 


After connecting the hard drive mount the cover, start the NHDR to check and format the hard drive. 


After  connecting  the  hard  disk  drive,  mount  the  recorder  housing  and  run  it  to  check  the  correct 

connections and format the hard disk drive. 


WARNING:


If the disk used has been used in another device, it must be formatted. The formatting process 

results in the loss of data saved on the disk. 


2.3. Connecting the power supply.


To start please connect  provided power cord in  the rear power port of the NHDR.  Initialization lasts 

approximately 60 seconds. During this time executing any device functions and pressing any buttons is 

prohibited. To shut down the device please use the menu.


CAUTION:


Make connection when the power is not applied.


Do not place the power cord under the carpet or rug. The power cord is usually earth

-

grounded. 

However, even if it's not earth

-

grounded, never modify it on your own for earth

-

grounding.


Make  sure  that  power  adapter  is  placed  near  of  NHDR  and  secured  from  accidental 

disconnection.


If the device was brought from a location with lower temperature, please wait until it reaches the 

temperature  of  location  it  is  currently  in.  Turning  the  device  on  immediately  after  bringing  it 

from  a  location  with  lower  ambient  temperature  is  forbidden,  as  the  condensing  water  vapour 

may cause short

-

circuits and damage the device as a result.


Before  starting  the  device  familiarize  yourself  with  the  description  and  the  role  of  particular 

inputs, outputs and adjusting elements that the device is equipped with. 


Summary of Contents for NHDR-6004-H1-II

Page 1: ...User s manual short NHDR 6004 H1 II NHDR 6008 H1 II...

Page 2: ...ice itself as a consequence 9 Mounting the device on unstable surface or using not recommended mounts is forbidden Improperly mounted device may cause a fatal accident or may be seriously damaged itse...

Page 3: ...S player included Storage Internal storage available mount 1 x HDD 3 5 SATA Total Internal Capacity 10 TB Alarm Motion Detection 18 x 22 grid individual settings of sensitivity System Reaction to Alar...

Page 4: ...rage Internal storage available mount 1 x HDD 3 5 SATA Total Internal Capacity 10 TB Alarm Motion Detection 18 x 22 grid individual settings of sensitivity System Reaction to Alarm Events buzzer e mai...

Page 5: ...adapter included WARNING ONVIF protocol support was verified with IP cameras based on ONVIF ver 2 2 and compatible with the PROFILE S Implementation of the ONVIF protocol by different manufacturers ma...

Page 6: ...onnect microphones 3 CVBS CVBS Video output 4 HDMI Main monitor connector use the HDMI cable to connect monitor 5 VGA VGA monitor connection 6 LAN RJ 45 connector port to connect to the local network...

Page 7: ...e HDDs that can be used with a given NHDR including HDDs designed for office use so called desktop disks However due to the fact that reliability of the recording process and data safety are paramount...

Page 8: ...t of the NHDR Initialization lasts approximately 60 seconds During this time executing any device functions and pressing any buttons is prohibited To shut down the device please use the menu CAUTION M...

Page 9: ...h between the recorder and camera depends on the quality of the cable and the mode used The recorder requires the use of a switch to connect IP cameras The permissible cable distance from the switch t...

Page 10: ...separately as an accessory REC recording started NET network activity PWR power supplay activity 2 USB USB 2 0 port for connecting a mouse with a USB connector or Flash memory for copying recordings 3...

Page 11: ...language used in the menu window on the left and the location of the device in window on the right Left clicking in one window changes the settings To go to the next menu click on NEXT button The nex...

Page 12: ...IRM PASSWORD To display the entered password check the DISPLAY PASSWORD box Checking in the AUTOMATICALLY LOG IN field will automatically log the user into the system after starting the recorder By se...

Page 13: ...using the keyboard Then click on the ANSWER field to enter the answer to the question Clicking on the ADD button adds a set of questions and answers Clicking the NEXT button takes you to the window in...

Page 14: ...14 Pressing the OK button confirms the intention to format the disk To start formatting enter a username and password for a user with administrator rights After entering the username and password pre...

Page 15: ...button to start the wizard I By default the recorder has the IP address and DNS settings download from the DHCP server enabled If the address retrieval fails the recorder is available at 192 168 1 10...

Page 16: ...NHDR To change the addressable cameras click on the icon in the column EDIT This works with cameras NOVUS IP 3000 and 6000 series only Enter the address in the IP ADDRESS and set the masks in the SUBN...

Page 17: ...ve a camera from the list press the in DELETE column IV Record Settings You can set one of the modes MANUAL RECORD SETTINGS You can set the recording time from the moment you select the manual recordi...

Page 18: ...MOTION RECORD SENSOR RECORD ANALYTICS RECORD constant recording recording alarm generated on alarm input after receiving motion detection information from the camera and after analytics alarm By clic...

Page 19: ...DR completes its initialization process it will enter the real time monitoring image Displaying all cameras simultaneously is the default mode On the bottom of screen STATUS BAR is displayed To start...

Page 20: ...R parameters Logout Starts playback menu Shutdown Shutdowns the the NHDR Item Icon Description Settings Click to open start menu Full screen Switches video view to full screen Division selection Selec...

Page 21: ...Manual Record Turn on off manually recording channels Manual Alarm Allow to trigger the alarm manually Recording Status Displays information about the recording Alarm Status Displays the status of ala...

Page 22: ...nuous data recording Yellow Motion motion event data recording Red Alarm alarm event data recording Light blue Inteligence To play the searched data simply double click a desired point on or press PLA...

Page 23: ...rchiving recordings Backup status displays the current status of archival recordings Back close the replay menu 4 3 Changing the menu language If the currently selected menu language is different than...

Page 24: ...2021 03 03 MB MK AAT SYSTEMY BEZPIECZE STWA SP Z O O 431 Pulawska St 02 801 Warsaw Poland tel 4822 546 07 00 fax 4822 546 07 59 www novuscctv com...

Page 25: ...instrukcja obs ugi skr cona NHDR 6004 H1 II NHDR 6008 H1 II...

Page 26: ...mi przez producenta w danych technicznych kamery Dlatego te zabrania si zasilania rejestratora ze r de o nieznanych niestabilnych lub niezgodnych z wymaganiami okre lonymi przez producenta parametrach...

Page 27: ...ormat plik w kopii AVI RPAS do czony odtwarzacz Dyski Dyski wewn trzne mo liwo monta u 1 x HDD 3 5 SATA Maksymalna wewn trzna pojemno 10 TB Alarmy Detekcja ruchu siatka 18 x 22 odr bne ustawienia czu...

Page 28: ...czony odtwarzacz Dyski Dyski wewn trzne mo liwo monta u 1 x HDD 3 5 SATA Maksymalna wewn trzna pojemno 10 TB Alarmy Detekcja ruchu siatka 18 x 22 odr bne ustawienia czu o ci Reakcja na zdarzenia alarm...

Page 29: ...wych opartych o ONVIF wer 2 2 i zgodnych z PROFILE S Jak wykazuje do wiadczenie implementacja protoko u ONVIF przez r nych producent w kamer mo e si r ni a co za tym idzie poszczeg lne funkcje mog dzi...

Page 30: ...Wyj cie wideo z cza CVBS 4 HDMI Z cze monitora w standardzie HDMI 5 VGA Z cze monitora w standardzie VGA 6 LAN Z cze RJ 45 do pod czenia kamer sieci lokalnej i Internetu 7 USB Port do pod czenia pami...

Page 31: ...z danym rejestratorem w tym tak e przeznaczone do pracy biurowej tzw desktopowe Jednak ze wzgl du na to e w systemach CCTV priorytetem jest niezawodno procesu rejestracji i zarz dzania danymi zaleca...

Page 32: ...od cz dostarczony przew d zasilaj cy do tylnego portu zasilania NHDR Inicjalizacja trwa oko o 60 sekund W tym czasie wykonywanie jakichkolwiek funkcji urz dzenia i naciskanie jakichkolwiek przycisk w...

Page 33: ...z czy BNC rejestratora Maksymalna d ugo kabla mi dzy rejestratorem a kamer uzale niona jest od jako ci kabla i zastosowanego trybu Rejestrator wymaga u ycia prze cznika do pod czenia kamer Dopuszczaln...

Page 34: ...la obs ugi pilotem zdalnego sterownia pilot mo na dokupi osobno 3 2 Sterowanie za pomoc myszy USB Za pomoc myszy z interfejsem USB pod czonej do portu USB rejestratora Istnieje mo liwo sterowania wi k...

Page 35: ...ania w oknie z prawej strony Klikni cie lewym przyciskiem myszki w jednym z okien zmienia ustawiania Aby wybra j zyk polski nale y w oknie z lewej strony wybra pozycj POLSKI a w prawym oknie wybra POL...

Page 36: ...le y zaznaczy pole WY WIETL HAS O Zaznaczenie w polu ZALOGUJ AUTOMATYCZNIE b dzie automatycznie logowa o u ytkownika do system po uruchomieniu rejestratora Zaznaczenie pola W CZ w wierszu BLOKADA GRAF...

Page 37: ...pomoc klawiatury wpisa pytanie Nast pnie nale y klikn na polu ODPOWIED aby wpisa odpowied na pytanie Klikni cie na przycisku DODAJ dodaje zestaw pyta i odpowiedzi Klikni cie przycisku DALEJ przechodzi...

Page 38: ...Naci ni cie przycisku OK potwierdza zamiar formatowania dysku Aby uruchomi formatowanie nale y wprowadzi naw u ytkownika i has o dla u ytkownika z prawami administratora Po wprowadzeniu nazwy u ytkow...

Page 39: ...ku KREATOR USTAWIE aby uruchomi kreatora I Ustawienia sieciowe Rejestrator domy lnie posiada w czone pobieranie adresu IP oraz ustawie DNS z serwera DHCP Je li pobieranie adresu nie powiedzie si rejes...

Page 40: ...h kana w istniej mo liwo zmiany nazwy kana u po klikni ciu w polu EDYTUJ Aby zmieni adresacj kamer IP nale y klikn na ikonie w kolumnie EDYTUJ Funkcja dzia a z kamerami NOVUS IP serii 6000 Wprowad adr...

Page 41: ...po czeniem z kamer nale y wprowadzi poprawna nazw u ytkownika w polu NAZWA U YT i has o w polu HAS O a nast pnie nacisn przycisk OK w celu zapisania ustawie Je li rejestrator nawi za po czenie z kame...

Page 42: ...tekcji ruchu ZAWSZE 24 7 NAGRAJ Z AKT WEJ nagrywanie ci g e 24 i dodatkowe nagrywanie po zdarzeniach wygenerowanych z czujnik w alarmowych ZAWSZE 24 7 NAGRAJ PO DETKECJI NAGRAJ Z AKT WEJ nagrywanie ci...

Page 43: ...m z nast puj cych j zyk w angielski polski i inne Po zako czeniu procesu inicjalizacji na ekranie monitora wy wietlane s obrazy z kamer na ywo U do u ekrany wy wietlany jest pasek stanu urz dzenia W c...

Page 44: ...loguj Wylogowuje u ytkownika z menu rejestratora Wy cz Wy cznie rejestratora Nazwa Ikona Opis Start Uruchamia menu Start Pe ny ekran Prze cza obraz wideo na ca y ekran Wyb r podzia u Wyb r podzia u ek...

Page 45: ...wy cza wy wietlane informacji OSD Odtwarzanie Uruchamia odtwarzanie wy wietlanych kamer Nagrywanie r czne W cz wy czna r czne nagrywanie kana w Alarm r czny Uruchamianie alarmu r cznego Status nagrywa...

Page 46: ...u ty zapis wywo any detekcj ruchu Czerwony zapis wywo any alarmem zewn trznym Jasno niebieski zapis wywo any zdarzeniem inteligencji Uruchomienie odtwarzania nast puje dwukrotnym klikni ciu wybranego...

Page 47: ...lny stan archiwizacji nagra Powr t wy cza menu odtwarzania rejestratora 4 3 Zmiana j zyka menu W przypadku gdy po uruchomieniu rejestratora aktualnie wybrany j zyk menu jest inny ni oczekiwany w celu...

Page 48: ...AAT SYSTEMY BEZPIECZE STWA SP Z O O 431 Pulawska St 02 801 Warsaw Poland tel 4822 546 07 00 fax 4822 546 07 59 www novuscctv com 2021 03 03 MB MK...

Reviews: