Indicator N1500G
NOVUS AUTOMATION
2/6
4.
ALARMS
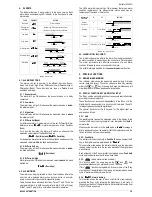
The indicator features 2 alarm outputs in the basic version. Each
alarm has a corresponding LED indicator in the front panel to show
alarm status.
TYPE
PROMPT
ACTION
Disabled
off
off
off
off
Alarm is inactive
Sensor Break
(
i
nput
Err
or)
ierr
ierr
ierr
ierr
Alarm will go ON if sensor breaks, input
signal is out of range or Pt100 is shorted.
Low Alarm
Lo
Lo
Lo
Lo
Alarm SP
PV
High Alarm
Ki
Ki
Ki
Ki
Alarm SP
PV
Diferential Low
Dif.lo
Dif.lo
Dif.lo
Dif.lo
PV
AL SP + Deviation
AL SP
Diferential High
Dif.ki
Dif.ki
Dif.ki
Dif.ki
PV
AL SP + Deviation
AL SP
Diferential
Dif
Dif
Dif
Dif
PV
AL SP + Deviation
Positive Deviation
AL SP
AL SP - Deviation
PV
AL SP - Deviation
Negative Deviation
AL SP
AL SP + Deviat.
Table 2
- Alarm functions
4.1.
ALARM FUNCTIONS
The alarms can set to operate in six different functions: Sensor
break, Low Alarm, High Alarm, Differential Low, Differential High or
Differential (Band). These functions are shown in
Table 2
and
described as follows.
4.1.1.
Sensor break
The alarm will go ON whenever the sensor breaks or is badly
connected.
4.1.2.
Low alarm
The alarm relay will go ON whenever the measured value is
below
the alarm set point.
4.1.3.
High alarm
The alarm relay will be ON whenever the measured value is
above
the alarm set point.
4.1.4.
Differential (Band)
For differential alarm 2 parameters must be set: Differential Alarm
Reference value (
ALrEF
ALrEF
ALrEF
ALrEF
) or alarm setpoint and Alarm Deviation
(Band).
For a positive deviation the alarm will switch on whenever the
measured value is
out
of the band defined as:
(
ALrEF
ALrEF
ALrEF
ALrEF
- Deviation) and (
ALrEF
ALrEF
ALrEF
ALrEF
+ Deviation)
For a negative deviation the alarm will be switched on whenever the
measured value is
within
the band defined above.
4.1.5.
Differential Low
The alarm relay will be ON whenever the measured value is
below
the band defined as:
(
ALrEF
ALrEF
ALrEF
ALrEF
- Deviation)
4.1.6.
Differential High
Alarm relay will be ON when the measured value is
above
the band
defined as:
(
ALrEF
ALrEF
ALrEF
ALrEF
+ Deviation)
4.2.
ALARM TIMER
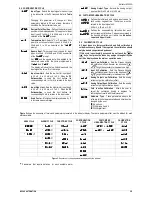
The alarms can be programmed to have timer functions where the
user can set a delayed alarm action, just one pulse in an alarm
event, or an oscillator function with sequential pulses.
Table 3 shows these advanced functions. Times T1 and T2 can be
programmed from 0 to 6500 seconds (refer to item 8.2). Set 0 (zero)
at the T1 and T2 prompt for a normal non-timer alarm operation.
The LEDs alarm indicators will go ON whenever there is an alarm
condition regardless of the present alarm status which may be
temporarily off because of timer action.
Advanced
Function
T1
T2
ACTION
Normal
Operation
0
0
Alarm Event
Alarm
Output
Delayed
0
1s to 6500s
Alarm Event
Alarm
Output
T2
Pulse
1s to 6500s
0
Alarm Event
Alarm
Output
T1
Oscillator
1s to 6500s 1s to 6500s
Alarm Event
Alarm
Output
T1
T2
T1
Table 3
- Timer Alarm Functions
4.3.
ALARM INITIAL BLOCKING
The initial blocking option inhibits the alarm from being recognized if
an alarm condition is present when the controller is first energized.
The alarm will actuate only after the occurrence of a non alarm
condition followed by a new occurrence for the alarm.
The initial blocking is disabled for the
sensor break
alarm function.
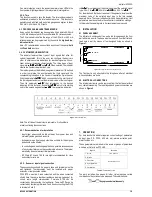
5.
SPECIAL FUNCTIONS
5.1.
MAXIMUM AND MINIMUM
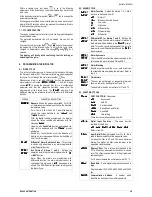
The indicator memorizes the measured maximum and minimum
values (peak and valley). These two values are shown by pressing
either the
or
key. Pressing both keys simultaneously will
clear the memory for a new peak and valley detection.
5.2.
SPECIAL FUNCTION KEY AND DIGITAL INPUT
The
F
key
and the optional digital input can execute special functions
according to the user selection.
These functions can be chosen independently to the
F
key or to the
digital input. A closed contact or a short circuit at terminals 12 and 13
is recognized as activating the digital input.
The special functions for the
F
key and for the digital input are
explained as follows.
5.2.1.
Hold
The
hold
function freezes the measured value in the display. Each
touch at the
F
key or closing the digital input alternates from
hold
to
normal mode.
Whenever the indicator is in the
hold
mode a “
HoLd
HoLd
HoLd
HoLd
” message is
briefly displayed to show the operator that the displayed value is the
frozen value and not the present reading.
5.2.2.
Peak Hold
The indicator turns automatically to
Peak Hold
mode whenever the
F
key or the digital input are programmed for “
P
P
P
PHoLd
HoLd
HoLd
HoLd
”
This operation mode makes the indicator display only the maximum
reading value from the time the key was pressed of the digital input
was activated.
Each activation of the
F
key or digital input triggers a new
Peak Hold
cycle and the display resets with a new peak value.
5.2.3.
rESEt
rESEt
rESEt
rESEt
(clears maximum and minimum)
This function works the same way as the
and
keys
pressed simultaneously, as explained in the 5.1 section.
If this “
rESEt
rESEt
rESEt
rESEt
” function is programmed, for every touch of the
F
key
or activation of the digital input the memory will be cleared and a new
cycle of maximum and minimum will start.
5.2.4.
AL.oFF
AL.oFF
AL.oFF
AL.oFF
-
Alarm blocking
This function allows the user to block or inhibit the alarm relays by
pressing the F key or by activating the digital input. Each touch of
the key or activation of the digital input will alternate the function from
ON to OFF and vice-versa.


