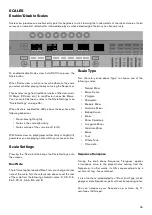
Novation SL Mk III User Manual Download Page 16

16

Arp Part

Arp can only arpeggiate one Part at once, so by default, this 
is set to ‘Selected Part’ . However, using the soft buttons 
below the screens, you can send the arpeggiated pattern 
to parts one through eight instead . In other words, you can 
send your arpeggiated patterns to different Parts to audition 
them on various elements of your song .

Arp Type

You can set Arp to the following pattern ‘Types’:

•  Up (default) - Notes held or latched (with the Latch 

button) play in an upwards direction at the Arp Sync 
Rate, one after another, then the pattern repeated .

•  Down - Notes held or latched play in a downwards 

direction at the Arp Sync Rate, one after another, then 
the pattern repeated .

•  Up/Down 1 - Notes held or latched play in an 

upwards direction, then downwards direction with no 
repeated notes, at the Arp Sync Rate, then the whole 
pattern repeated .

•  Up/Down 2 - Notes held or latched play in an 

upwards direction, then downwards direction with 
the highest and lowest notes repeated, at the Arp 
Sync Rate, then the whole pattern repeated .

•  Random - Notes held or latched play in a random 

order at the Arp Sync Rate until keys are released .

•  Played - Notes held or latched output in the order 

they were played, at the Arp Sync Rate, then the 
whole pattern repeated .

•  Chord - Notes held or latched play as a chord on 

each Arp step, at the Arp Sync Rate, until the notes 
are released . 

Arp Gate

The Arp’s Gate control shortens the length of arpeggiated 
notes from the maximum length of one arpeggiated step 
(100%) down to 1/100th of an arpeggiated step (1%) . Gate 
is set to 100% by default, with an adjustable range of one to 
100% . Gate considers Arp Sync Rate and tempo; therefore, 
as Sync Rate changes and tempo increases/decreases the 
Arp gate length will remain a consistent percentage of the 
Arp step length .

Arp Sync Rate

This changes the musical rate the Arp runs relative to the SL 
MkIII’s clock . The Arp can be set to these sync rates:

•  1
•  1/2
•  1/2 Triplet
•  1/4
•  1/4 Triplet
•  1/8

•  1/8 Triplet
•  1/16 (Default)
•  1/16 Triplet
•  1/32
•  1/32 Triplet

Arp Octaves

This setting increases the output range of the Arp by octaves . 
For example, if you set Octaves to two the sequence plays 
and then Is immediately repeated one octave higher . Three 
means the Sequence will repeat one octave higher, and then 
an octave higher still . By default, Octaves is set to one but 
can go as far as six .

If arpeggiated notes go out of range, the Arp will correct the 
notes to within the top octave (G#6 to G7) . There are no 
duplicated notes when you change Arp Octaves .

Octaves interact with Types in different ways . These 
scenarios are a reference when programming with octaves 
in mind:

•  When Type = Up/Down 1 or Up/Down 2 the Arp will 

play up the full octave range before playing down .

•  When Type = Played the notes play in the first octave 

before repeating in additional octaves .

•  When Type = Random, the sequence of notes is 

randomised across the whole octave range, and 
every note is picked at random .

•  When Type = Chord, additional octaves will cause the 

held notes to repeat according to the octave setting 
in an upwards direction . For example, if Octaves = 
3, the held notes will be played as a chord at the 
pitch, then +1 octave and then +2 octaves, before 
the pattern repeats .

Summary of Contents for SL Mk III

Page 1: ......

Page 2: ...ootloader Version 21 Standby Animation 21 CV GATE 21 Notes 21 Mod 21 KEYBOARD SETTINGS 21 Octave 21 Transpose 21 TEMPO SWING VIEW 21 Set Tempo 21 Display Clock Source 21 Swing 22 Swing Sync Rate 22 Ta...

Page 3: ...teps to ensure that the information given here is both correct and complete In no event can Novation accept any liability or responsibility for any loss or damage to the owner of the equipment any thi...

Page 4: ...synth style semi weighted keyboard 16 full colour RGB backlit velocity sensitive pads 64 customisable templates Eight continuous rotary knobs Eight faders Six dedicated transport controls RGB backlit...

Page 5: ...ity Slot 8 Teal silicone strip the feet of the SL MkIII 9 Shift button 10 Global Settings button 11 InControl Zones Sequencer Scales Arp Tempo and Latch buttons 12 Up down buttons to change pages of S...

Page 6: ...e Clear Grid Options Pitch Modulation Octave Transpose Track _ Templates Expand With the Sequencer enabled pressing play on the Transport will show the play head stepping through the pads turning each...

Page 7: ...e first encoder This will not affect steps without notes assigned Velocity In the Options menu press the soft button below Velocity to edit each Step in the current Pattern By default you will see Ste...

Page 8: ...step use the knob above each step to lengthen or shorten the Gate for every assigned note Since the SL MkIII operates under the rules of MIDI how the Gate parameter influences your resulting sound de...

Page 9: ...position and step progresses to the start Step You could think of this as reverse Ping Pong During the first phase playback begins at the start position and progresses to the end position During the...

Page 10: ...access the Expand view This arranges the Patterns for each Track vertically Use the up and down buttons to access more Patterns Press Patterns again to return to the default horizontal layout of Patte...

Page 11: ...s are also forwarded to the output of that Part whether recording or not While live recording note on events are quantised to the sync rate of the playing pattern note off events are quantised to the...

Page 12: ...you hold Clear While still holding Clear move a control to clear its automation in the current pattern You can also manually assign values to a Step which is useful when more accuracy is needed With t...

Page 13: ...s a standalone application available here components novationmusic com With Components you can configure each control to send one of many different MIDI messages with different ranges values and behav...

Page 14: ...or CV Gate two to change them options listed below USB Off On DIN Off 1 2 or Both CV Gate Off 1 2 or Both The Session stores your destination preferences so changing Sessions will change these Destina...

Page 15: ...of the SL MkIII is a fun way of augmenting Arp s functionality Pressing the Latch button toggles Arp Latch on and off When on any notes you play hold and their note offs are delayed until you release...

Page 16: ...0th of an arpeggiated step 1 Gate is set to 100 by default with an adjustable range of one to 100 Gate considers Arp Sync Rate and tempo therefore as Sync Rate changes and tempo increases decreases th...

Page 17: ...played notes and does not change the order they play Additional Arp Notes While using Up Down 1 with an octave range greater than one when the arp moves down reducing the octave range to one will caus...

Page 18: ...ck messages 1 Press the Global button 2 The menu item labelled MIDI Clock Rx shows either On or Off showing whether the device can respond to an external MIDI clock 3 Turn the rotary knob above to the...

Page 19: ...passes the previous value This behaviour prevents sudden jumps in the value after switching between Parts for example The default value for these controls will be at the lowest position i e fader all...

Page 20: ...ply to save these settings The full range of the CV Pitch port will now calibrate Click the Reset soft button to remove your calibration and restore the factory default settings Press the Exit soft bu...

Page 21: ...e sequencer or MIDI it will output as a voltage in the range of 0 to 5V from the Mod port KEYBOARD SETTINGS Octave The octave up and down buttons and buttons change the octave offset of the keyboard T...

Page 22: ...culates the tempo you must press the Tap button at least three times If the SL MkIII is synchronised to an external clock tap tempo will be unavailable TRANSPORT Located at the far right side of the S...

Page 23: ...number takes priority For example Zone 1 takes priority over Zone 2 so Zone 1 s range shows on the LEDs overriding the LEDs of Zone two where there is an overlap Entering Zones view In Zone s view yo...

Page 24: ...ttings You can also apply an Offset to the selected Zone with the Octave and Transpose parameters By default the Offset values are 0 and both Follow settings are On Turn the knobs above the Follow set...

Page 25: ...soft buttons below the screen to scroll through session colours Once you have found your preferred colour either press the Save button again to save in place or select a different session pad to save...

Page 26: ...ew on playing keys either dimly or brightly lit guarantees you are playing notes within your chosen scale Scale Settings Pressing the Scale button brings the Scale Settings onto the screens Root Note...

Page 27: ...follows Snap Notes outside the scale snap up or down to the nearest scale note Filter Notes not in the scale don t play i e not snapped to a correct note Display Only Notes not in the scale pass unmod...

Page 28: ...SL MkIII Weight Metric Imperial 5 56kg 12 26lbs 6 54kg 14 42lbs Dimensions Width 817mm 32 12 981mm 38 62 Height 100mm 3 937 100mm 3 937 Depth 300mm 11 81 300mm 11 81 COMPONENTS Novation Components is...

Page 29: ...s Yes Yes N A Yes Mute Track Yes Yes Yes Yes N A Yes Solo Track Yes Yes Yes Yes N A Yes Arm Track Yes Yes Yes Yes N A Yes Transport Controls Rewind Yes Yes No Yes Yes Yes Fast Forward Yes Yes No Yes Y...

Page 30: ...se the page up down buttons next to the screens to access send groups A through E Transport Control The Transport buttons control the equivalent functions in each DAW The function of each button depen...

Page 31: ...rol surface mode to HUI partial and set the input and output port to Focusrite A E Novation SL MkIII SL MkIII InControl as shown below Cubase To set the SL MkIII up as a HUI control surface in Cubase...

Page 32: ...ction ring is a visual aid you can move beyond its scope by pressing the right left Track buttons The selection ring moves to include the newly selected track The selection ring can only contain eight...

Page 33: ...above the faders allow you to change the state of your tracks quickly The button labels show on the rightmost screen the current function of the soft buttons Grid Pressing Grid changes the pads to a...

Page 34: ...ers Displaying and Editing Pan and Send Controls After pressing the Options button select the yellow Pan button to access the pan controls for the eight tracks within the selection ring The green soft...

Page 35: ...sends press the Options button followed by Sends The eight knobs will then control Bus levels in Logic Press the up and down arrows to the left of the screens to change the selected send You can contr...

Page 36: ...Players Active knobs display on the screens with their parameter name and value Pads These control parameters in Reason When using the Kong Drum Designer Instrument pads select Kong s drum sounds The...

Page 37: ...sc1 Level will appear on the fifth screen along with a decibel value Transport buttons These buttons on the far right of the SL MkIII control Reason s transport including Rewind Fast Forward Stop Play...

Page 38: ...nor the names of other contributors to this software may be used to endorse or promote products derived from this software or part thereof without specific written permission 4 This software or any p...

Page 39: ......

Reviews: