background image

17 

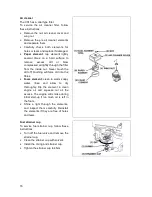
Spark plug 
To  service  the  spark  plug,  follow  these 

instructions: 

  Visually  inspect  the  spark  plug. 

Discard  the  plug  if  the  insulator  is 
cracked or chipped. 

  Remove carbon or other deposits with 

a stiff wire brush. 

  Measure the plug gap with a wire-type 

feeler  gauge.  If  necessary,  adjust  the 
gap by bending the side electrode. 

  Make  sure  the  sealing  washer  is  in 

good  condition;  replace  the  plug  if 
necessary. 


  Install the plug fingertight to seat the washer, then tighten with a plug wrench (an additional 

½ turn if a new plug) to compress the sealing washer. If you are reusing a plug, tighten 1/8-
1/4 turn after the plug seats. 


Fuel line 
To  service  the  fuel  line,  follow  these 
instructions: 

  Drain the fuel into a suitable container, 

and remove the fuel tank. 

  Disconnect  the  fuel  line,  and  unscrew 

the fuel filter from the tank. 

  Clean  the  filter  with  solvent,  and 

check,  that  the  filter  screen  is 
undamaged. 

  Place  the  O-ring  on  the  filter  and 

reinstall.  Tighten  the  filter  to  2N.m. 
After reassembly, check for fuel leaks. 


Further maintenance 
For further maintenance, please contact the nearest engine maintenance centre.  

Summary of Contents for Clipper CS1 P13

Page 1: ...CS1 P13 OPERATING INSTRUCTIONS...

Page 2: ...2...

Page 3: ...HONDA Cyclonic 70184624214 CS1 P13 HONDA Cyclonic 500 70184629389 is in conformity with the following Directives European Machinery Directive 2006 42 EC Electromagnetic Compatibility Directive 2004 1...

Page 4: ...4...

Page 5: ...g 10 3 1 Tool assembly 10 3 2 Water cooling system 10 3 3 Starting the machine 11 4 Transport and Storing 12 4 1 Securing for transport 12 4 2 Transport procedure 12 4 3 Long period of inactivity 12 5...

Page 6: ...shall be borne entirely by the user Observing the operating instructions and compliance with inspection and servicing requirements shall also be considered as included under use in accordance with the...

Page 7: ...specified Processes No 8 of the Protection of Eyes Regulation 1974 Regulation 2 2 Part 1 For security reasons never leave the machine unattended untied or unlocked While the engine is running Do not m...

Page 8: ...ons Being of small construction it can be transported in a car or van The water container is enclosed in the frame All component parts on the CS1 are assembled to a high quality standard ensuring long...

Page 9: ...the machine in case of danger The water cooling system 8 is composed of a 70 litres water tank a water tank tap and two water nozzles on the blade guard ensuring adequate flow of water to both sides o...

Page 10: ...ge with the 36mm wrench Remove the outer flange Clean the flanges and blade shaft and inspect for wear Mount the blade on the shaft ensuring that direction of rotation is correct Wrong direction of ro...

Page 11: ...e emergency switch on the board of the machine is in the correct position Pull the starter grip lightly until you feel resistance then pull briskly CAUTION Do not allow the starter grip to snap back a...

Page 12: ...heel 4 2 Transport procedure The machine can be moved on a flat surface using its wheels Use the metal hook located on the board of the machine over the motor to move the machine with a crane 4 3 Long...

Page 13: ...acturer depending on the material to be worked the working procedure dry or wet cut to be carried out and the efficiency required Make sure that the flanges securely hold the diamond blade Make sure t...

Page 14: ...Adjustment and replacement of the belts After one hour of work the belts heat and stretch Therefore you have to re tension them To adjust the belts firstly remove the belt guard by unscrewing the 2 n...

Page 15: ...ssary Every 2 years Engine oil To change the oil Remove the oil filler cap dipstick and drain bolt Allow the oil to drain completely Dispose of used motor oil in a manner that is compatible with the e...

Page 16: ...ever brush the dirt off brushing will force dirt into the fibres Foam element clean in warm soapy water rinse and allow to dry thoroughly Dip the element in clean engine oil and squeeze out all the ex...

Page 17: ...er then tighten with a plug wrench an additional turn if a new plug to compress the sealing washer If you are reusing a plug tighten 1 8 1 4 turn after the plug seats Fuel line To service the fuel lin...

Page 18: ...mber 7 digits The code of the part The exact denomination The number of parts required The delivery address Please indicate clearly the means of transportation required such as express or by air Witho...

Page 19: ...Saint Gobain Abrasives KFT Banyaleg Utca 60B H 1225 BUDAPEST Tel 36 1 371 2250 Fax 36 1 371 2255 e mail nortonbp axelero hu Czech Republic Norton Diamantove Nastroje Sro Vinohrdadska 184 CS 13000 PRA...

Page 20: ...20 SAINT GOBAIN ABRASIVES 190 Bd J F Kennedy L 4930 BASCHARAGE LUXEMBOURG Tel 352 50401 1 Fax 352 501633 e mail sales nlx saint gobain com www construction norton eu 10 12 2008...

Reviews: