background image

About Your Grinder 


Thank you for purchasing or renting your NorthStar grinder! 


Owner/Operator/Renter Training 


Read and follow all instructions and safety precautions presented throughout this manual.  A summary of 
important safety information can be found at the end of the manual.  Keep this manual for reference and 
review.

  If the owner of this unit is different than the operator, give a copy of this manual to any 

operator to read. 
 

Rental Companies 

All persons to whom you rent/loan this grinder must have access to this manual and read it.

 Check the 

tube on the side of the unit to make sure a manual is inside.  Advise all persons who will operate the 
machine to read it.  You should also provide personal instruction on how to safely operate the grinder and 
remain available to answer any questions a renter/borrower might have.  If videos are available, have 
renter watch training video.   


Engine Instructions 

For detailed Engine operation and maintenance information, always refer to the engine Owner's Manual 
furnished with the grinder. 


Product Suitability 

Before using, the user shall determine the suitability of this product for this intended use and assumes 
liability therein. 


Your NorthStar grinder can be used to remove many tree stumps and exposed root systems close to 
ground level.  By moving the blade in sweeping movements laterally over the top and front of the stump, 
you can gradually grind it away.  Make sure you completely read and understand this manual before using 
the grinder for the first time.  If you have any questions, contact your retail or rental dealer or NorthStar 
Product Support at 1-800-270-0810. 


WARNING:  Never attempt to cut on a slope exceeding 15

Exercise caution when cutting stumps on an incline, as the machine may shift or slide unpredictably.  Never 
attempt to cut with the machine uphill or downhill from you as it may slide toward you or you may fall 
toward the machine.  Cut only on a slope from the side. 

˙ 


NorthStar is constantly improving its products.  The specifications outlined herein are subject to change 
without prior notice or obligation.  The purchaser and/or user shall assume liability for any modification 
and/or alterations of this equipment from original design and manufacture.  


Contact NorthStar Product Support at 1-800-270-0810 for any questions about the appropriate use 
of this grinder or about optional accessories. 


Warranty Registration


Please fill out and submit the warranty registration card so that we have your contact information for any 
future product literature or replacement parts you may need. 


Summary of Contents for M296026C

Page 1: ...ye protection and other personal protection against flying rocks and debris Check that cutter wheel teeth are secured sharp and not missing Do not operate if operator presence bar fails to stop engine upon release Make sure no children or bystanders are within 75 feet of stump grinding operation Protect cars windows and other objects within 75 feet from flying debris Be prepared for machine kickba...

Page 2: ...Hazard Signal Word Definitions 2 ...

Page 3: ...ing the Engine 13 4 Grinding the Stump 14 5 Refueling 15 6 Storing the Machine 16 Part III Maintenance and Repair Maintenance To be done by owner or Rental Dealer 18 1 Belt Tension Adjustment 20 2 Stop Switch Adjustment 21 3 Installing Teeth 21 4 Schedule 23 Specifications 25 Part IV Important Safety Information Summary of Important Safety Information 26 Special Safety Information on Static Electr...

Page 4: ...n Your NorthStar grinder can be used to remove many tree stumps and exposed root systems close to ground level By moving the blade in sweeping movements laterally over the top and front of the stump you can gradually grind it away Make sure you completely read and understand this manual before using the grinder for the first time If you have any questions contact your retail or rental dealer or No...

Page 5: ... Poisonous Gas Hazard 4 Flying Debris Hazard direction 5 Personal Injury Fire Explosion Entanglement Hazards 6 Flying Debris Hazard person 7 Amputation and Entanglement Hazard 8 Brake Lever WARNING ALWAYS make sure safety labels are in place and in good condition If a safety label is missing or not legible order new labels ...

Page 6: ...Safety Decals 6 To order replacement safety labels call NorthStar Product Support at 1 800 270 0810 2 1 3 5 7 6 4 8 ...

Page 7: ...ending on your unit and model it may have been shipped on a wooden skid cardboard container or other appropriate method If any assembly is required Separate assembly instructions will be included New Unit From a Dealer Your unit should have been delivered completely assembled and ready to run Read the Pre Start Checklist Procedures section and verify that the unit has been properly prepped before ...

Page 8: ...ion 1 Throttle Lever 2 Handle Grip 3 Operator Presence Bar 4 Manual Storage 5 Brake Lever 6 T Handle Knob 7 Engine 8 Starter Grip 9 Tire and Hub 10 Engine On Off Switch 11 Discharge Flap 12 Belt Guard 13 Cutter Guard 14 Cutter Wheel Disc 15 Cutting Tooth ...

Page 9: ...all 811 or your local utility company to request marking utilities 3 days before stump grinding Trees can grow on top of and around underground wiring that was installed many years before a tree was planted Check controls Check that All guards are in place and tight Operator presence bar switch is free moving Inspect tires and rims for looseness damage and tire inflation Check cutting teeth Inspec...

Page 10: ...haust open flames including pilot lights Inspect Fuel System Check for Leaks Inspect fuel system check for leaks BEFORE starting grinder WARNING Fuel leak hazard A leaking fuel line no matter how small can be the source of a fire or explosion when starting or operating the engine Inspect the entire fuel system Look for Signs of leaks or deterioration chafed or spongy fuel hose loose connections lo...

Page 11: ...his grinder 3 Wear long pants to protect legs from sparks hot engine and flying debris 4 Never wear jewelry or loose fitting clothing when starting or operating the grinder or any mechanical device Loose or dangling apparel jewelry or hair can become entangled in moving parts Trim Stump with Saw Cut or trim the stump preferably to ground level using a power saw Clear Area Dig away the earth and re...

Page 12: ...controls Never leave grinder unattended 4 For cold engine move choke lever to the CLOSED position To restart a warm engine leave choke lever in OPEN position 5 Turn engine switch to the ON position 6 Grip operator presence bar and handle bar together in left hand WARNING A rotating cutting wheel is very dangerous Stay at the controls and keep others away until you are sure the blade has come to a ...

Page 13: ...e cutter wheel so it is resting against the ground 2 Make sure brake is set before leaving the controls particularly if you are on an incline 3 Turn engine switch to OFF position 4 Allow the engine to cool for at least 5 minutes before releasing brake and moving to storage or transporting A hot engine can be a fire hazard Operator presence bar Brake lever Cutting wheel Brake lever Throttle lever O...

Page 14: ...e pushing too hard If you can t swing it to the side raise the grinder up You can cut roots off by plunging straight through them WARNING Rotating cutter wheel Keep hands and feet away Contact with wheel rotating teeth will cause serious personal injury Chip Build up 3 When grinding larger stumps chips may begin to build up under the wheels 4 Release brake and pull machine towards you so that the ...

Page 15: ...oline to the grinder s tank Be aware of safety warning and instructions below for avoiding static electric caused fires Do not overfill WARNING Static electric spark hazard A static electric spark can explosively ignite gasoline vapor resulting in a flash fire that could cause serious injury or death See Special Safety Information on Static Electricity at end of this manual 4 Clean up gasoline spi...

Page 16: ...ll a portable gas container while it is sitting inside a vehicle trailer trunk or pick up truck bed ALWAYS place container on the ground to be filled Keep nozzle in contact with container while filling Do not use a nozzle lock open device 6 Storing the Machine When you are finished using the grinder and it has cooled you must Cool engine before storage Clean the grinder Inspect for worn or damaged...

Page 17: ...to prevent gum deposits from forming and causing malfunction of the engine Prepare engine for long term storage by o Removing all gasoline from the tank and carburetor OR o Adding fuel stabilizer to the gasoline following manufacturer s instructions Fuel stabilizer steps 1 Ensure gas tank is full 2 Add fuel stabilizer to fuel tank 3 Run engine at least 10 minutes after adding stabilizer to allow i...

Page 18: ... Repair Major service including the installation or replacement of parts should be performed only by a qualified electrical service technician Obtain factory approved parts from NorthStar Product Support at 1 800 270 0810 Replacement parts If a part needs replacement only use factory approved repair parts Replacement parts that do not meet specifications may result in a safety hazard or poor opera...

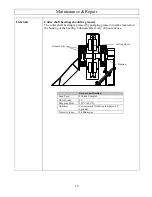
Page 19: ...by pumping grease into zerks located on the housing of the bearing Lubricate after every 20 hours of use Grease Specification Soap Type Lithium Complex NLGI Grade 2 Dropping Point 230 C 446 F Additives Corrosion and Oxidation inhibitors EP optional Viscosity Index 80 Minimum Grease zerks Cutting wheel Bearing ...

Page 20: ...u may need to adjust the alignment bolt This bolt will serve as an adjustment point to counter the tension in the belts which may cause the engine pulley to be misaligned with the cutter wheel pulley Note Set screws in pulley have a torque specification of 14 ft lbs 6 Belt tension is proper when a 5 to 7lbs force will deflect the belt 1 4 at the midpoint 7 Retighten all loosened nuts and bolts 8 R...

Page 21: ...r and smoother and can withstand heat better Though carbide is tremendously hard it is also reasonably brittle Sharpen the teeth before excessive wear or if a chip is noticed Less material will have to be removed and the teeth will last longer with more frequent sharpenings WARNING Carbide dust is harmful if inhaled A respirator and safety glasses must be worn while sharpening Grinding Equipment E...

Page 22: ...el 5 Although the angle is not critical always grind the tooth so that there is a relief under the carbide edge 6 The tooth may be ground until the carbide until the carbide has approximately 3 16 remaining Installing Teeth 1 When installing teeth on the cutting wheel be sure that all teeth are extended an equal length beyond the wheel A tooth gauge part 793190 has been provided with the grinder f...

Page 23: ...p grinders are equipped with reversible pockets When reversing pockets position them in the same exact location This will ensure the cutter wheel will remain in balance Use only pockets and teeth recommended by NorthStar Position 1 4 3 2 ...

Page 24: ...ion Tension X Bolts Tightness X Engine See manual Gasoline Amount X Safety Switches Operation X Warning Decals Legible X Tires Flaps Condition X Wires Cables Condition X Cutter Teeth Sharpness X IMPORTANT If a part needs replacement only use parts that meet the manufacturer s specifications Replacement parts that do not meet specifications may result in a safety hazard or poor operation of the gri...

Page 25: ...e Starting Recoil Oil Sensor Yes CUTTER WHEEL Diameter 9 6 24 4 cm Thickness 3 8 95 cm Bearings Dia 2 1 2 5 cm Teeth Pockets Reversible Teeth 4 Carbide tips Cutter Wheel RPM 4700 RPM Drive Direct Belt Drive AX37 Gates belt Centrifugal Clutch CUTTING CAPACITY Above Grade 10 25 cm Below Grade 9 23 cm Stump Diameter No Limit GROUND TRAVEL Transportation Push Pull Type Non towable Drive Wheel Hub 12 5...

Page 26: ...e and it s controls safely Understand and follow all safety labels Weather Never use in foul bad or questionable weather which causes a slippery ground condition Prohibition Against Modifications Never modify or alter the grinder in any way Modifications can create serious safety hazards and will also void the warranty Fuel exhaust system Never modify the exhaust system fuel tanks or fuel lines Ca...

Page 27: ...at flame or sparks away while adding fuel Don t fill to the top DO NOT overfill the gas tank Allow at least 1 of empty space below the fill neck to allow for fuel expansion and operation on slopes Don t fill to the top Do not fill the gas tank to the top Gasoline may spill when operating on a slope Replace cap Replace gas cap securely before starting engine Spills Clean up fuel spills immediately ...

Page 28: ... before storing Let engine cool for at least five minutes before storing A hot engine can be a fire hazard Shut off fuel supply Make sure gasoline shut off valve is in the OFF position Prevent accidental starting When grinder is not in use remove key from starter electric start engines and secure in a safe location or remove spark plug in order to ensure that grinder cannot be started in a storage...

Page 29: ... Objects made of non conductive materials e g plastics easily accumulate and retain static electric charge as can objects made of conductive material e g metal water if they are not electrically grounded The static electric charge on an object such as a human body or plastic fuel tank container can reach as high as several thousand volts A static electric spark can be generated if the static elect...

Page 30: ...M296026 Exploded View Rev C 30 ...

Page 31: ...asher 1 19 785907 Screw exhaust deflector 2 58 786639 Brake pin 1 20 786549 Exhaust deflector 1 59 786780 3 16 x 1 2 clevis pin 1 21 60590 GX160 Honda engine 1 60 786781 Hitch pin clip 1 22 82017 5 16 18 x 1 1 2 HHSF 4 61 783539 5 8 x 2 spring 1 23 82019 5 16 18 Flange Nut 10 62 82100 15 16 split lock washer 9 24 786081 Rear rubber flap 1 63 786920 Hinge bracket right 1 25 790114 Belt guard flat 1...

Page 32: ...Wiring Diagram 32 ...

Page 33: ... such as engines are guaranteed by their manufacturer and can be serviced at factory authorized locations near you Any costs incurred due to replacement or repair of items outside of a NorthStar approved facility is the responsibility of the buyer and not covered under warranty NorthStar can supply you with the service center location in your area This warranty specifically excludes the following ...

Page 34: ...34 Manufactured by Northern Tool Equipment Co Inc 2800 Southcross Drive West P O Box 1499 Burnsville MN 55337 0499 Made in the USA ...

Reviews: