background image

IP4AFDIR100 IP Dome Camera 

· 

Quick Start Guide


32 

32 

Service”

“Privacy Policy”


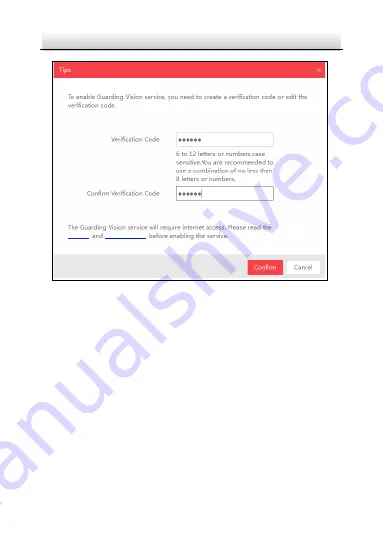
Verification Code Setting (SADP) 

Figure 5-1

Note:   

The verification code is required when you add the camera to 
Guarding Vision app.   

3.


Click and read "Terms of Service" and "Privacy Policy".   

4.


Confirm the settings. 


Enable Guarding Vision via Web Browser 

5.1.2

Before you start: 

You need to activate the camera before enabling the service. Refer to 
Chapter 3.2. 

Summary of Contents for IP4AFDIR100

Page 1: ...Rev 061218 3625 Cincinnati Avenue Rocklin CA 95765 855 388 7422 www northernvideo com Installation Quick Setup Guide IP4AFDIR100 4 0 Megapixel IP True WDR Auto Focus Outdoor IR Dome Camera...

Page 2: ...CT WITH INTERNET ACCESS THE USE OF PRODUCT SHALL BE WHOLLY AT YOUR OWN RISKS OUR COMPANY SHALL NOT TAKE ANY RESPONSIBILITES FOR ABNORMAL OPERATION PRIVACY LEAKAGE OR OTHER DAMAGES RESULTING FROM CYBER...

Page 3: ...no guarantee that interference will not occur in a particular installation If this equipment does cause harmful interference to radio or television reception which can be determined by turning the equ...

Page 4: ...contains a battery that cannot be disposed of as unsorted municipal waste in the European Union See the product documentation for specific battery information The battery is marked with this symbol wh...

Page 5: ...with the electrical safety regulations of the nation and region Please refer to technical specifications for detailed information Input voltage should meet both the SELV Safety Extra Low Voltage and t...

Page 6: ...gers If cleaning is necessary use clean cloth with a bit of ethanol and wipe it gently If the camera will not be used for an extended period please replace the lens cap to protect the sensor from dirt...

Page 7: ...ile in shipping the camera shall be packed in its original packing or packing of the same quality If the product does not work properly please contact tech support at 855 388 7422 or techsupport north...

Page 8: ...ra over the LAN 22 Wiring 22 3 1 Activating the Camera 23 3 2 3 2 1 Activation via Web Browser 23 Activation via SADP Software 24 3 2 2 Modifying the IP Address 26 3 3 4 Accessing via Web Browser 29 5...

Page 9: ...IP4AFDIR100 IP Dome Camera Quick Start Guide 8 1 Appearance Description The overview of the network dome camera is shown below 1 2 3 4 5 6 7 8 12 9 10 11 Figure 1 1 Overview of Dome Camera...

Page 10: ...nput output 9 Lens 4 RJ45 Ethernet port PoE 10 Reset button 5 Power interface 12 VDC 11 Memory card slot 6 Video Out BNC 12 Grounding screw Notes Reset button operation Press Reset button for about 10...

Page 11: ...camera that supports IR you are required to pay attention to the following precautions to prevent IR reflection Dust or grease on the dome cover will cause IR reflection Please do not remove the dome...

Page 12: ...ory card slot cover Cover Memory Card Install Memory Card Figure 2 1 2 Insert the memory card into the memory card slot and push to get it mounted 3 Optional To unmount the memory card push to eject i...

Page 13: ...Start Guide 12 Steps 1 Lift the camera body to separate the junction box and the adapter plate 2 Separate the junction box and the adapter plate 3 Unscrew the bubble Bubble Junction Box Adapter Plate...

Page 14: ...g through the ceiling and through side outlet Through the ceiling you should cut a hole in ceiling and route the cables in advance Through side outlet you choose to route cables with or without a cond...

Page 15: ...plied Connect the Conduit Joint to Conduit Figure 2 4 2 Fit the adapter plate into the conduit joint Install the Conduit Figure 2 5 3 Secure the adapter plate to the ceiling with four supplied screws...

Page 16: ...read cables through the sealing plugs Note For RJ45 network interface use supplied cable routing tool Cable Routing Tool Sealing Plug Route RJ45 Network Interface through Sealing Plug Figure 2 6 Junct...

Page 17: ...ks on junction box and adapter plate Secure the junction box to adapter plate with three screws Safety Rope Install Junction Box Figure 2 8 6 Hang the camera body on the safety rope 7 Connect the cabl...

Page 18: ...7 8 Fix the camera body to the junction box with three screws Fix the Camera Body Figure 2 10 9 Adjust surveillance angle 1 Use supplied BNC video out cable to connect the camera to a monitor Power on...

Page 19: ...a Quick Start Guide 18 Video Out BNC To Monitor Connect Video Out Figure 2 11 2 Hold the lens to adjust the panning tilting and rotating position Pan 0 to 355 Rotate 0 to 355 Tilt 0 to 75 Adjust Surve...

Page 20: ...ing bracket shown below is only for demonstration Note When choosing a wall mounting bracket you must pay attention to the size of the cap which should match the adapter plate of the camera See Figure...

Page 21: ...nt Mounting Before you start Pendant mounting bracket is not included in package If you choose this mounting type you have to prepare a bracket first The pendant mounting bracket shown below is only f...

Page 22: ...t Figure 2 15 3 Align the screw holes of the adapter plate with the correspondent screw holes of the cap 4 Route the cables through the cable hole on adapter plate and secure the adapter plate to the...

Page 23: ...etwork attacks and information leakage please strengthen your own protection If the product does not work properly contact your dealer or the nearest service center for help Wiring 3 1 Connect the cam...

Page 24: ...camera activation Note Refer to the User Manual of Network Camera for Activation via Client Software 3 2 1 Activation via Web Browser Steps 1 Power on the camera Connect the camera to your computer o...

Page 25: ...e letters lower case letters numbers and special characters in order to increase the security of your product And we recommend you reset your password regularly especially in the high security system...

Page 26: ...1 Run the SADP software to search the online devices 2 Check the device status from the device list and select the inactive device SADP Interface Figure 3 4 Note The SADP software supports activating...

Page 27: ...he device during activation Refer to Chapter 5 1 for detailed information 4 Click Activate to start activation You can check whether the activation is completed on the popup window If activation faile...

Page 28: ...27 Steps 1 Run the SADP software 2 Select an active device 3 Change the device IP address to the same subnet with your computer by either modifying the IP address manually or checking the checkbox of...

Page 29: ...ision service for the device during activation Refer to Chapter 5 1 for detailed information 4 Input the admin password and click Modify to activate your IP address modification The batch IP address m...

Page 30: ...n Steps 1 Open the web browser 2 In the browser address bar input the IP address of the network camera and press the Enter key to enter the login interface Note The default IP address is 192 168 1 64...

Page 31: ...llow the installation prompts to install the plug in Note You may have to close the web browser to finish the installation of the plug in Download Plug in Figure 4 2 6 Reopen the web browser after the...

Page 32: ...e Guarding Vision on Camera 5 1 Purpose Guarding Vision service should be enabled on your camera before using the service You can enable the service through SADP software or web browser Enable Guardin...

Page 33: ...5 1 Note The verification code is required when you add the camera to Guarding Vision app 3 Click and read Terms of Service and Privacy Policy 4 Confirm the settings Enable Guarding Vision via Web Bro...

Page 34: ...uarding Vision dev guardingvision com Platform Access Configuration Web Figure 5 2 3 Select Platform Access Mode as Guarding Vision 4 Check the checkbox of Enable 5 Click and read Terms of Service and...

Page 35: ...Vision Before you start You need to enable the Guarding Vision service on camera before adding it to your Guarding Vision account Refer to Chapter 5 1 Steps 1 Use a network cable to connect the camer...

Page 36: ...camera s serial number 3 Input the verification code of your camera Note The required verification code is the code you create or change when you enabling Guarding Vision service on camera If you forg...

Page 37: ...the memory card status by tapping on the Storage Status in the Device Settings interface If the memory card status displays as Uninitialized tap to initialize it The status will then change to Normal...

Reviews: