GB
19
Self-closing hatch
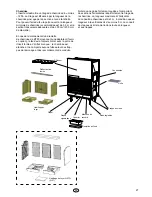
The insert can be supplied with a self-closing hatch. First open the hatch according to section “Cleaning the hatch
glass”, then remove the four screws to release the Upper member. Remove the two screws that hold the spring
assembly, install the weight to the upper member and reinstall the spring assembly in the upper screw holes.
Reinstall the Upper member using the four screws. The insert can now be supplied with the self-closing hatch.
Installing removable parts
Removing the hatch from the insert facilitates the
installation of the hearth surround on the Q-30FL. If the
insert is recessed, removal of the hatch is made easier
if the damper knob is removed. After the catches have
been opened the hatch will fall forward to a limit
position. Now lift the hatch and at the same time move
it to the left so that the right side releases from its
mounting, then tilt the hatch out. Assembly takes place
in the reverse order.
Assembly of the Thermotte plates
See separate manual
2
1
Spring assembly
Weight
Upper member
Summary of Contents for Q-27FL
Page 89: ......
Page 90: ......
Page 91: ......
Page 92: ...Nordpeis AS Gjellebekkstubben 9 11 N 3420 LIERSKOGEN Norway www nordpeis no ...


