background image


Then press MODE again to leave the menu options.


11

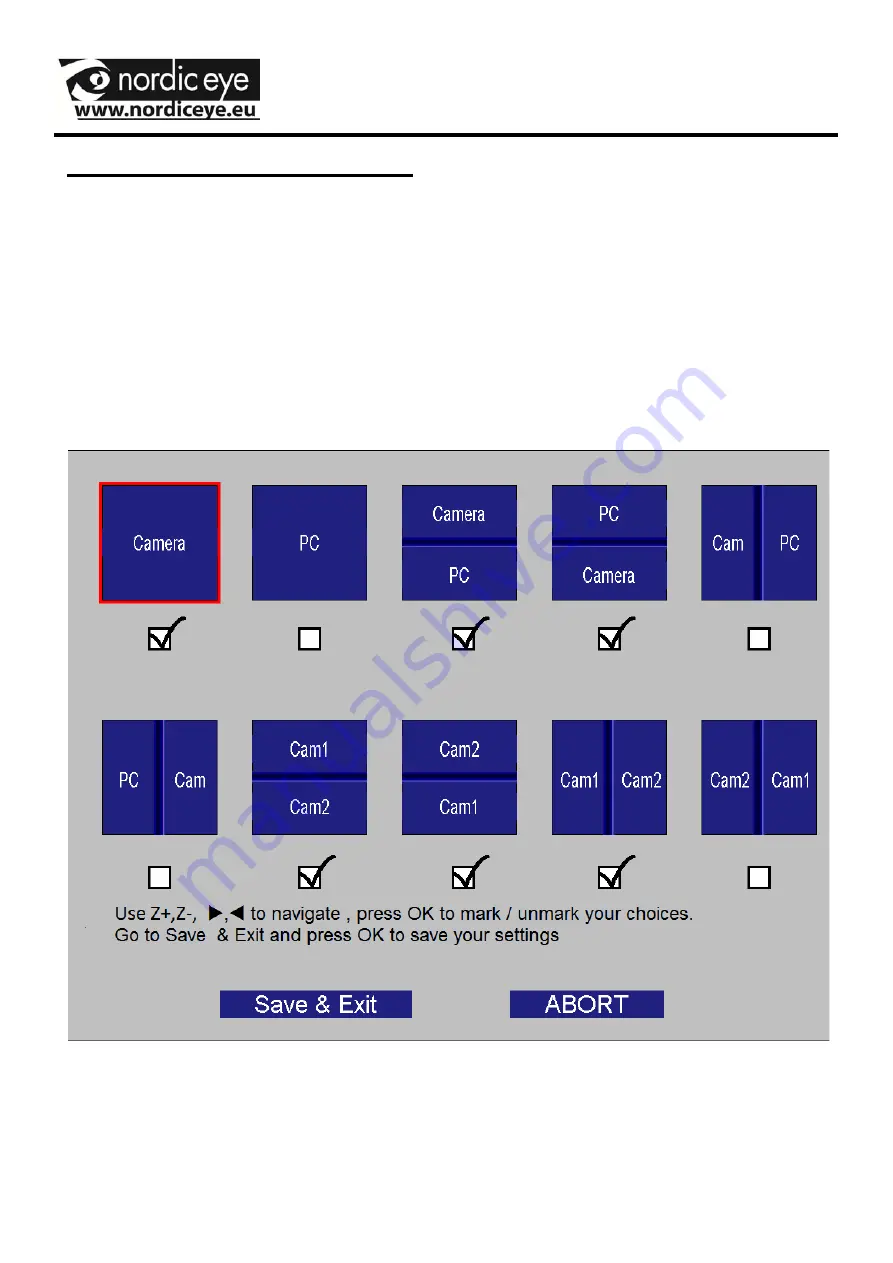
Settings , split camera / PC 

When a PC is connected to the camera system there is a 
choice in the menu to choose what positions that should be 
visible when pressing the MODE button. Press MODE button 
for 5 sec, move in the menu by pressing Z+ or Z-. Go to the 
alternative “split choice” and press OK. 

The following Picture appears on the screen. 


Summary of Contents for Contrast HD

Page 1: ...Nordic eye Contrast HD Nordiceye Contrast V11115 1 ...

Page 2: ...ng aid we hope this will help you in your everyday life Contents Introduction page 2 System information page 3 Unpacking and assembly page 4 Functions and setting page 10 Safety information page 14 Maintenance page 15 Technical data page 17 1 ...

Page 3: ...ns such as Autofocus many false color options High contrast mode can be mixed with PC and also with Distance camera if needed To a Contrast it is possible to choose any monitor that has a DVI VGA or HDMI input When connecting to VGA monitor an adapter is needed Included also when using a monitor with HDMI an adapter is needed Not included 2 ...

Page 4: ...embled to suit different people with different needs or length Accessories To Contrast there is a lot of options to make the everyday life better arms for monitors table etc Contact your supplier Warranty Contrast delivered with 3 years warranty TCO To Contrast we suggest to use monitors that have the TCO 03 labeling This labeling tells about the radiation More information about TCO can be found a...

Page 5: ...Part Name Part No Camera unit 40110010 Remote control 9540003 Powersupply 9540002 Contrast is delivered with the following items 4 Unpacking and assembly ...

Page 6: ...s and adapters At arrival check that the box has no visible damage If so report to transport company Packaging Packing Materials EPP Carton CORRUGATED PAPER Wrap around bag LDPE4 Contact your community to recycle the packaging material in a proper way 5 ...

Page 7: ...the working table Preferable is a chair that can be adjusted in many ways The chair seat shall be adjusted so that the legs are in a angle and the feet shall be resting on the floor The Desk shall be in a height so that the underarms can rest horizontally The Monitor shall be in front of the eyes and a height and angle under eyesight Shade of daylight lights in roof windows can give reflexes into ...

Page 8: ...tion as the camera unit Connect the monitor cable from the monitor to the camera unit Connect the power cable from power supply to a power outlet and connect the dc cable from the power supply to power connector at the camera unit You can now start the system by pressing the button at the top of the camera unit ...

Page 9: ...Remote control 8 Functions and settings ...

Page 10: ...ce line or give split picture with PC or Mac if computer is connected Keep FUNC pressed for 5 sec and you can change how much of the Camera PC you would like to show do the adjustment with the Z or Z buttons and the X Wbuttons A quick press at FUNCwill leave this option If no PC or Mac is connected it will instead move the ref line 9 Keep the OK button pressed until a signal beeps and the actual m...

Page 11: ...m To navigate use Z Z W X To confirm a choice or function press OK To leave the menu press MODE again 3 of the menus are important for the daily using It is RefLine Split choice settings and False colors The other menus are mainly for service to qualified personnel 10 ...

Page 12: ...nnected to the camera system there is a choice in the menu to choose what positions that should be visible when pressing the MODE button Press MODE button for 5 sec move in the menu by pressing Z or Z Go to the alternative split choice and press OK The following Picture appears on the screen ...

Page 13: ...False colors At delivery the system has full color white on black and black on white as default mode Full color is always available The following color combinations can be stored to the mode button 12 ...

Page 14: ...or deactivate the refline When the ref line is activated it is also possible to change the lines position and ref line color Press the button Z or Z and the position will be changed To go back to the main menu press ok Reference line can be showed with or without PC All choices made through the menus will be stored to the unit 13 ...

Page 15: ...cted to Contrast sometimes adjustments needs to be done In cases where a blue o red tone is experienced change the settings from indoor to outdoor or Auto this is due to the cameras white balance and how the camera behave to surrounding light sun windows 14 ...

Page 16: ...Lever to the left XY table is locked in both X and Y direction Lever centered XY is locked in X direction Lever to the right free movement X Y 15 ...

Page 17: ...ll inform regarding when a distance camera is attached to the Contrast There are 2 different distance cameras Standard SD and High Definition HD The functions for the system are the same difference in format and performance In picture above the cable between camera pole and the contrast are not illustrated To the HD camera an extra power supply is needed 16 ...

Page 18: ...ble and tighten the table clamp Connect the cable to the pole of the distance camera and the other end to CAM2 on the Contrast If a HD distance camera is used connect the power supply to the pole Connect the joystick to JOY on the Contrast 17 ...

Page 19: ...between the 2 cameras when a computer is connected Zoom Increase or decrease magnification Memory Save Hold A B or C until a beep indicates that magnification and position is saved Recall Press A B or C camera will go to the stored posistion and magnification Other functions Press until a beep sounds A C Change Up Down to Down Up A B Change Left Right to Right Left B C Change light compensation wh...

Page 20: ... All parts that the equipment consists can be wiped with a damp cloth with mild soapy water or glass clean The equipment should be treated the same way as computer equipment If the product is reconditioned it should be reviewed Clean as above Contact the supplier or nordiceye directly Troubleshooting No picture Make sure the system is switched on and the power cord is in the socket Possibly check ...

Page 21: ...is at its maximum position it should not be overloaded so the product can tip over and cause injury When placing the product choose a stable table with at least 45 cm depth If no normal function can be set after troubleshooting turn power off and contact your local supplier Always turn the power off when not in use If in doubt always contact your supplier The unpacking of this product is enclosed ...

Page 22: ...rnment for details of where and how they can recycle in an environmentally manner Contact us Nordic eye AB Telefon 0470 72 98 88 Illervägen 15 Fax 0470 74 95 80 352 45 Växjö mail info nordiceye eu Sweden www nordiceye eu Register your product by sending a mail to info nordiceye eu 21 ...

Page 23: ...us Focus area 80 mm Free working distance under camera 280mm Resolution Depends on monitor Max 1920x1200 Frame rate 60 Hz Output DVI I Single link Effect 29 W Effect stand by 4 W Power 100 240 VAC Lightning LED Weight 4 5 Kg EMC Product is tested according to EMC immunity and emission 93 42 EEG 22 ...

Reviews: