background image


Montageanleitung 


N.º 

467_SERIE_MWZ_

AUFBAUANLEITUN

G_2009-03


467_SERIE_MWZ_AUFBAUANLEITUNG_2009-03


40/59  

TEC 


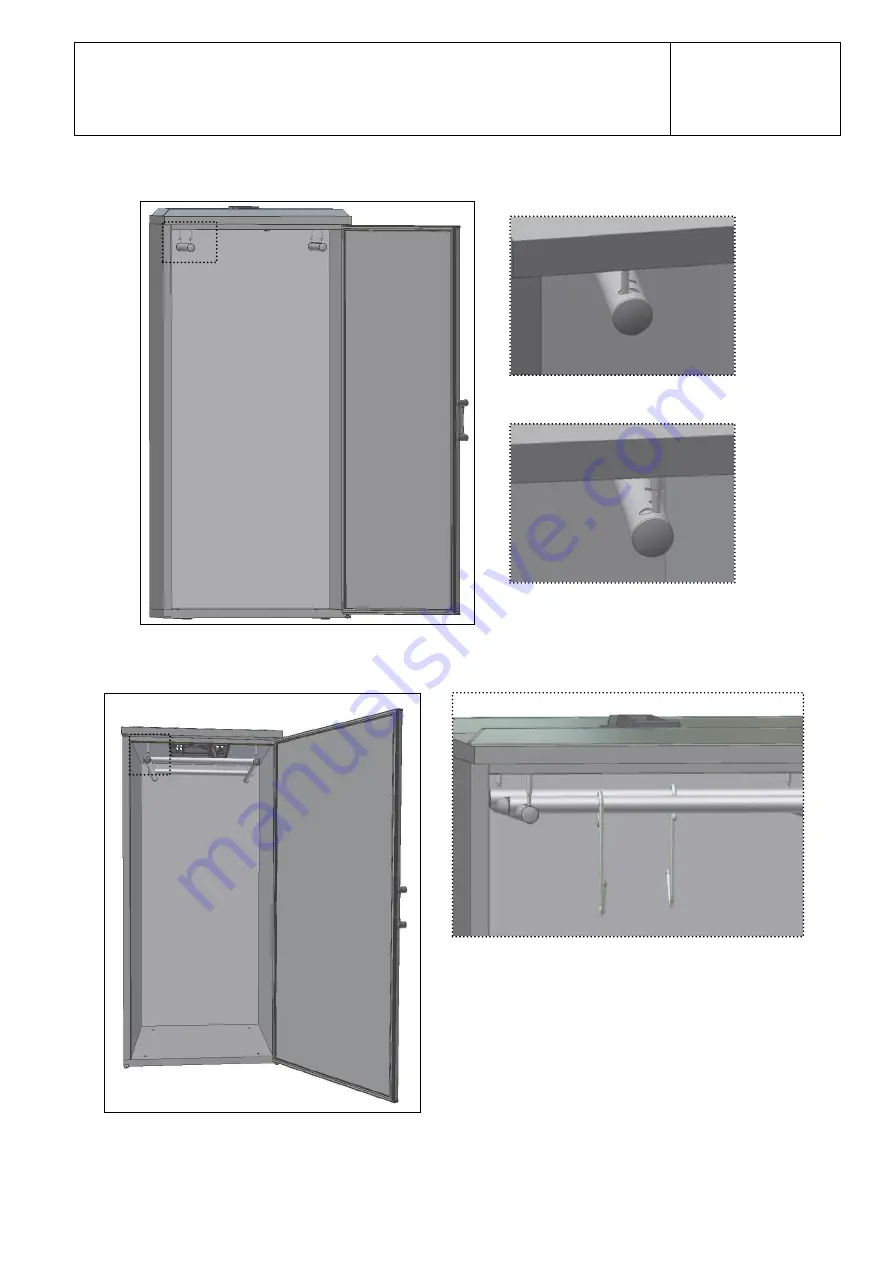
Stellen Sie 

die Seiterohren 

auf die Stabstahlstützen (A) und drehen Sie bis die endgültige Position (B) (Abb.13); 


Stellen Sie 

die horizontale Rohren

 auf die Seiterohren und stellen Sie die Haken, wo Sie den Wild aufhängen werden (Abb. 14); 


Abb. 14 


Abb. 13 

Summary of Contents for 46710404004-K

Page 1: ...Montage Montageanleitung Manuale di Montaggio Manual de Montaje 467_SERIE_MWZ_AUFBAUANLEITUNG_2009 03 TEC ARM RIO PARA CA A V4C WILD GAME CABINET V4C ARMOIRE POUR GRAND GIBIER V4C WILDK HLSCHRANK V4C...

Page 2: ...ontage Montageanleitung Manuale di Montaggio Manual de Montaje N 467_SERIE_MWZ_A UFBAUANLEITUNG_ 2009 03 467_SERIE_MWZ_AUFBAUANLEITUNG_2009 03 2 59 TEC PORTUGU S P G 3 ENGLISH PAGE 11 FRAN AIS PAGE 19...

Page 3: ...correspondem s especifica es da ordem de compra A instala o manuten o e outras interven es devem ser efectuadas por t cnicos especializados e autorizados O fabricante declina qualquer responsabilidad...

Page 4: ...a atendendo sempre s seguintes normas Regulamentos referentes constru o de edif cios e normas contra inc ndios Regras em vigor quanto preven o de acidentes Normas Europeias em vigor 4 Recomenda es ao...

Page 5: ...Manual de Montagem N 467_SERIE_MWZ_A UFBAUANLEITUNG_ 2009 03 467_SERIE_MWZ_AUFBAUANLEITUNG_2009 03 5 59 TEC...

Page 6: ...467_SERIE_MWZ_A UFBAUANLEITUNG_ 2009 03 467_SERIE_MWZ_AUFBAUANLEITUNG_2009 03 6 59 TEC Colocar painel do fundo sobre o piso e nivela lo Fig 2 Encaixar painel das costas sobre o painel do fundo e apert...

Page 7: ..._MWZ_AUFBAUANLEITUNG_2009 03 7 59 TEC Encaixar painel lateral esquerdo sobre o painel do fundo e apertar apenas ao fundo Fig 4 Encaixar painel lateral direito sobre o painel do fundo e apertar apenas...

Page 8: ...AUANLEITUNG_ 2009 03 467_SERIE_MWZ_AUFBAUANLEITUNG_2009 03 8 59 TEC Encaixar painel do tampo sobre os pain is laterais e painel da costa e apertar apenas costa Fig 7 Colocar casquilhos na parte inferi...

Page 9: ...ser montada a abrir para a esquerda ou para a direita Apertar restantes ganchos dos laterais e costas Para o aperto dos ganchos estando a trabalhar pelo lado de fora do arm rio deve proceder da seguin...

Page 10: ...Manual de Montagem N 467_SERIE_MWZ_A UFBAUANLEITUNG_ 2009 03 467_SERIE_MWZ_AUFBAUANLEITUNG_2009 03 10 59 TEC Ap s o aperto colocar tacos nos furos Fig 10...

Page 11: ...gem N 467_SERIE_MWZ_A UFBAUANLEITUNG_ 2009 03 467_SERIE_MWZ_AUFBAUANLEITUNG_2009 03 11 59 TEC Colocar tacos no fundo Fig 11 Encaixar as barras com suspens es nos orif cios pelo exterior do tampo Fig 1...

Page 12: ...03 467_SERIE_MWZ_AUFBAUANLEITUNG_2009 03 12 59 TEC Encaixar os tubos laterais nas suspens es A e rodar para a posi o definitiva B Fig 13 Encaixar os tubos transversais nos tubos laterais e colocar os...

Page 13: ...Manual de Montagem N 467_SERIE_MWZ_A UFBAUANLEITUNG_ 2009 03 467_SERIE_MWZ_AUFBAUANLEITUNG_2009 03 13 59 TEC...

Page 14: ...nsibility and will not cover the guarantee if these conditions are not respected This appliance must be used according to these instructions and only for the manufacturer s purpose The incorrect use o...

Page 15: ...ion European standards into effect 4 Recommendations for the User The STOCK cabinets have been designed to preserve food during short periods of time Children should be supervised to ensure that they...

Page 16: ...467_SERIE_MWZ_ AUFBAUANLEITUN G_2009 03 467_SERIE_MWZ_AUFBAUANLEITUNG_2009 03 16 59 TEC Put the panel of the bottom on the floor and level it Fig 2 Fix the back panel to the panel of the bottom and f...

Page 17: ...E_MWZ_AUFBAUANLEITUNG_2009 03 17 59 TEC Fix the left side panel to the panel of the bottom and fasten only the bottom Fig 4 Fix the right side panel to the panel of the bottom and fasten only the bott...

Page 18: ..._ AUFBAUANLEITUN G_2009 03 467_SERIE_MWZ_AUFBAUANLEITUNG_2009 03 18 59 TEC Fix the panel of the top on the side and back panels fasten only the back Fig 7 Insert the sleeves in the inferior and superi...

Page 19: ...d to the top Fig 9 Door with left or right opening Fasten the other hooks of side and back panels To fasten the hooks being outside the cabinet you must proceed as follows Turn the screwdriver like th...

Page 20: ...Assembly Instructions N 467_SERIE_MWZ_ AUFBAUANLEITUN G_2009 03 467_SERIE_MWZ_AUFBAUANLEITUNG_2009 03 20 59 TEC After fastening Insert the covers in the holes Fig 10...

Page 21: ...tions N 467_SERIE_MWZ_ AUFBAUANLEITUN G_2009 03 467_SERIE_MWZ_AUFBAUANLEITUNG_2009 03 21 59 TEC Insert covers in the bottom Fig 11 Fix the supports bars into the holes by the outside of the cover Fig...

Page 22: ...2009 03 467_SERIE_MWZ_AUFBAUANLEITUNG_2009 03 22 59 TEC Fix the side pipes into the supports A and turn it to the final position B Fig 13 Fix the cross pipes into the side pipes and place the hooks wh...

Page 23: ...Assembly Instructions N 467_SERIE_MWZ_ AUFBAUANLEITUN G_2009 03 467_SERIE_MWZ_AUFBAUANLEITUNG_2009 03 23 59 TEC...

Page 24: ...icant d cline toutes responsabilit s quand ces conditions ainsi que les pr cautions ci dessous ne sont pas respect es L appareil doit tre utilis selon ces instructions et seulement pour les fins indiq...

Page 25: ...op ennes 4 Recommandations l Utilisateur Les armoires de STOCKAGE ont t con ues pour la conservation des aliments pendant de courtes p riodes de temps Il faudrait supervisionner les enfants pour s ass...

Page 26: ...ge N 467_SERIE_MWZ_ AUFBAUANLEITUN G_2009 03 467_SERIE_MWZ_AUFBAUANLEITUNG_2009 03 26 59 TEC Mettre le panneau du fond par terre et le niveller Fig 2 Fixer le panneau arri re au panneau du fond et ser...

Page 27: ...E_MWZ_AUFBAUANLEITUNG_2009 03 27 59 TEC Fixer le panneau lat ral gauche au panneau du fond et serrer seulement le fond Fig 4 Fixer le panneau lat ral droit au panneau du fond et serrer seulement le fo...

Page 28: ...009 03 467_SERIE_MWZ_AUFBAUANLEITUNG_2009 03 28 59 TEC Fixer le panneau du plateau aux panneaux lat raux et au panneau arri re serrer seulement le panneau arri re Fig 7 Placer les manchons dans la par...

Page 29: ...verture gauche ou droite Serrer les restants crochets des lat raux et de l arri re Afin de serrer les crochets tant l ext rieur de l armoire proc der de la mani re suivante Tourner le tourne vis dans...

Page 30: ...TUN G_2009 03 467_SERIE_MWZ_AUFBAUANLEITUNG_2009 03 30 59 TEC Apr s avoir serr placer les caches dans les trous Fig 10 Placer les caches sur le fond Fig 11 Fixer les barres avec supports dans les trou...

Page 31: ...467_SERIE_MWZ_AUFBAUANLEITUNG_2009 03 31 59 TEC Fixer les tubes lat raux dans les supports A et tourner dans la position d finitive B Fig 13 Fixer les tubes transversaux dans les tubes lat raux et pla...

Page 32: ...Instructions de Montage N 467_SERIE_MWZ_ AUFBAUANLEITUN G_2009 03 467_SERIE_MWZ_AUFBAUANLEITUNG_2009 03 32 59 TEC...

Page 33: ...sgef hrt werden Falls diese Bedingungen nicht eingehalten werden kann der Hersteller seine Gew hrleistungspflicht nicht einhalten Dieses Ger t ist ausschlie lich und nur in der vom Hersteller beschrie...

Page 34: ...urzen Periodendauer Man sollte auf die Kinder aufpassen damit sichergestellt wird dass sie mit dem Ger t nicht spielen werden Um ein reibungsloses Funktionieren zu gew hrleisten sollten folgende Hinwe...

Page 35: ...E_MWZ_ AUFBAUANLEITUN G_2009 03 467_SERIE_MWZ_AUFBAUANLEITUNG_2009 03 35 59 TEC Stellen Sie die Bodenplatte auf eine gerade Unterfl che Abb 2 Stellen Sie die R ckwand auf die Bodenplatte und befestige...

Page 36: ...03 36 59 TEC Bringen Sie die linke Seitenwand auf der Bodenplatte in Position und befestigen Sie sie mit ihr Abb 4 Bringen Sie die rechte Seitenwand auf der Bodenplatte in Position und befestigen Sie...

Page 37: ...03 467_SERIE_MWZ_AUFBAUANLEITUNG_2009 03 37 59 TEC Bringen Sie die Abdeckplatte auf den Seitenw nden und der R ckwand in Position und befestigen Sie sie nur mit der R ckwand Abb 7 Stellen Sie die H ls...

Page 38: ...stigen Sie die brigen Haken der Seiten und R ckwand Die Befestigung der Haken wird wie folgt an den Au enseiten des Lagerschrankes vorgenommen Drehen Sie den Werkzeugschl ssel im Uhrzeigersinn bis zum...

Page 39: ...RIE_MWZ_ AUFBAUANLEITUN G_2009 03 467_SERIE_MWZ_AUFBAUANLEITUNG_2009 03 39 59 TEC Stellen Sie die kleine Abdeckung auf den Boden Abb 11 Durch die Au enseite stellen Sie die Stabstahlst tzen auf die Lo...

Page 40: ...BAUANLEITUNG_2009 03 40 59 TEC Stellen Sie die Seiterohren auf die Stabstahlst tzen A und drehen Sie bis die endg ltige Position B Abb 13 Stellen Sie die horizontale Rohren auf die Seiterohren und ste...

Page 41: ...utorizzati Il fabbricante declina qualsiasi responsabilit non essendo tenuto a coprire qualsiasi garanzia nel caso in cui queste condizioni non siano rispettate L apparechio deve essere utilizzato sec...

Page 42: ...igore sulla prevenzione di infortuni Norme europee in vigore 4 Raccomandazioni per l Utilizzatore Gli Armadi di Stocaggio sono stati concepiti per la conservazione dI prodotti alimentari per brevi per...

Page 43: ..._SERIE_MWZ_ AUFBAUANLEITUN G_2009 03 467_SERIE_MWZ_AUFBAUANLEITUNG_2009 03 43 59 TEC Colocare il pannello del fondo per terra e livellarlo Fig 2 Inserire il pannello del retro sul pannello del fondo e...

Page 44: ...UFBAUANLEITUNG_2009 03 44 59 TEC Inserire il pannello laterale sinistro sul pannello del fondo e fissare solo al fondo Fig 4 Inserire il pannello laterale destro sul pannello del fondo e fissare solo...

Page 45: ...G_2009 03 467_SERIE_MWZ_AUFBAUANLEITUNG_2009 03 45 59 TEC Inserire il pannello del coperchio sui pannelli laterali e sui pannelli del retro fissare solo al retro Fig 7 Collocare cuscinetti nella parte...

Page 46: ...g 9 Montare la porta in modo ad aprire a sinistra o a destra Fissare i ganci mancanti dei laterali e del retro Per fissare i ganci lavorando fuori del armadio procedere come segue Girare la chiave nel...

Page 47: ...TUN G_2009 03 467_SERIE_MWZ_AUFBAUANLEITUNG_2009 03 47 59 TEC Dopo fissare collocare i cappucci nei fuori Fig 10 Collocare i cappucci nel fondo Fig 11 Inserire le barre con supporti nei fuori dalla pa...

Page 48: ...03 467_SERIE_MWZ_AUFBAUANLEITUNG_2009 03 48 59 TEC Inserire i tubi laterali nei supporti A e girare nella posizione definitiva B Fig 13 Inserire i tubi transversali nei tubi laterali e collocare i ga...

Page 49: ...Manuale di Montaggio N 467_SERIE_MWZ_ AUFBAUANLEITUN G_2009 03 467_SERIE_MWZ_AUFBAUANLEITUNG_2009 03 49 59 TEC...

Page 50: ...icante declina cualquier responsabilidad y no se encuentra obligado a cubrir la garant a en el caso de que estas condiciones no hayan sido respetadas El aparato debe ser utilizado segundo esto manual...

Page 51: ...accidentes Normas Europeas en vigor 4 Recomendaciones al Utilizador Los Armarios de Stock fueron concebidos para la conservaci n de alimentos durante cortos per odos de tiempo Los ni os deben ser vig...

Page 52: ...SERIE_MWZ_A UFBAUANLEITUNG_ 2009 03 467_SERIE_MWZ_AUFBAUANLEITUNG_2009 03 52 59 TEC Colocar el panel del fondo en el suelo y nivelarlo Fig 2 Encajar el panel de la espalda sobre el panel del fondo y a...

Page 53: ...UFBAUANLEITUNG_2009 03 53 59 TEC Encajar el panel lateral izquierdo sobre el panel del fondo y apretar s lo al fondo Fig 4 Encajar el panel lateral derecho sobre el panel del fondo y apretar s lo al f...

Page 54: ..._ 2009 03 467_SERIE_MWZ_AUFBAUANLEITUNG_2009 03 54 59 TEC Encajar el panel de la encimera sobre los paneles laterales y sobre el panel de la espalda y apretar a la espalda Fig 7 Colocar el casquillo e...

Page 55: ...na abertura a la izquierda o a la derecha Apretar los restantes ganchos de los laterales y de la espalda Para apretar los ganchos trabajando en el lado de fuera del armario proceder de la siguiente fo...

Page 56: ...467_SERIE_MWZ_AUFBAUANLEITUNG_2009 03 56 59 TEC Despu s de apretar colocar los tapones en las perforaciones Fig 10 Colocar los tapones en el fondo Fig 11 Encajar las barras con soportes en las perfor...

Page 57: ...ERIE_MWZ_AUFBAUANLEITUNG_2009 03 57 59 TEC Encajar los tubos laterales en los soportes A y girar en la posici n definitiva B Fig 13 Encajar los tubos transversales en los tubos laterales y colocar los...

Page 58: ...Manual de Montaje N 467_SERIE_MWZ_A UFBAUANLEITUNG_ 2009 03 467_SERIE_MWZ_AUFBAUANLEITUNG_2009 03 58 59 TEC...

Page 59: ...Manual de Montaje N 467_SERIE_MWZ_A UFBAUANLEITUNG_ 2009 03 467_SERIE_MWZ_AUFBAUANLEITUNG_2009 03 59 59 TEC...

Reviews: